
Introduction

In this article, we will write an endpoint using the Django REST framework with API Key throttling (rate limiting). We will first use Django default cache configuration Local Memory Caching for throttling and we will see that this method does not work for multiple workers on gunicorn or multiple replicas on Kubernetes. We will change the Django cache configuration to Redis to solve this problem. We will test throttling with the open-source load testing tool Ddosify.
From Django Docs: Each process will have its own private cache instance, which means no cross-process caching is possible. This also means the local memory cache isn’t particularly memory-efficient, so it’s probably not a good choice for production environments. It’s nice for development.
Prerequisites
- Python3
- Docker for Redis installation
- Docker Desktop for single-node Kubernetes
- kubectl for accesing the Kubernetes resources
- cURL for API testing
- Ddosify CLI or Ddosify Docker Extension for load testing
Create a Project
In this section, we will create a Django application with rate limiting based on API key header.
Create Django Environment
Let's create an python environment env and activate it.
python3 -m venv env
source env/bin/activate
Create requirements.txt
Django==4.0.7
djangorestframework==3.13.1
gunicorn==20.1.0
redis==4.3.4
Install Django Dependencies
pip3 install -r requirements.txt
Create Django Project and Application
Let's create an Django project throttling and application core.
django-admin startproject throttling
cd throttling
python3 manage.py startapp core
Update Django Settings
- Add
rest_frameworkintoINSTALLED_APPSlist. - Add
REST_FRAMEWORKdictionary configuration.
INSTALLED_APPS = [
    'django.contrib.admin',
    'django.contrib.auth',
    'django.contrib.contenttypes',
    'django.contrib.sessions',
    'django.contrib.messages',
    'django.contrib.staticfiles',

    'rest_framework',
]

REST_FRAMEWORK = {
    'DEFAULT_RENDERER_CLASSES': (
        'rest_framework.renderers.JSONRenderer',
    ),
}
Create a custom throttling class
ConcurrencyThrottleApiKey class uses SimpleRateThrottle from Django REST framework. Last request information for throttling is stored in the default Django cache. For more: Django Docs.
- Allow one request per second
(1/s). - Use
api_keyfrom request url query parameters for the cache key. So requests with the sameapi_keyquery parameters will be rate limited.
from rest_framework.throttling import SimpleRateThrottle

class ConcurrencyThrottleApiKey(SimpleRateThrottle):
    rate = "1/s"

    def get_cache_key(self, request, view):
        return request.query_params['api_key']
You will change this cache implementation later in this article.
Create a basic endpoint
We will create a basic GenericAPIView DjangoThrottlingAPIView endpoint with GET method. This endpoint uses throttling.ConcurrencyThrottleApiKey throttling class for rate limiting.
- If the request is valid and not throttled, the response will be
HTTP 200 OK - If the request is valid and throttled, the response will be
HTTP 429 Too Many Requests
from rest_framework import status
from rest_framework.generics import GenericAPIView
from rest_framework.response import Response

from core import throttling


class DjangoThrottlingAPIView(GenericAPIView):
    throttle_classes = [throttling.ConcurrencyThrottleApiKey]

    def get(self, request):
        return Response("ok", status=status.HTTP_200_OK)
Update Endpoint URLs
Update Django application URLs.
from django.urls import path
import core.views as core_views

urlpatterns = [
    path('', core_views.DjangoThrottlingAPIView.as_view(), name="throtling"),
]
Update Django root URLs.
from django.urls import path

urlpatterns = [
    path('', include('core.urls')),
]
Run gunicorn HTTP Server with 1 worker
gunicorn --workers 1 --bind 0.0.0.0:9018 throttling.wsgi
Test Endpoint with cURL
Let's test the endpoint http://localhost:9018/?api_key=1234 with cURL.
We can use random api_key query parameter for the URL. We used 1234 as the api_key in this example. Throttling is determined by the api_key query parameter.
curl http://localhost:9018/?api_key=1234
We should see ok in the response of the request.
Load Test Endpoint with Ddosify
Make a load test with Ddosify by sending 100 requests for 10 seconds (10 requests per second).
ddosify -t http://localhost:9018/?api_key=1234 -n 100 -d 10
Ddosify output shows that 90 requests are throttled, and 10 requests are not throttled, which we expect.
⚙️  Initializing...
🔥 Engine fired.

...

Status Code (Message) :Count
  200 (OK)                   :10
  429 (Too Many Requests)    :90
Run gunicorn HTTP Server with 6 workers
Let's increase the gunicorn worker size from 1 to 6 to be able to serve more users.
gunicorn --workers 6 --bind 0.0.0.0:9018 throttling.wsgi
Load Test Endpoint with Ddosify
Let's test it again with Ddosify by sending 100 requests for 10 seconds (10 requests per second).
ddosify -t http://localhost:9018/?api_key=1234 -n 100 -d 10
Ddosify output shows that 65 requests are throttled, and 35 requests are not throttled, which we do not expect. So why is that? Maybe we can solve this problem by deploying to Kubernetes with 6 replicas and run gunicorn with 1 worker. Let's try.
⚙️  Initializing...
🔥 Engine fired.

...

Status Code (Message) :Count
  200 (OK)                   :35
  429 (Too Many Requests)    :65
Deploy Django Application to Kubernetes
In order to deploy the Django application to Kubernetes, we need to dockerize the application. Create a Dockerfile and entrypoint.sh on the root of the project.
Create Docker Image
#!/bin/bash
cd throttling && gunicorn --workers 1 --bind 0.0.0.0:9018 throttling.wsgi
Make sure to give executable permission to `entrypoint.sh``
chmod +x entrypoint.sh
Create Dockerfile with python:3.9.10-slim base.
FROM python:3.9.10-slim

COPY ./requirements.txt .
RUN pip --no-cache-dir install -r requirements.txt

WORKDIR /workspace
COPY . /workspace

CMD ["/workspace/entrypoint.sh"]
Build the Dockerfile.
docker build -t django_throttling .
Run the docker image django_throttling.
docker run -it --rm -p 9018:9018 django_throttling
Test the application with cURL.
curl http://localhost:9018/?api_key=1234
We should see ok in the response of the request. The docker application is ready. Next step is the deploy the image to Kubernetes.
Create Kubernetes Cluster
If you have already installed Kubernetes, you can skip this step.
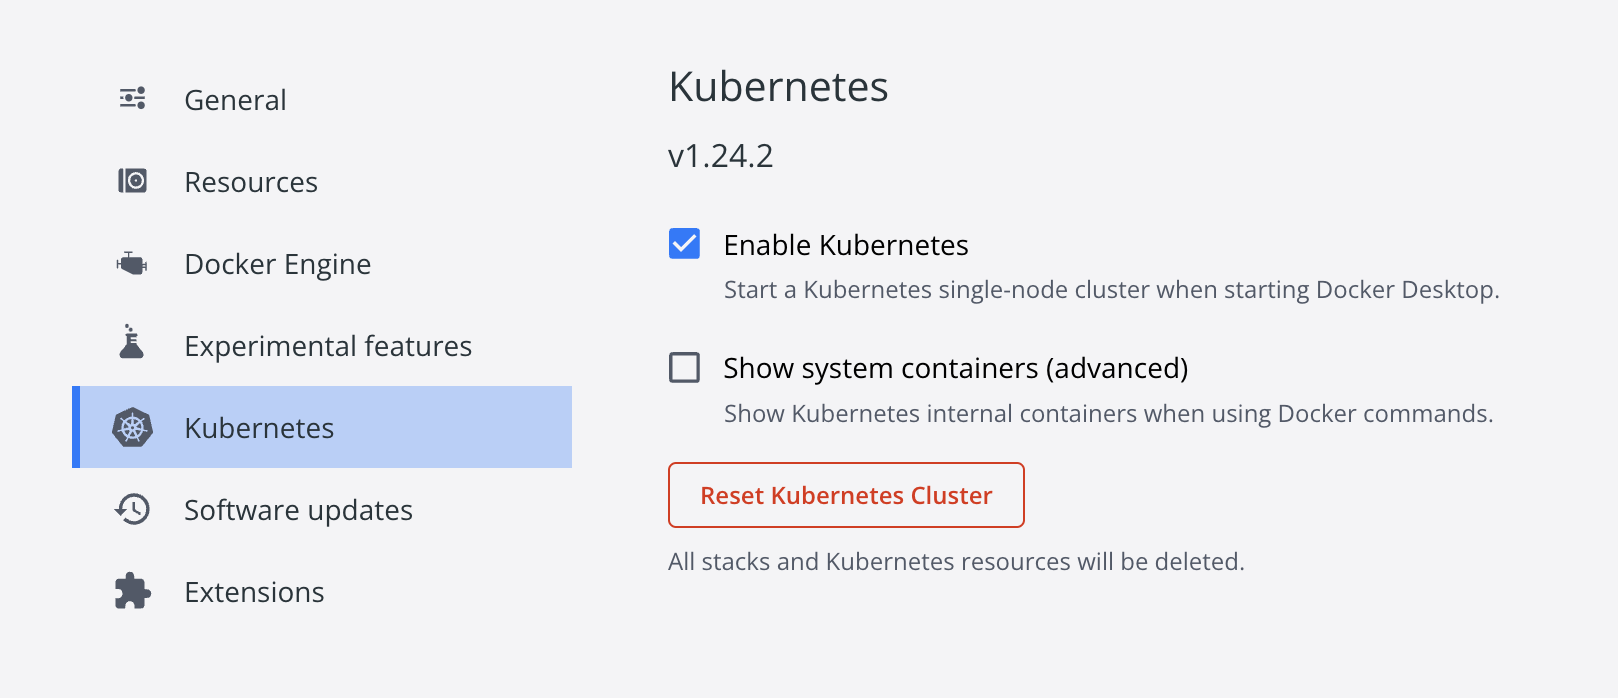
We will use Docker Desktop to enable single-node Kubernetes cluster.
Test Kubernetes with kubectl:
kubectl get nodes
We should see the docker-desktop node with Ready status.
NAME             STATUS   ROLES           AGE   VERSION
docker-desktop   Ready    control-plane   99m   v1.24.2
Create Deployment and Service on Kubernetes
We will deploy django application into Kubernetes with 6 replicas.
apiVersion: apps/v1
kind: Deployment
metadata:
  name: throttling-deployment
  labels:
    app: throttling
spec:
  replicas: 6
  selector:
    matchLabels:
      app: throttling
  template:
    metadata:
      labels:
        app: throttling
        appType: ddosify
    spec:
      containers:
        - name: throttling
          image: django_throttling:latest
          imagePullPolicy: Never
          ports:
            - containerPort: 9018
              name: throttling-port
---
apiVersion: v1
kind: Service
metadata:
  name: throttling-service
spec:
  type: NodePort
  selector:
    app: throttling
  ports:
    - protocol: TCP
      port: 9018
      targetPort: 9018
      nodePort: 31534
Apply the yaml file.
kubectl apply -f k8s_django.yaml
Show the pods.
kubectl get pods
We should see the pods with Running status. Since we set the replicas to 6 in the yaml file, there should be 6 pods.
NAME                                     READY   STATUS    RESTARTS   AGE
throttling-deployment-6d545fdd88-2c5s2   1/1     Running   0          107s
throttling-deployment-6d545fdd88-5jb9d   1/1     Running   0          107s
throttling-deployment-6d545fdd88-8l48d   1/1     Running   0          107s
throttling-deployment-6d545fdd88-fmpst   1/1     Running   0          107s
throttling-deployment-6d545fdd88-g2d6b   1/1     Running   0          107s
throttling-deployment-6d545fdd88-pskjc   1/1     Running   0          107s
Show the services.
kubectl get svc
We should see the service throttling-service with NodePort type.
NAME                 TYPE        CLUSTER-IP      EXTERNAL-IP   PORT(S)          AGE
kubernetes           ClusterIP   10.96.0.1       <none>        443/TCP          115m
throttling-service   NodePort    10.109.83.155   <none>        9018:31534/TCP   89m
The service is accesible from http://localhost:31534/?api_key=1234.
Let's test the endpoint with cURL.
curl http://localhost:31534/?api_key=1234
We should see ok in the response of the request.
Load Test Endpoint with Ddosify
Let's test the endpoint with Ddosify by sending 100 requests for 10 seconds (10 requests per second).
ddosify -t http://localhost:31534/?api_key=1234 -n 100 -d 10
⚙️  Initializing...
🔥 Engine fired.

...

Status Code (Message) :Count
  200 (OK)                   :39
  429 (Too Many Requests)    :61
Ddosify output shows that 61 requests are throttled, and 39 requests are not throttled, which we do not expect. Since all the pods run a separate Django application, the default Django caches are not global. You need a global cache for throttling.
Change the Throttling Cache
We need a global cache for consistent throttling. Deploy a redis to Kubernetes with 1 replica.
apiVersion: apps/v1
kind: Deployment
metadata:
  name: redis-deployment
  labels:
    app: redis
spec:
  replicas: 1
  selector:
    matchLabels:
      app: redis
  template:
    metadata:
      labels:
        app: redis
        appType: ddosify
    spec:
      containers:
        - name: redis
          image: redis:6.2.7
          imagePullPolicy: Always
          ports:
            - containerPort: 6379
              name: redis-port
---
apiVersion: v1
kind: Service
metadata:
  name: redis-service
spec:
  type: NodePort
  selector:
    app: redis
  ports:
    - protocol: TCP
      port: 6379
      targetPort: 6379
      nodePort: 31514
Apply the yaml file.
kubectl apply -f k8s_redis.yaml
Update Django Settings
CACHES = {
    'alternate': {
        'BACKEND': 'django.core.cache.backends.redis.RedisCache',
        'LOCATION': f'redis://redis-service:6379',
    },
}
Update the custom throttling class
Change the default Django cache to Redis cache.
from rest_framework.throttling import SimpleRateThrottle
from django.core.cache import caches

class ConcurrencyThrottleApiKey(SimpleRateThrottle):
    cache = caches['alternate']
    rate = "1/s"

    def get_cache_key(self, request, view):
        return request.query_params['api_key']
Let's deploy to Kubernetes with 6 gunicorn workers. Update workers to 6 in entrypoint.sh.
#!/bin/bash
cd throttling && gunicorn --workers 6 --bind 0.0.0.0:9018 throttling.wsgi
Build the Dockerfile.
docker build -t django_throttling .
Delete and apply the yaml file.
kubectl delete -f k8s_django.yaml && kubectl apply -f k8s_django.yaml
Load Test Endpoint with Ddosify
Let's test the endpoint with Ddosify by sending 100 requests for 10 seconds (10 requests per second).
ddosify -t http://localhost:31534/?api_key=1234 -n 100 -d 10
⚙️  Initializing...
🔥 Engine fired.

...

Status Code (Message) :Count
  200 (OK)                   :10
  429 (Too Many Requests)    :90
Ddosify output shows that 90 requests are throttled, and 10 requests are not throttled, which we expect. The results show that the global Redis cache solved the problem.
Conclusion
In this article, we built a simple Django application with throttling using API key. First, the default Django cache is used for throttling. If we use more than 1 worker on gunicorn or more than 1 replica on Kubernetes deployment, the throttling results were unexpected. Then a global cache with Redis is used and tested again with multiple workers on gunicorn and multiple replicas on Kubernetes deployment. The global Redis cache solved the problem.
Share on social media: