Kubernetes is an orchestration system for containerized applications. To access applications running in a Kubernetes cluster from outside, they must first be exposed. There are different ways to expose the applications running in the Kubernetes cluster. One of the ways is to use the Kubernetes ingress controller.
In this article, we will look at how to use the NGINX ingress controller to expose the applications running in a Kubernetes cluster. We will also look at how to use Let's Encrypt to generate SSL certificates for the applications running in the Kubernetes cluster and how to automate this process using the Cert-Manager. For this tutorial, we will deploy the Anteon Self-Hosted application using helm charts.
If you are new to Kubernetes and its concepts, you can check out our Kubernetes 101 blog.
Prerequisites
- A Kubernetes cluster. In this tutorial, AWS EKS will be used.
- kubectl installed on your local machine.
- helm installed on your local machine.
- Anteon Self-Hosted as the application to deploy.
What is Kubernetes Ingress?
Kubernetes ingress is an API object that manages external access to the services running in the Kubernetes cluster. It provides a single entry point to the cluster. It also provides load balancing, SSL termination, and other features. It is an alternative to the Kubernetes service (Load Balancer). Check out this blog post for a comparison between Kubernetes ingress and Kubernetes service.
The Kubernetes ingress is a collection of rules that allow inbound HTTP and HTTPS connections to reach the services running in the cluster.
Check out the Kubernetes ingress documentation for more information about Kubernetes ingress.
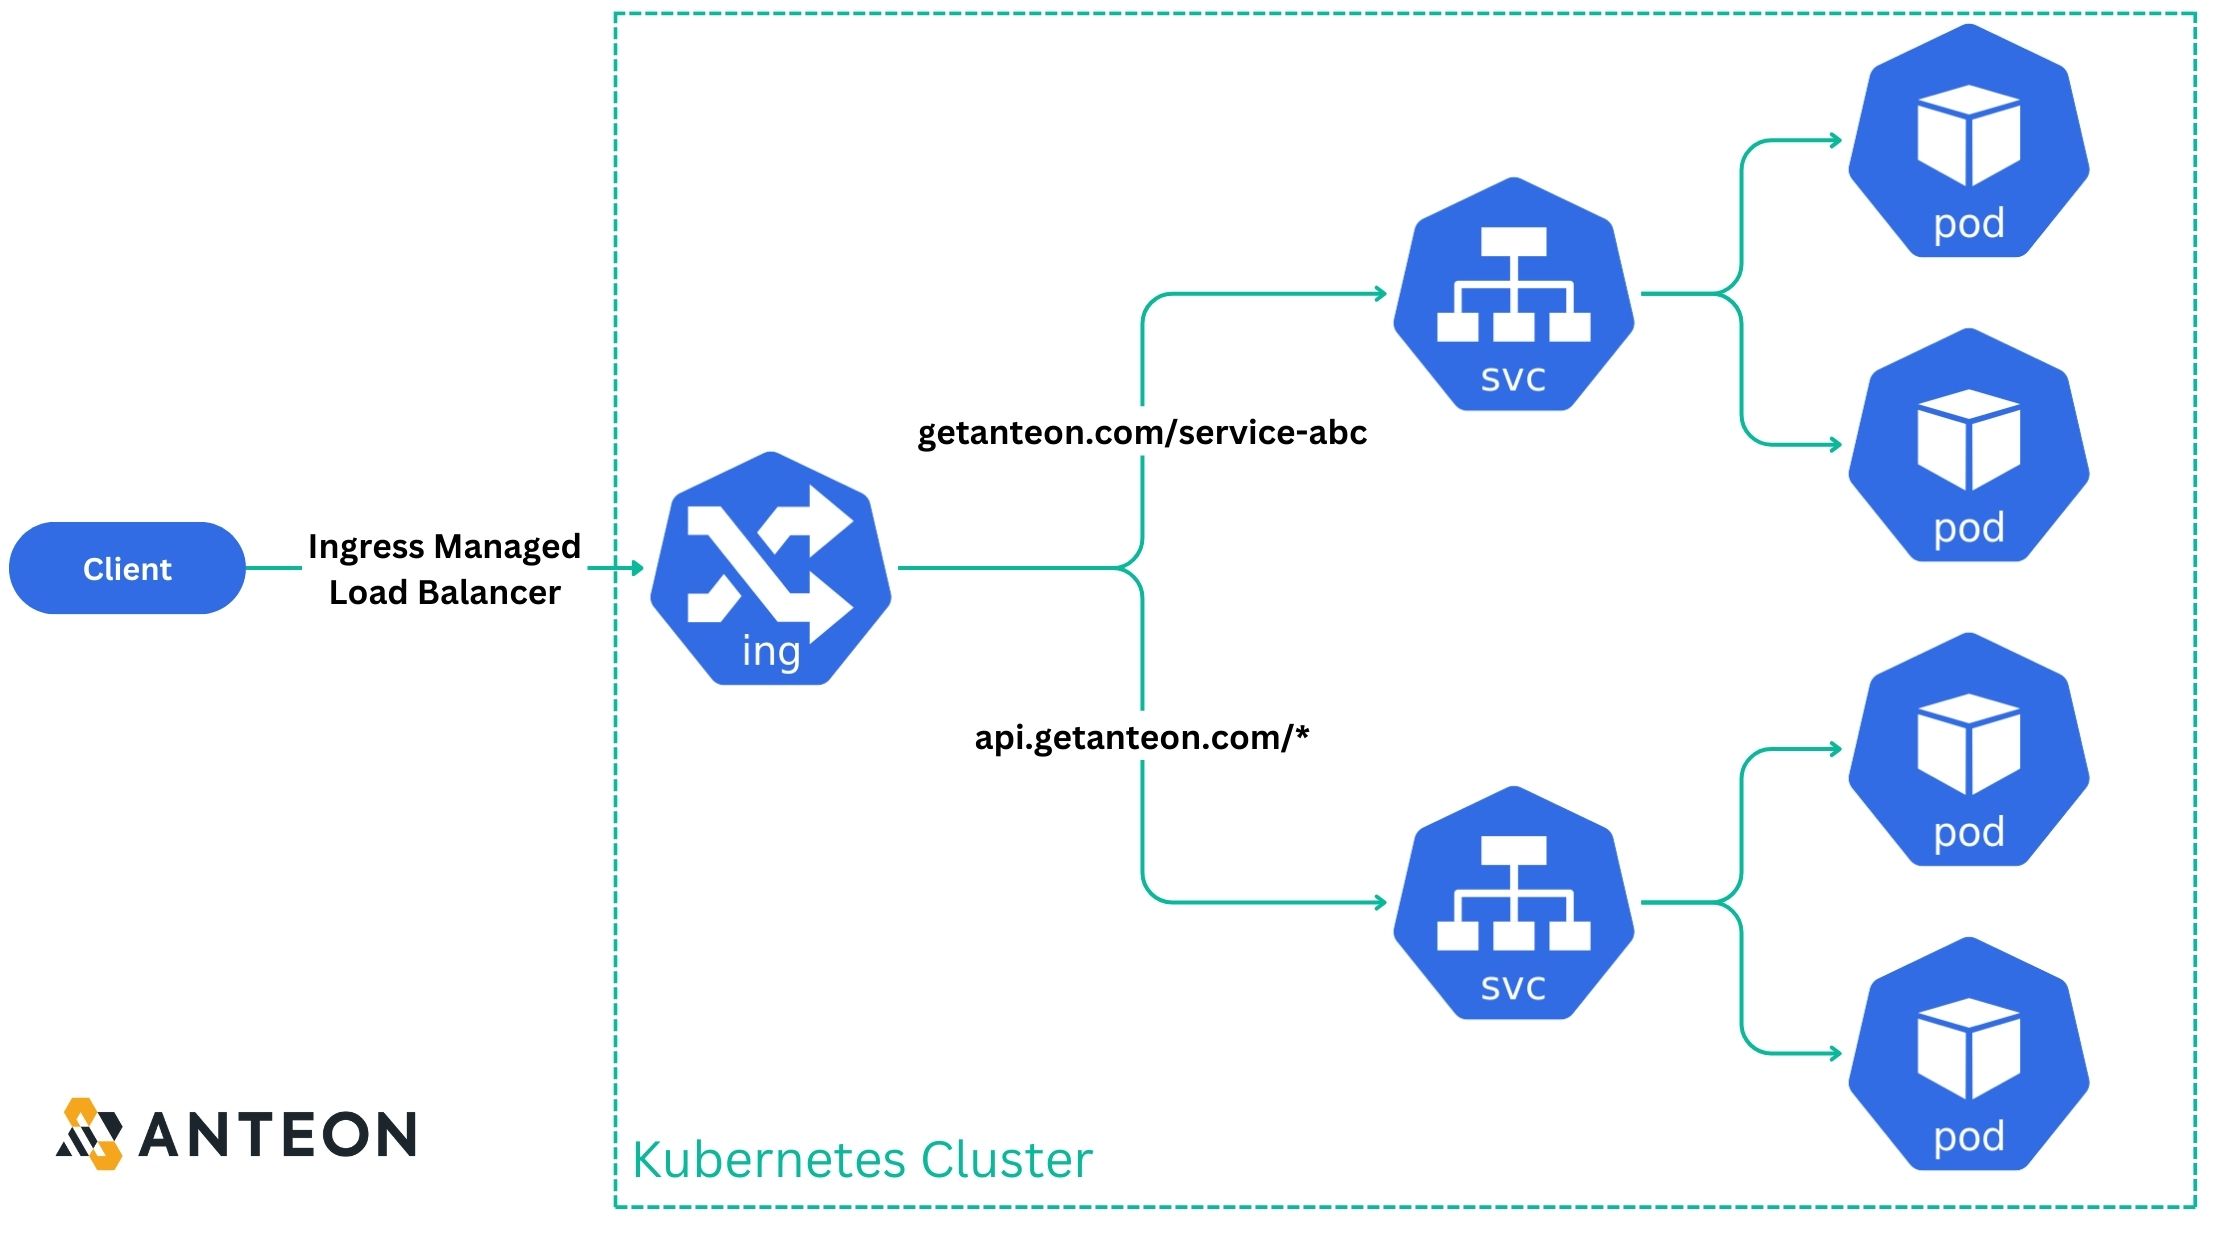
In this Figure, we have an ingress that routes the traffic to the services running in the Kubernetes cluster. The ingress routes the traffic based on the host and path specified in the ingress rules. There are two ingress rules in this example:
- The first ingress rule routes the traffic to the top service, which has the host
getanteon.comand the path/service-abc. - The second ingress rule routes the traffic to the bottom service, which has the host
api.getanteon.comand the path/*(all paths).
Check the Ingress api-resources in your Kubernetes cluster using the following command:
kubectl api-resources --api-group=networking.k8s.io
The output should be similar to the following:
NAME              SHORTNAMES   APIVERSION             NAMESPACED   KIND
ingressclasses                 networking.k8s.io/v1   false        IngressClass
ingresses         ing          networking.k8s.io/v1   true         Ingress
networkpolicies   netpol       networking.k8s.io/v1   true         NetworkPolicy
What is Kubernetes Ingress Controller?
The Kubernetes ingress controller is a pod that runs in the Kubernetes cluster that is responsible for fulfilling the ingress rules, as well as managing for the load balancing, SSL termination, and other features. There are different ingress controllers available for Kubernetes. NGINX ingress controller, Traefik, Kong and HAProxy are some of the popular ingress controllers.
For more information about Kubernetes ingress controllers, refer to the official documentation.
Deploy Kubernetes NGINX Ingress Controller
In this section, we will deploy the NGINX ingress controller in the Kubernetes cluster. We will use the Helm chart to deploy the NGINX ingress controller.
If you do not have a Kubernetes cluster, you can follow this tutorial to create a Kubernetes cluster on AWS EKS.
1. Add NGINX Helm repository
helm repo add nginx-stable https://helm.nginx.com/stable
2. Update the Helm repository
helm repo update
3. Deploy the NGINX ingress controller
helm install nginx-ingress nginx-stable/nginx-ingress \
--set controller.enableCustomResources=true \
--set controller.enableCertManager=true \
--namespace nginx-ingress \
--create-namespace
The output should be similar to the following:
NAME: nginx-ingress
LAST DEPLOYED: Sat Jan  6 21:47:04 2024
NAMESPACE: nginx-ingress
STATUS: deployed
REVISION: 1
TEST SUITE: None
NOTES:
The NGINX Ingress Controller has been installed.
4. Verify the NGINX ingress controller deployment
kubectl get deployments --namespace nginx-ingress
The output should be similar to the following. READY column should be 1/1.
NAME                       READY   UP-TO-DATE   AVAILABLE   AGE
nginx-ingress-controller   1/1     1            1           115s
5. Verify the NGINX ingress controller Service
Get the external IP address of the NGINX ingress controller service using the following command:
kubectl get svc --namespace nginx-ingress
The output should be similar to the following:
NAME                       TYPE           CLUSTER-IP      EXTERNAL-IP                                                              PORT(S)                      AGE
nginx-ingress-controller   LoadBalancer   10.100.46.148   ab4da885f084847e18a3ed4de72eaabe-228673503.us-west-1.elb.amazonaws.com   80:30936/TCP,443:30367/TCP   3m30s
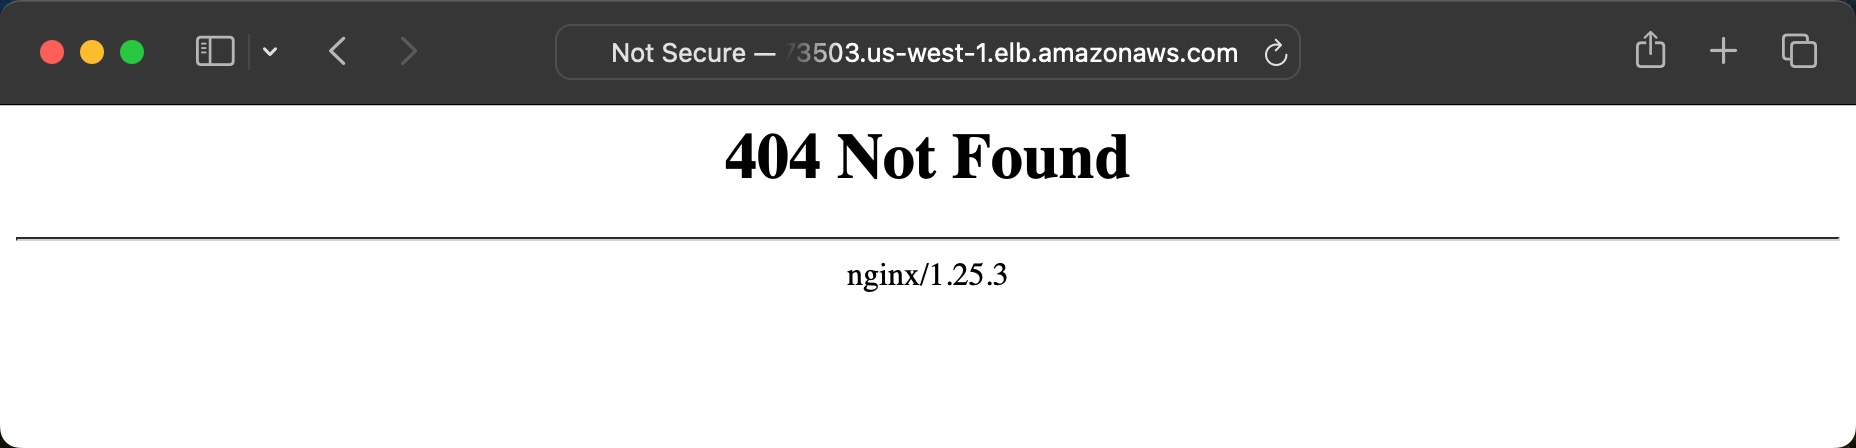
The EXTERNAL-IP column should not be empty. If you are using AWS EKS, the EXTERNAL-IP column should have an AWS ELB DNS name. This IP address or DNS name is the entry point to the Ingress controller from outside the Kubernetes cluster.
If we visit the IP address or DNS name, we should see the NGINX 404 page because we do not have any ingress rules yet.
6. Add a DNS record for the NGINX ingress controller (Optional)
Since we will add Ingress rules with a host, we should consider adding a DNS record for the NGINX ingress controller, although this step is optional.
If you do not want to add a DNS record, you can use the external IP address of the NGINX ingress controller service.
We will use the Cloudflare DNS service to add a DNS record for the NGINX ingress controller. You can use any DNS service you want.
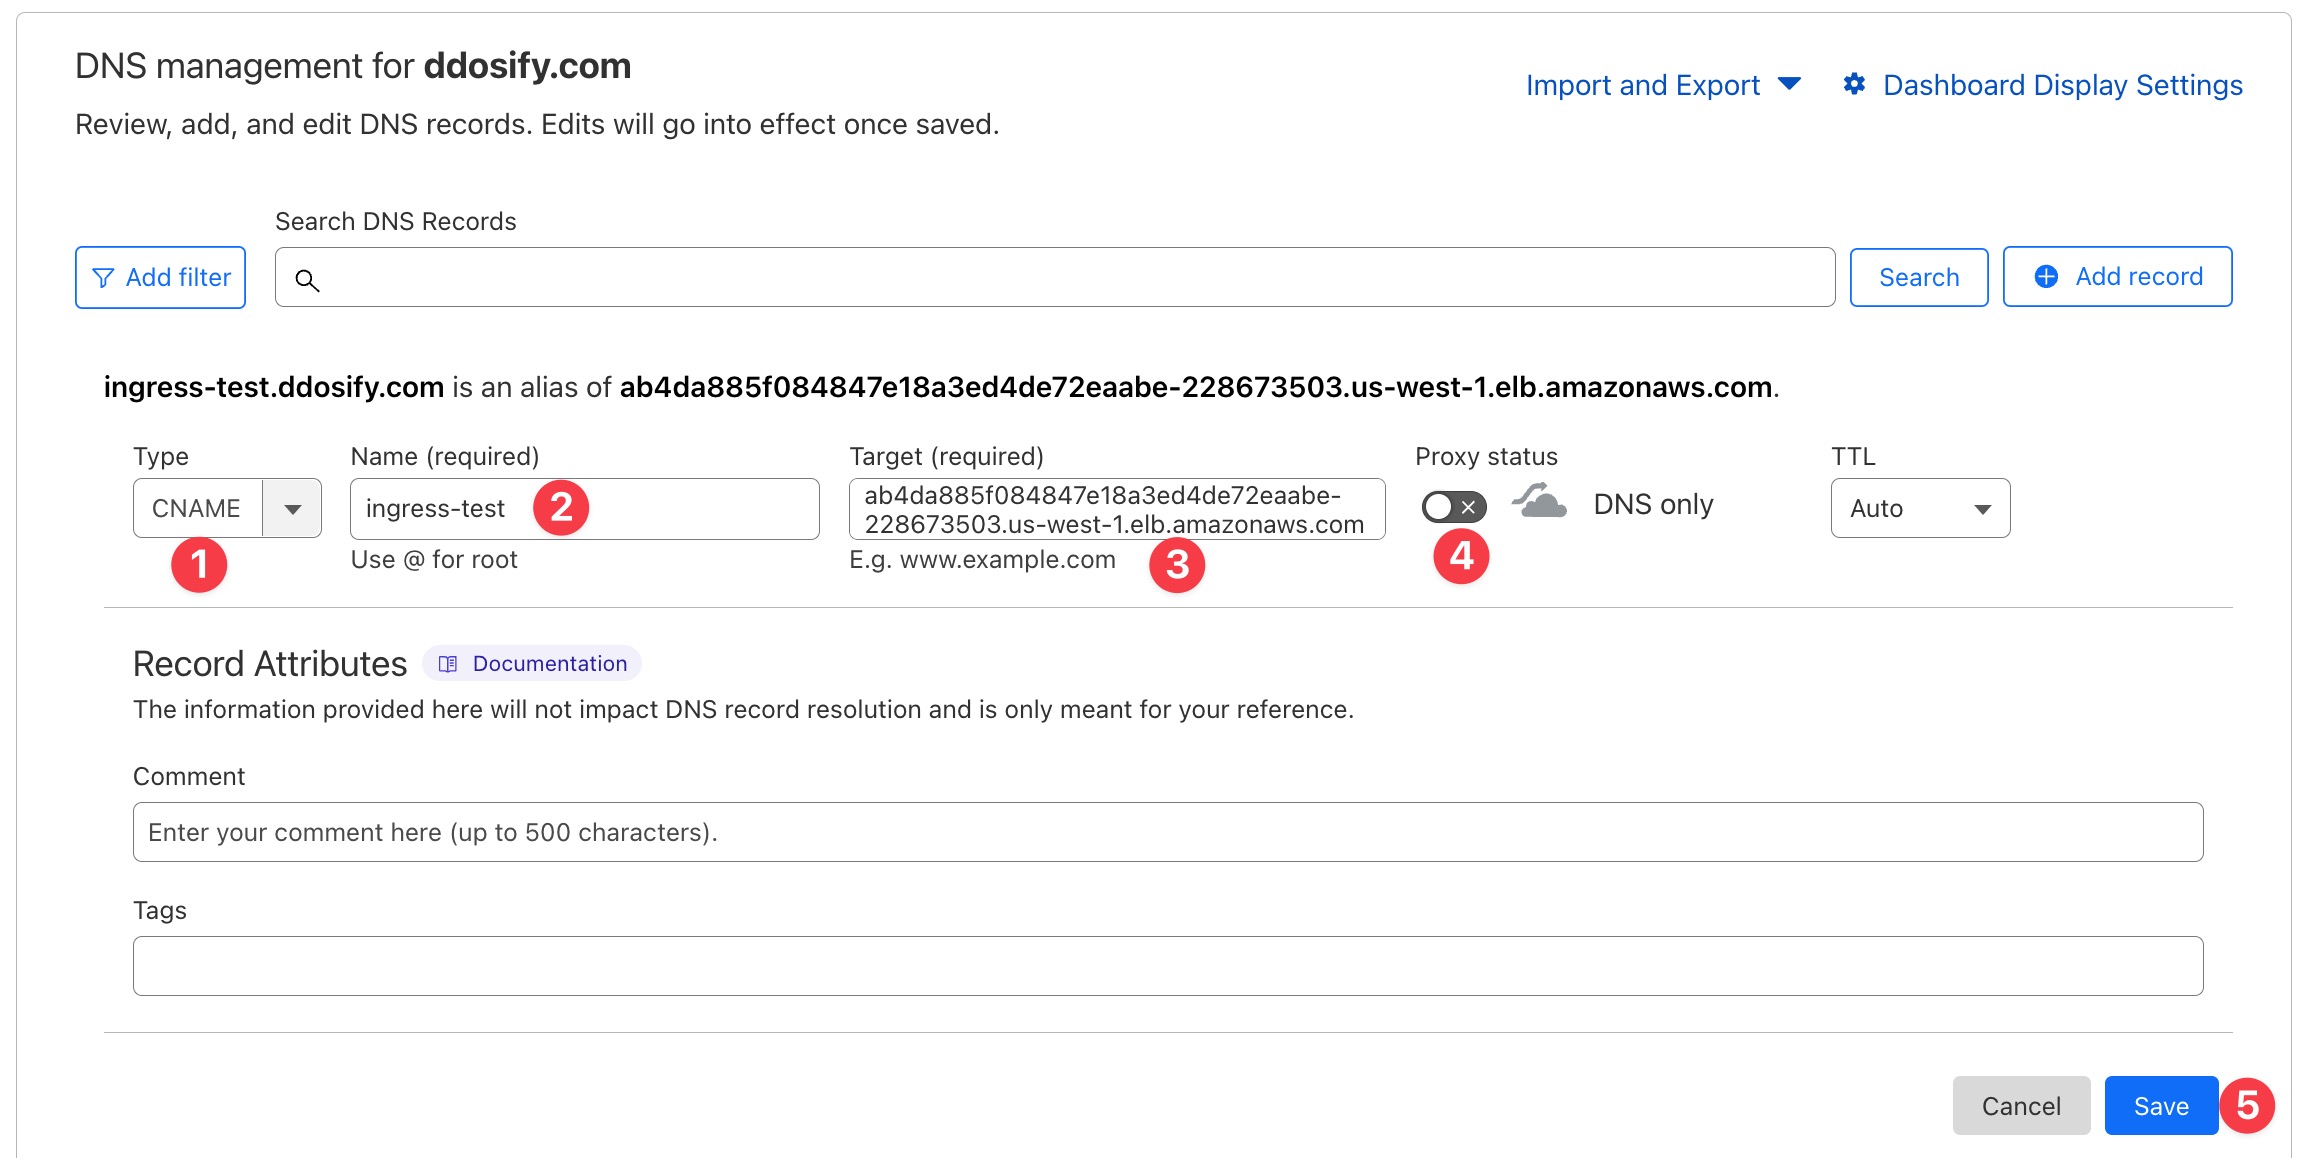
- Select the
CNAMErecord type. - Enter the name of the record. We will use
ingress-test. - Enter the value of the record. We will use the
EXTERNAL-IPof the NGINX ingress controller service. - Set the Proxy status to
DNS only. - Click the
Savebutton.
After adding the DNS record, you should be able to access the NGINX ingress controller using the DNS name. The DNS propagation may take some time. You can verify the DNS record using the following command:
host ingress-test.getanteon.com
The output should be similar to the following:
ingress-test.getanteon.com is an alias for ab4da885f084847e18a3ed4de72eaabe-228673503.us-west-1.elb.amazonaws.com.
ab4da885f084847e18a3ed4de72eaabe-228673503.us-west-1.elb.amazonaws.com has address 13.56.34.216
Deploy Cert-Manager
In this section, we will install the Cert-Manager in the Kubernetes cluster. Cert-Manager is an X.509 certificate management controller specifically designed for Kubernetes. It can help with issuing certificates from a variety of sources, such as Let's Encrypt, HashiCorp Vault, Venafi, a simple signing key pair, or self-signed. The full list of supported issuers can be found here.
We will use the Helm chart to install the Cert-Manager in the Kubernetes cluster.
1. Add the Cert-Manager Helm repository
helm repo add jetstack https://charts.jetstack.io
2. Update the Helm repository
helm repo update
3. Deploy the Cert-Manager
helm install cert-manager jetstack/cert-manager \
--version v1.9.1 \
--set installCRDs=true \
--namespace cert-manager \
--create-namespace
The output should be similar to the following:
NAME: cert-manager
LAST DEPLOYED: Sat Jan  6 22:23:11 2024
NAMESPACE: cert-manager
STATUS: deployed
REVISION: 1
TEST SUITE: None
NOTES:
cert-manager v1.9.1 has been deployed successfully!
4. Verify the Cert-Manager deployment
kubectl get deployments --namespace cert-manager
The output should be similar to the following. READY column should be 1/1 for each deployment.
NAME                      READY   UP-TO-DATE   AVAILABLE   AGE
cert-manager              1/1     1            1           7m54s
cert-manager-cainjector   1/1     1            1           7m54s
cert-manager-webhook      1/1     1            1           7m54s
cert-manageris the main Cert-Manager deployment.cert-manager-cainjectoris the deployment that signs the certificate requests for the Cert-Manager.cert-manager-webhookis the deployment that handles the certificate validation.
For more information about the Cert-Manager concepts, you can check out the Cert-Manager documentation.
Deploy Cluster Issuer
In this section, we will deploy the Cluster Issuer, a Kubernetes resource representing a certificate authority (CA) used to sign certificates. We'll use the Cluster Issuer to generate SSL certificates for applications running in the Kubernetes cluster.
Our certificate authority will be Let's Encrypt, a free, automated, and open CA provided by the Internet Security Research Group (ISRG). Let's Encrypt offers free SSL certificates for Kubernetes applications.
The ACME (Automatic Certificate Management Environment) protocol determines domain ownership and issues SSL certificates. The following parameters are required to use the Let's Encrypt as the certificate authority:
- metadata.name is the name of the Cluster Issuer.
- spec.acme.email is the email address used for registration. The email address is used for important account notifications and lost key recovery.
- spec.acme.server is the ACME server URL. We will use the Let's Encrypt production server URL for this tutorial. The production server URL is https://acme-v02.api.letsencrypt.org/directory. You can use the Let's Encrypt staging server URL for testing. The staging server URL is https://acme-staging-v02.api.letsencrypt.org/directory. The staging server URL is used for testing purposes only. The certificates issued by the staging server URL are not trusted by browsers. The staging server URL has rate limits that are higher than the production server URL.
- spec.acme.privateKeySecretRef is the name of the Kubernetes secret that contains the private key used to sign the certificate requests. You do not need to create this secret manually because the Cert-Manager will create this secret automatically.
- spec.acme.solvers is the list of solvers used to solve the ACME challenges. The ACME challenges are used to determine ownership of a domain name. We will use the HTTP-01 challenge for this tutorial.
For more details, check out the Cert-Manager documentation.
Create a ClusterIssuer resource using the following command. We will use the Let's Encrypt production server URL for this tutorial.
Ensure to change the email address in the command below.
cat << EOF | kubectl apply -f -
apiVersion: cert-manager.io/v1
kind: ClusterIssuer
metadata:
  name: letsencrypt-prod
spec:
  acme:
    email: [email protected]
    server: https://acme-v02.api.letsencrypt.org/directory
    privateKeySecretRef:
      name: prod-issuer-account-key
    solvers:
    - http01:
        ingress:
          class: nginx
EOF
Verify the Cluster Issuer
kubectl get clusterissuers
The output should be similar to the following. READY column should be True.
NAME               READY   AGE
letsencrypt-prod   True    16s
Now we have the Cluster Issuer that can be used to generate SSL certificates for the applications running in the Kubernetes cluster. We will use this Cluster Issuer to generate SSL certificates for the Anteon Self-Hosted application.
Deploy Anteon Self-Hosted
In this section, we will deploy the Anteon Self-Hosted application in a Kubernetes cluster.
Anteon is an open-source tool for Kubernetes cluster monitoring and performance testing. It offers both Self-hosted and SaaS options and uses eBPF technology to collect metrics from the cluster. This approach requires no changes to your code, no service restarts, and no additional sidecars for your services. For more information about eBPF and Anteon, check out this blog post.
Check out the Anteon GitHub repository for more information. If you like the project, please give us a star 🌟 on GitHub.
We will use the Helm chart to deploy the Anteon Self-Hosted application.
1. Add the Anteon Helm repository
helm repo add anteon https://getanteon.github.io/anteon-helm-charts/
2. Update the Helm repository
helm repo update
3. Create a Custom Values File for Ingress
Anteon Self-Hosted Helm chart can be changed using the values file. We will create a custom values file to change the Helm chart to enable the ingress. By default, the ingress is disabled in the Helm chart. Check the default values of Anteon here.
Create a file named values-nginx-ingress.yaml with the following content:
ingress:
  enabled: true
  annotations:
     kubernetes.io/ingress.class: nginx
     kubernetes.io/tls-acme: "true"
     cert-manager.io/cluster-issuer: "letsencrypt-prod"
     acme.cert-manager.io/http01-edit-in-place: "true"
  hosts:
    - host: ingress-test.getanteon.com
      paths:
        - path: /
          pathType: Prefix
  tls:
    - secretName: anteon-secret
      hosts:
        - ingress-test.getanteon.com
Here is the explanation of the parameters:
- ingress.enabled is used to enable the ingress. The default value is
false. - ingress.annotations is used to add annotations to the ingress. We will use the following annotations:
- kubernetes.io/ingress.class is used to specify the ingress class. We will use the NGINX ingress controller.
- kubernetes.io/tls-acme is used to enable the ACME TLS challenge. We will use the Let's Encrypt as the certificate authority.
- cert-manager.io/cluster-issuer is used to specify the Cluster Issuer. We will use the Cluster Issuer (
letsencrypt-prod) we created in the previous section. - acme.cert-manager.io/http01-edit-in-place is used to enable the HTTP-01 challenge. We will use the HTTP-01 challenge.
- ingress.hosts is used to specify the host for the ingress. We will use the
ingress-test.getanteon.comhost. - ingress.tls is used to specify the TLS configuration for the ingress. We will use the
anteon-secretsecret to store the TLS certificate and key. We will use theingress-test.getanteon.comhost. You do not need to create this secret manually because the Cert-Manager will create this secret automatically.
4. Deploy the Anteon Self-Hosted application
Now we can deploy the Anteon Self-Hosted application with custom values using the following command:
helm install anteon anteon/anteon \
-f values-nginx-ingress.yaml \
--namespace anteon \
--create-namespace \
--wait
The output should be similar to the following:
NAME: anteon
LAST DEPLOYED: Sat Jan  6 23:22:53 2024
NAMESPACE: anteon
STATUS: deployed
REVISION: 1
TEST SUITE: None

...
5. Verify the Anteon Self-Hosted application deployment
kubectl get deployments --namespace anteon
The output should be similar to the following. READY column should be 1/1 for each deployment.
NAME                          READY   UP-TO-DATE   AVAILABLE   AGE
backend                       1/1     1            1           5m45s
backend-celery-beat           1/1     1            1           5m45s
backend-celery-worker         1/1     1            1           5m45s
frontend                      1/1     1            1           5m45s
hammer                        1/1     1            1           5m45s
hammerdebug                   1/1     1            1           5m45s
hammermanager                 1/1     1            1           5m45s
hammermanager-celery-beat     1/1     1            1           5m45s
hammermanager-celery-worker   1/1     1            1           5m45s
influxdb                      1/1     1            1           5m45s
nginx-deployment              1/1     1            1           5m45s
postgres                      1/1     1            1           5m45s
postgres-alaz-dep             1/1     1            1           19d
prometheus                    1/1     1            1           5m45s
rabbitmq-celery               1/1     1            1           5m45s
rabbitmq-celery-backend       1/1     1            1           5m45s
rabbitmq-job                  1/1     1            1           5m45s
redis                         1/1     1            1           5m45s
seaweedfs                     1/1     1            1           5m45s
6. Verify the Anteon Ingress
kubectl get ingress --namespace anteon
The output should be similar to the following:
NAME      CLASS    HOSTS                      ADDRESS                                                                  PORTS     AGE
anteon   <none>   ingress-test.getanteon.com   ab4da885f084847e18a3ed4de72eaabe-228673503.us-west-1.elb.amazonaws.com   80, 443   6m42s
7. Verify the Anteon Certificate
kubectl get certificate --namespace anteon
The output should be similar to the following. READY column should be True.
NAME             READY   SECRET           AGE
anteon-secret   True    anteon-secret   9m8s
The cerfiticate is successfully created and stored in the anteon-secret secret. You can check the content of the secret using the following command:
kubectl get secret anteon-secret --namespace anteon -o yaml
8. Verify the Certificate Request
kubectl get certificaterequest --namespace anteon
The output should be similar to the following. READY column should be True and APPROVED column should be True.
NAME                   APPROVED   DENIED   READY   ISSUER             REQUESTOR                                         AGE
anteon-secret-zdgpg   True                True    letsencrypt-prod   system:serviceaccount:cert-manager:cert-manager   10m
The certificate request is successfully approved by the Cert-Manager. The certificate is successfully issued by the Let's Encrypt.
9. Access the Anteon Self-Hosted application
Now, we can access the Anteon Self-Hosted application using the following URL that we specified in the ingress rule: https://ingress-test.getanteon.com. Check that the SSL certificate is valid.
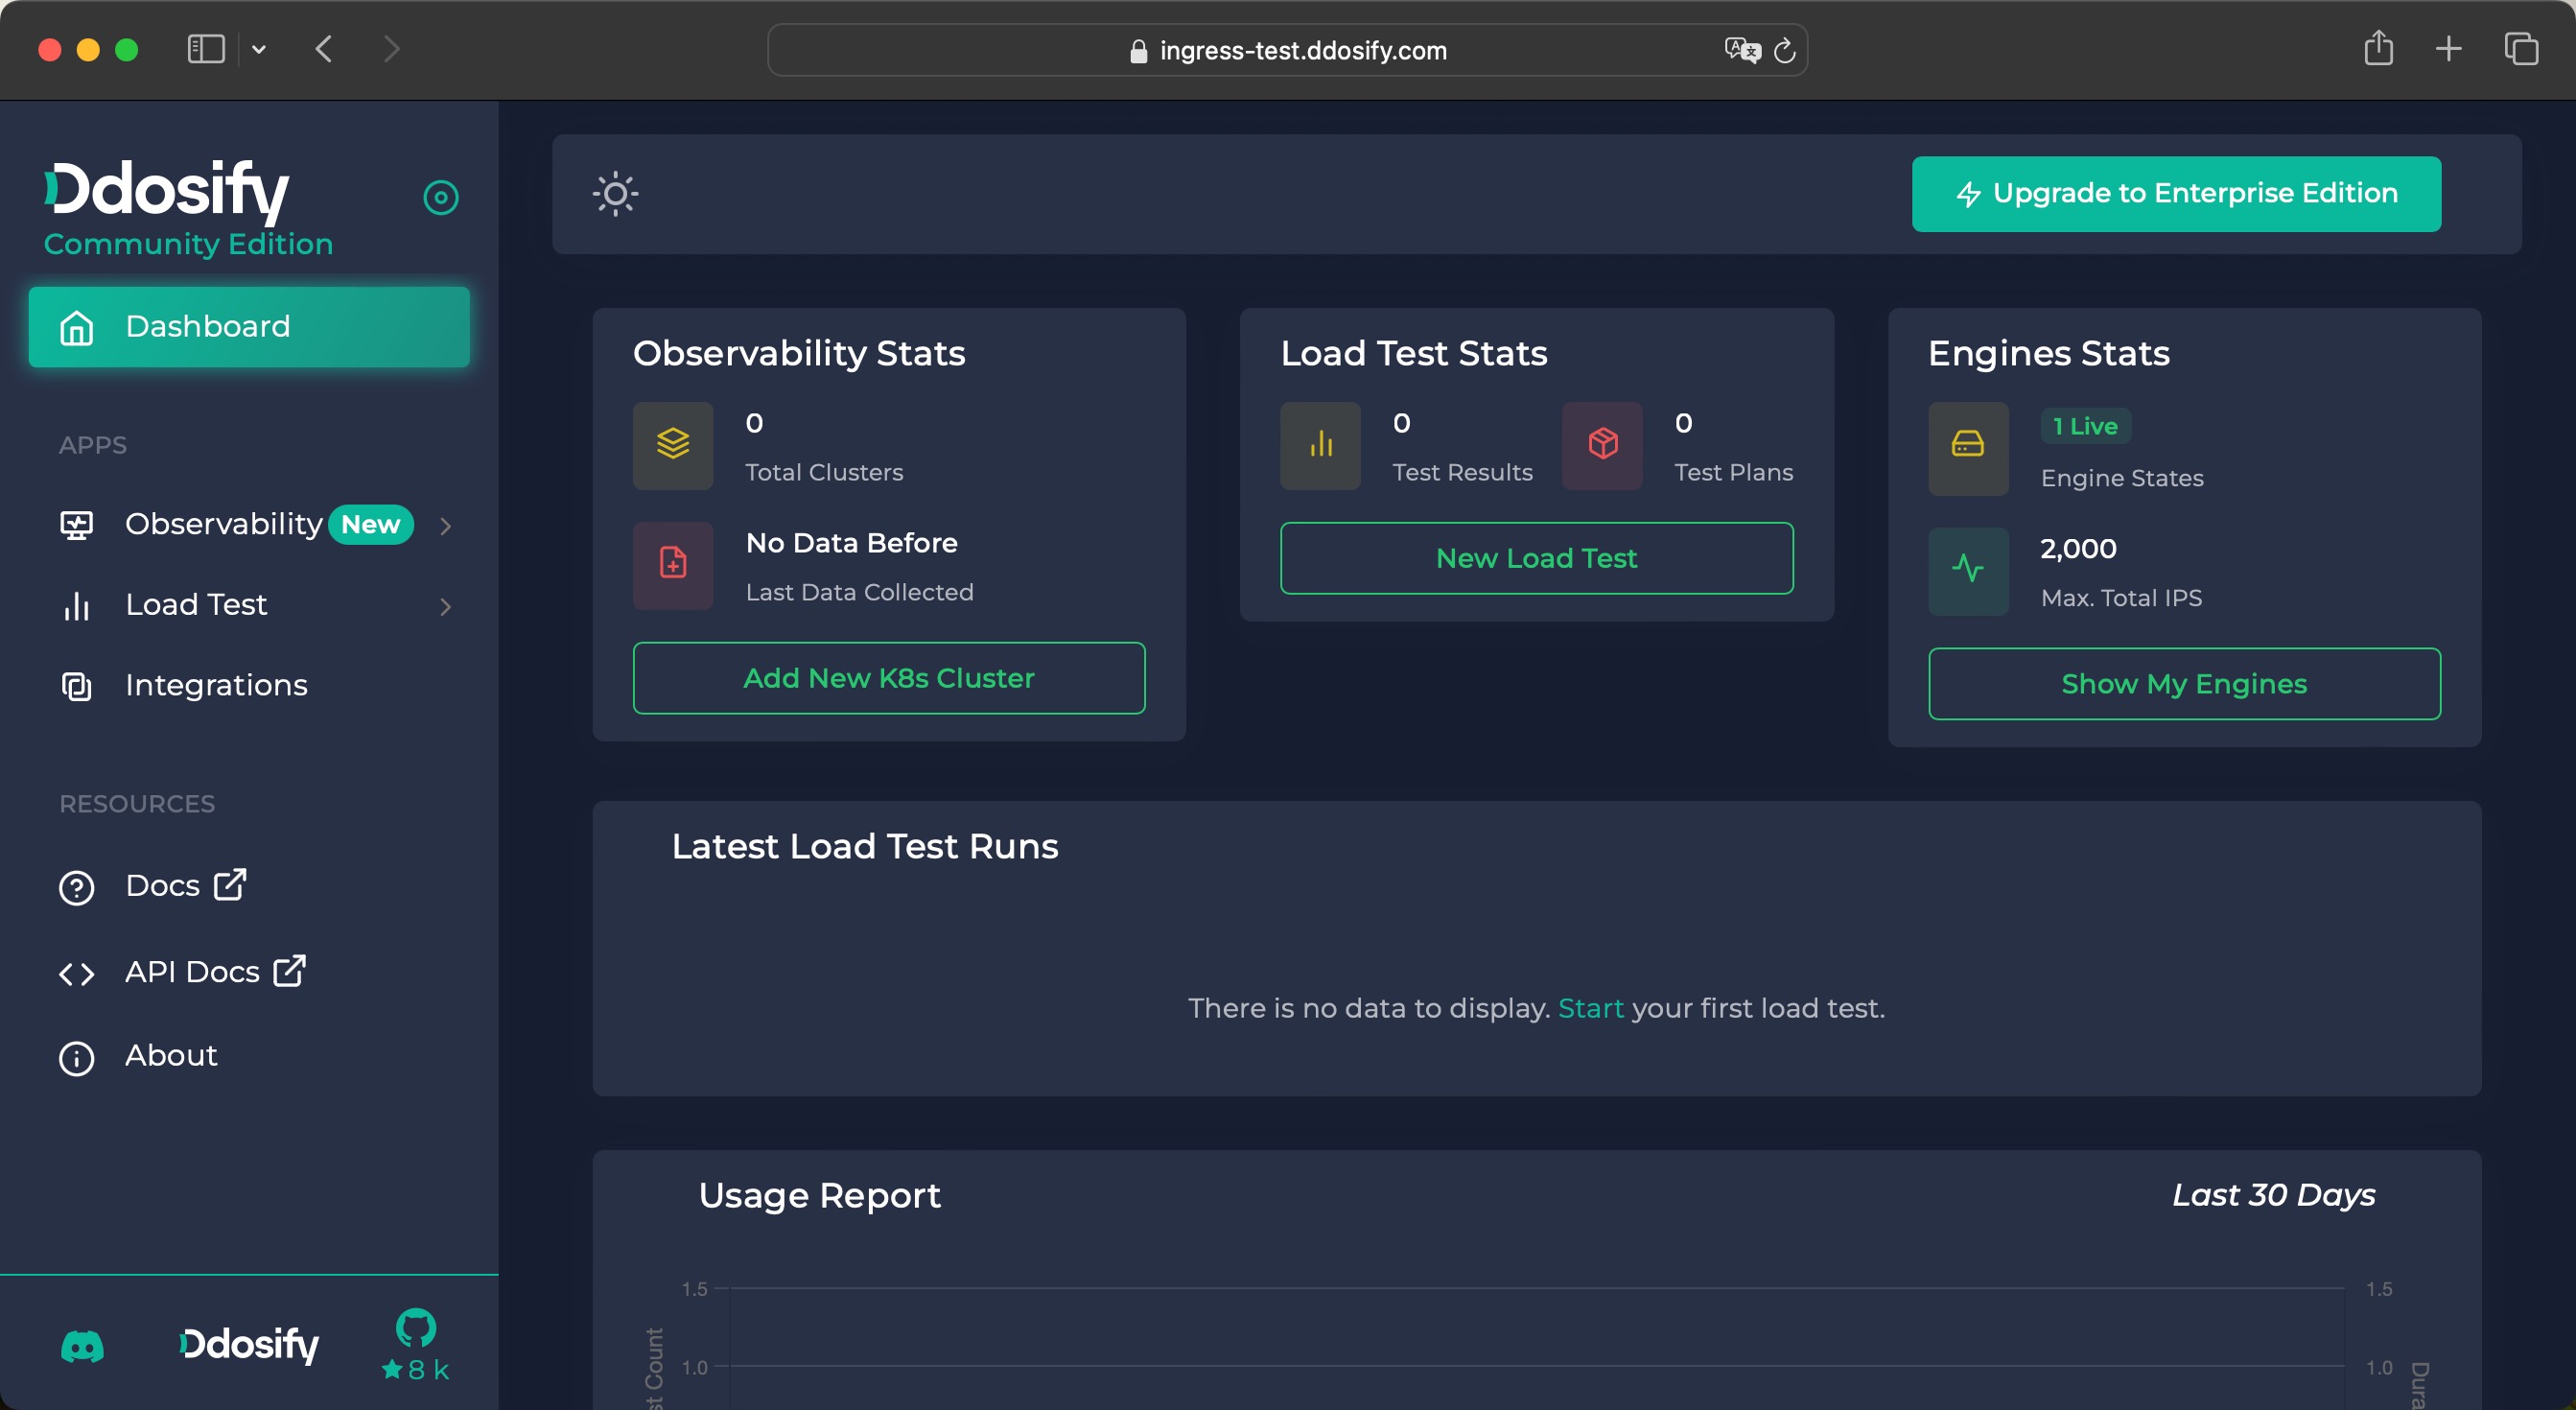
You cannot access https://ingress-test.getanteon.com because it has been generated specifically for this tutorial. Please use your own domain name.
10. Verify the Anteon Self-Hosted application
We can start a simple load test using the Anteon Self-Hosted application for verification. Check out Anteon Docs for more information about Anteon usage and features.
Troubleshooting
If the certificate request fails, you can check the Cert-Manager logs for errors.
kubectl logs -l app.kubernetes.io/name=cert-manager --namespace cert-manager
Or, you can check events of the certificate request using the following command:
kubectl get certificaterequest -n anteon

# change the name of the certificate request
kubectl describe certificaterequest anteon-secret-zdgpg --namespace anteon
Clean Up
Since all the applications are created with Helm, we can delete all the applications easily.
First, check the Helm releases list using the following command:
helm list --all-namespaces
The output should be similar to the following. There are three Helm releases in this example.
NAME            NAMESPACE       REVISION        UPDATED                                 STATUS          CHART                   APP VERSION
cert-manager    cert-manager    1               2024-01-06 22:23:11.476556 +0300 +03    deployed        cert-manager-v1.9.1     v1.9.1
anteon         anteon         1               2024-01-06 23:22:53.377134 +0300 +03    deployed        anteon-1.5.1           2.1.1
nginx-ingress   nginx-ingress   1               2024-01-06 21:47:04.182498 +0300 +03    deployed        nginx-ingress-1.1.0     3.4.0
Delete the Anteon Self-Hosted application
helm delete anteon --namespace anteon
Delete the NGINX ingress controller
helm delete nginx-ingress --namespace nginx-ingress
Delete the Cert-Manager
helm delete cert-manager --namespace cert-manager
Delete the Cluster Issuer
Since we deleted the Cert-Manager, the Cluster Issuer was deleted automatically.
Conclusion
In this article, we explored the using of the NGINX ingress controller for exposing applications within a Kubernetes cluster. Additionally, we discussed the process of generating SSL certificates for these applications using Let's Encrypt. To automate this process, we used the Cert-Manager to generate SSL certificates. Finally, we deployed the Anteon Self-Hosted application using Helm charts.