
In this article, we will monitor a Kubernetes cluster, detect bottlenecks and automatically create K8s service map using eBPF without service restarts, code instrumentation or side-cars. We will deploy Ddosify Self-hosted platform from AWS Marketplace with a single click. We will spin up a Kubernetes cluster on AWS using eksctl and deploy a sample application to the cluster. Our eBPF Agent (Alaz) collects metrics and network traffic from the Kubernetes cluster and sends them to the Ddosify Self-hosted platform. Then we will use Ddosify Self-hosted platform to monitor the cluster and detect bottlenecks. All the files used in this article can be found in here.
Prerequisites
- AWS Account
- AWS CLI
- eksctl for creating a Kubernetes cluster on AWS
- kubectl for managing Kubernetes clusters
- Ddosify Self-hosted for monitoring the Kubernetes cluster
- Ddosify Engine (Optional) for generating load to the Kubernetes cluster
- Helm (Optional) for installing Alaz to the Kubernetes cluster
What is eBPF?
eBPF (extended Berkeley Packet Filter) is a technology that allows you to run sandboxed programs in the Linux kernel without changing kernel source code or loading a kernel module. eBPF programs are written in a restricted C-like language and compiled into bytecode that is verified and translated into native code that can be executed safely in the kernel. The verifier ensures that the program is safe to run, will not crash the kernel and prevents infinite loops. eBPF programs can be attached to various kernel hooks and run when an event occurs. For example you can attach an eBPF program to sys_enter_connect tracepoint to detect TCP connections. eBPF programs can be used for tracing, networking, security, and more. You can find more information about eBPF here.
What is Ddosify Self-hosted?
Ddosify Self-hosted is a observability and performance testing platform that provides real-time visibility into Kubernetes clusters. Without any effort you can start to monitor and detect bottlenecks with Ddosify Self-hosted under 5 minutes. The Ddosify Self-hosted platform provides real-time visibility into Kubernetes clusters and helps you to detect bottlenecks and golden signals like slow SQL queries, 5xx errors, idle K8s services, slow HTTP requests, CPU, Memory, Disk and Network and more. It's also natively integrated with Ddosify Performance Testing solution and you can run performance tests against your K8s services and detect bottlenecks.
What is Ddosify eBPF Agent (Alaz)?
Our eBPF Agent (Alaz) is an open-source tool that collects Kubernetes cluster metrics and network traffic with eBPF without code instrumentation or service restarts, and sends them to the Ddosify Self-hosted platform. Unlike sidecars, it doesn't add overhead to the cluster. Alaz is easy to deploy as a DaemonSet, and it has a limited resource usage of up to 1 CPU core and 1Gi memory.
In the Alaz eBPF directory, you can find eBPF programs written in C using libbpf. These programs are attached to kernel tracepoints and uprobes to capture network traffic on the K8s cluster. Alaz eBPF programs are compiled using the Cilium bpf2go package, which generates helper files in Go for interacting with eBPF programs. We embed these helper files and load them into the kernel using the Cilium eBPF package. You can find more architecture details about Alaz here.
Deploy Ddosify Self-hosted to AWS
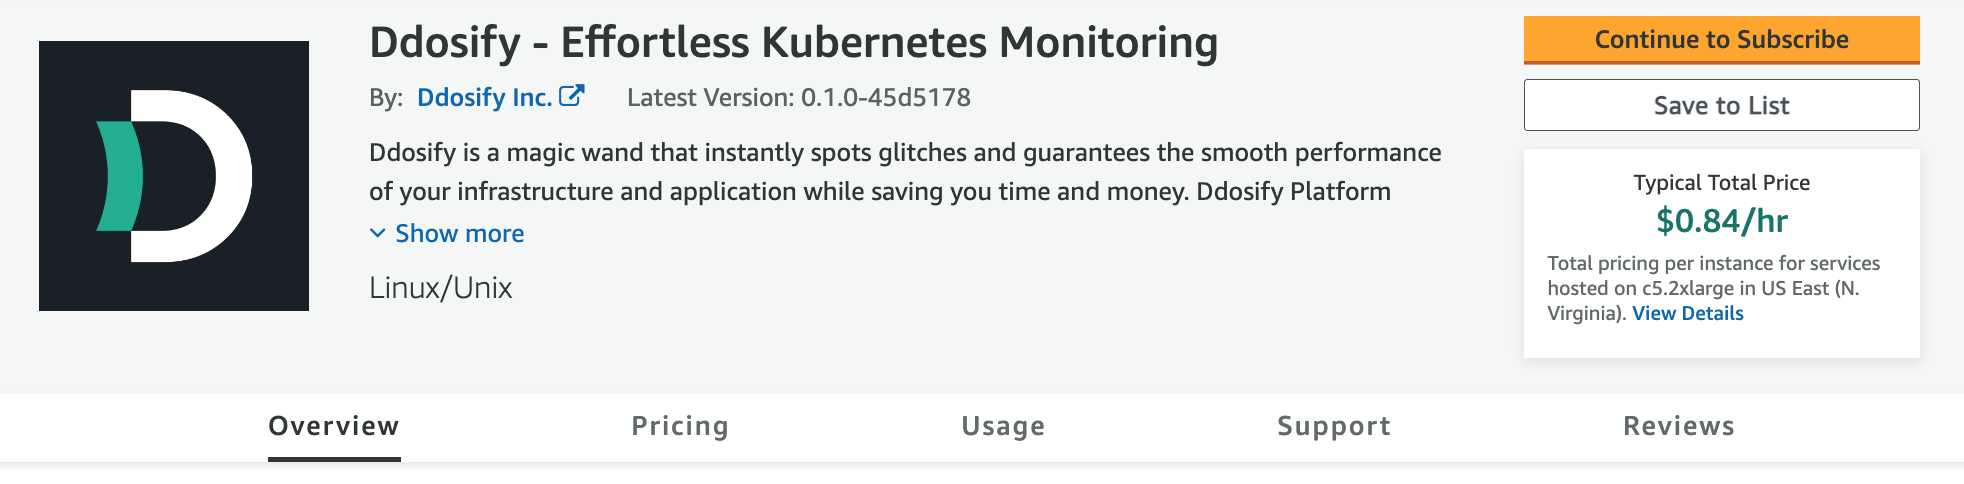
First, we will deploy Ddosify Self-hosted to AWS using AWS Marketplace. You can also install Ddosify Self-hosted platform on your servers that is not on AWS. Check Ddosify Self-hosted documentation for more information.
Click Continue to Subscribe button and then Configure This Software. As a region, you can choose any region that is close to you. Ddosify supports all AWS regions. We will use US West (N. California) in this article. Click Continue to Launch button.
- Choose Action: Launch from Website
- EC2 Instance Type: c5.2xlarge (c5.xlarge and c5.2xlarge are also supported)
- VPC Settings: Leave as Default VPC
- Subnet Settings: Leave as Default Subnet
- Security Group Settings: Click
Create New Based On Seller Settings. Ddosify uses22for SSH access and8014for Ddosify Self-hosted platform.- Give a name and description to the security group
- Click
Savebutton
- Key Pair Settings: Choose an existing key pair or create a new one
- Click
Launchbutton
Now you can see your Subscriptions on AWS Subscriptions Page. Click the Manage button of Ddosify - Effortless Kubernetes Monitoring. Click Actions button and then click View Instances. Click Access Software button, and you will see the Ddosify Self-hosted platform.
Create a Kubernetes Cluster on AWS using eksctl
For testing, we will use eksctl to create a Kubernetes cluster on AWS EKS. You can also deploy Ddosify Self-hosted to other K8s providers like GKE, AKS, minikube, k0s, etc. You can find more information about eksctl here. First, we will create a K8s cluster configuration file:
apiVersion: eksctl.io/v1alpha5
kind: ClusterConfig

metadata:
  name: ddosify-k8s-test-blog
  region: us-west-1
vpc:
  clusterEndpoints:
    publicAccess: true
    privateAccess: false

managedNodeGroups:
  - name: managed-ng-ddosify-k8s-test-blog
    amiFamily: "AmazonLinux2"
    instanceType: c5.large
    minSize: 1
    maxSize: 3
    desiredCapacity: 2
    volumeSize: 30
    iam:
      attachPolicyARNs:
        - arn:aws:iam::aws:policy/AmazonEKSWorkerNodePolicy
        - arn:aws:iam::aws:policy/AmazonEKS_CNI_Policy
        - arn:aws:iam::aws:policy/AmazonEC2ContainerRegistryReadOnly
      withAddonPolicies:
        ebs: true
addons:
- name: vpc-cni
  serviceAccountRoleARN: arn:aws:iam::aws:policy/AmazonEKSCNIAccess
- name: aws-ebs-csi-driver
  serviceAccountRoleARN: arn:aws:iam::aws:policy/AmazonEKS_CSI_Driver
It will generate a K8s cluster with two nodes on AWS. Now, create a Kubernetes cluster using eksctl:
eksctl create cluster -f cluster.yaml
You need to have access to the AWS account to create a Kubernetes cluster. For more information, you can check eksctl documentation.
After the cluster is created, we will update the KUBECONFIG environment variable to point to the new cluster:
aws eks update-kubeconfig --name ddosify-k8s-test-blog --region us-west-1
Now you can check the nodes of the Kubernetes cluster, and you should see two nodes:
kubectl get nodes
Deploy a Sample Application to the Kubernetes Cluster
We will deploy simple two microservices and PostgreSQL to the Kubernetes cluster.
Services:
testserver- A simple Python Django web application for getting currencies, make exchanges and get exchange rates. It uses PostgreSQL as a database.currencies- A simple Python Flask web application that returns currency rates.testserverservice callscurrenciesservice to get currency rates with HTTP requests.postgres- PostgreSQL database.
Deployment:
Run the following command to deploy the sample services to the Kubernetes cluster. This command will create a namespace named testserver and deploy the services to this namespace:
kubectl apply -f https://raw.githubusercontent.com/ddosify/blog_examples/main/006_effortless_kubernetes_monitoring_using_ebpf/sample_apps.yaml
After few seconds, you should see that all the pods are running:
kubectl get pods -n testserver
Access the testserver service by forwarding the port 8200 to the local machine:
kubectl port-forward --namespace testserver service/testserver-service 8200:8200
Now you can access the testserver service from your local machine. To get the currency rates, you can send a request to the /currencies/ endpoint. testserver service calls currencies service to get currency rates with HTTP requests:
curl http://localhost:8200/currencies/
To get the exchange rate, you can send a request to the /exchange_rate/ endpoint. It returns the exchange rate between two currencies:
curl http://localhost:8200/exchange_rate/USD/EUR/
It also has a dummy endpoint for testing the HTTP status codes. It returns the HTTP status code that you give as a parameter:
curl http://localhost:8200/status/500/
Generate Load to the Kubernetes Cluster
We will use Ddosify Engine to generate load to the sample application that we deployed to the Kubernetes cluster. Ddosify Engine is an open-source and high-performance load testing tool that allows you to generate load to your services. Install it with the following command:
curl -sSfL https://raw.githubusercontent.com/ddosify/ddosify/master/scripts/install.sh | sh
After the installation, you can run the following command to generate load to the testserver service. This command will send 1000 GET requests for 10 seconds to the testserver currencies endpoint:
ddosify -t http://localhost:8200/currencies/ -n 1000 -d 10 -m GET
You can add --debug flag to the ddosify command to send one request and print curl-like verbose result.
Send 200 GET requests for 10 seconds to the testserver exchange rate endpoint:
ddosify -t http://localhost:8200/exchange_rate/USD/EUR/ -n 200 -d 10 -m GET
Send 100 GET requests for 10 seconds to the testserver status endpoint. This endpoint returns the HTTP status code that you give as a parameter. Ddosify Engine will send random HTTP status codes with dynamic parameters:
ddosify -t http://localhost:8200/status/{{_randomInt}}/ -n 100 -d 10 -m GET
Monitor the Kubernetes Cluster with Ddosify Self-hosted and Alaz
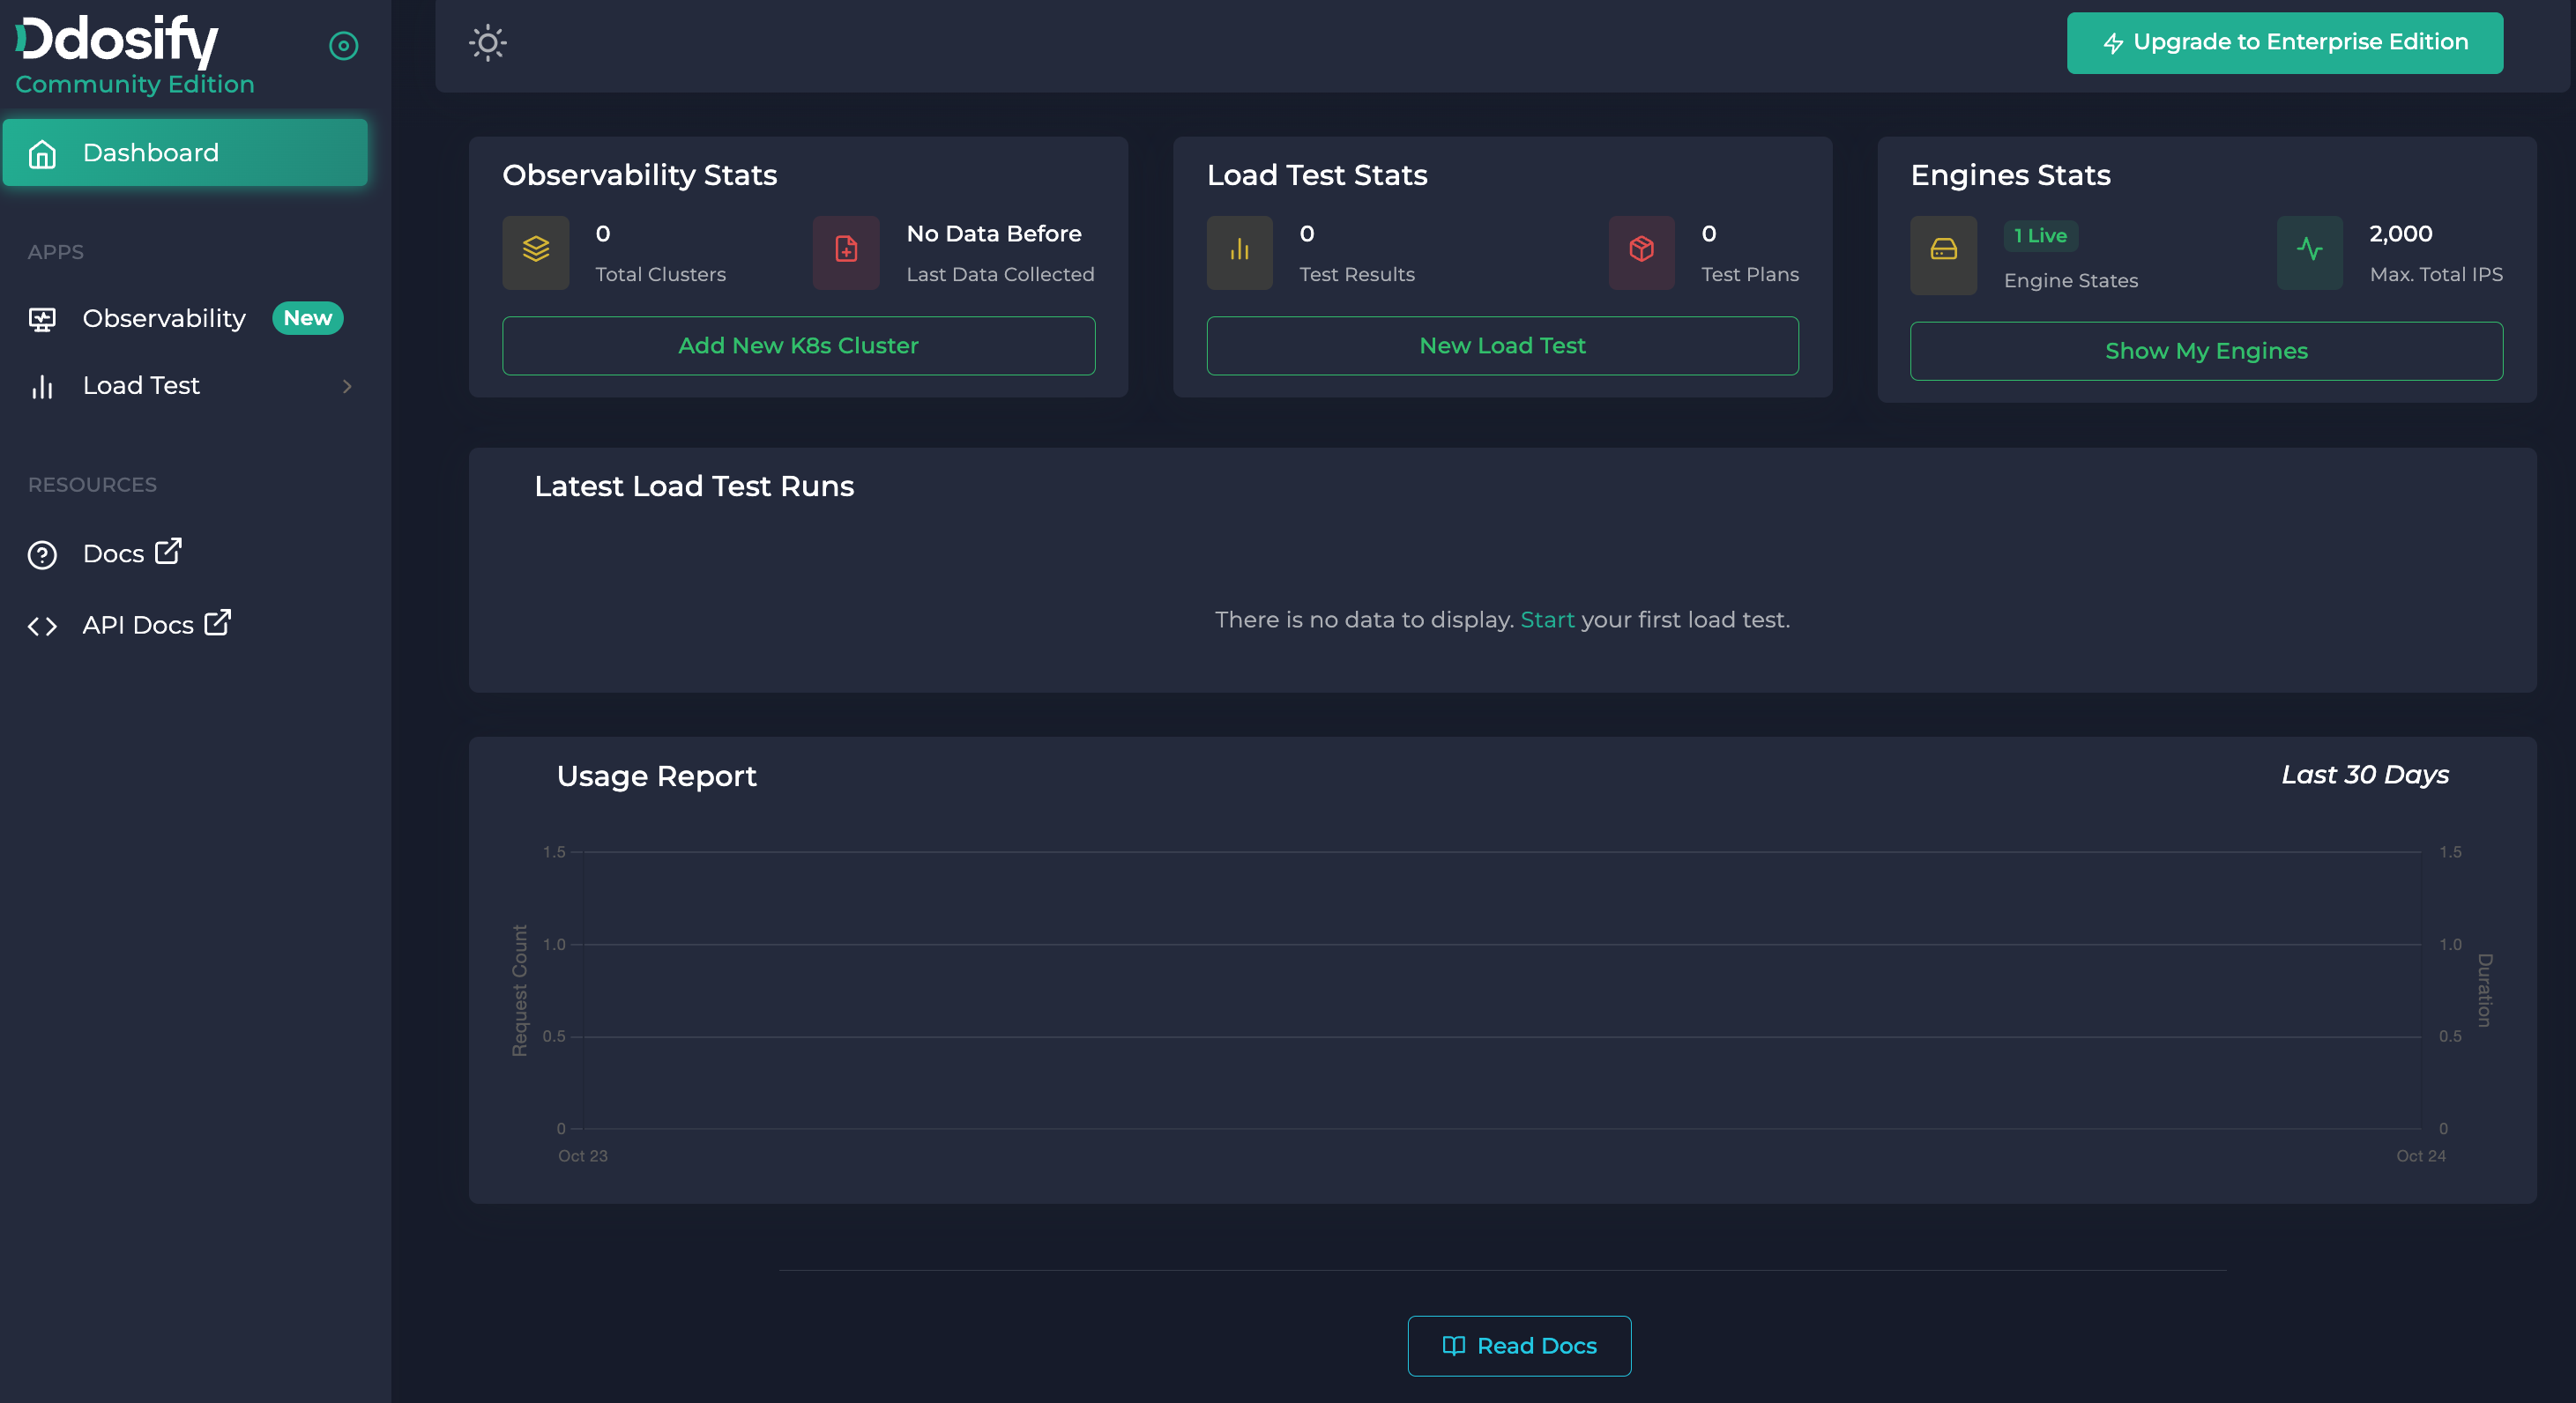
Now we will monitor the Kubernetes cluster with Ddosify Self-hosted and Alaz. First, we will create a new cluster on Ddosify Self-hosted. Click Observability on the left menu and then click + Add Cluster button. Give a name to the cluster and click Save button.
After the cluster is created, you will see the Alaz installation instructions.
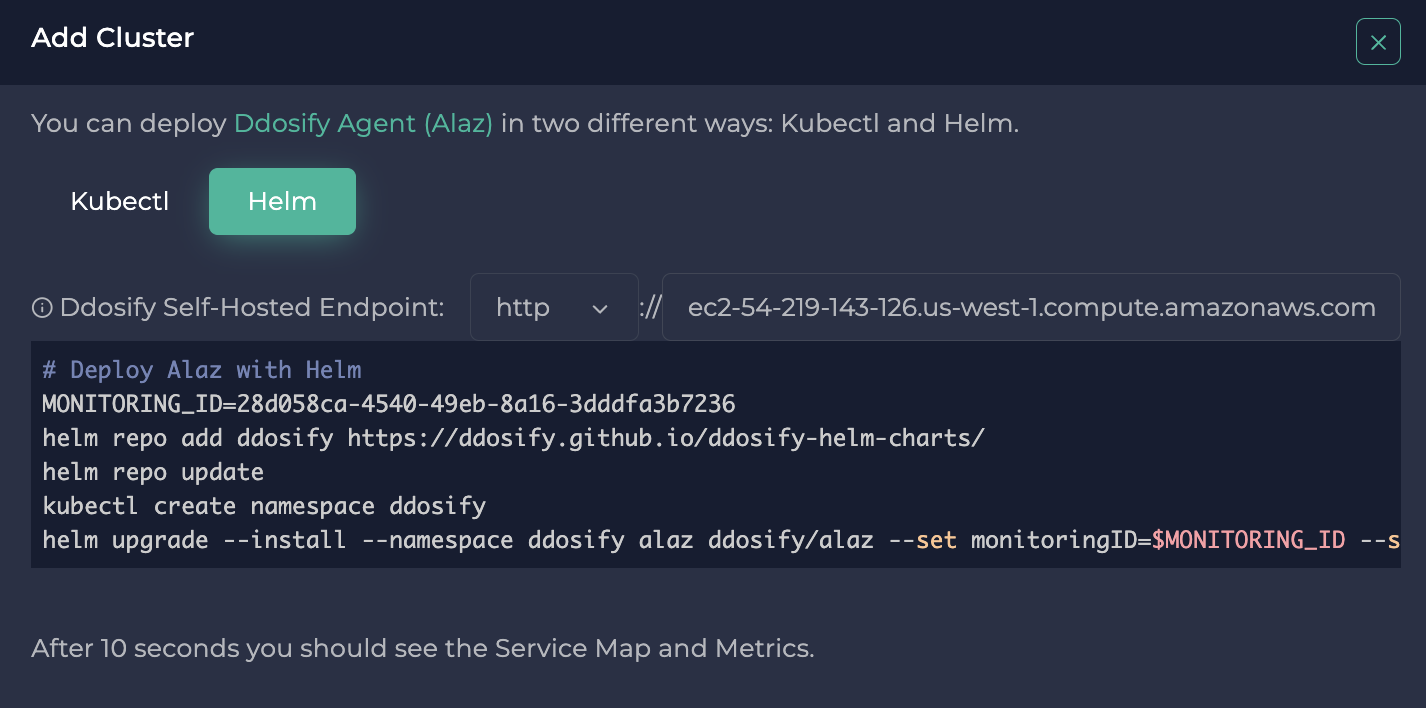
We will use the helm installation method. You can also install it with kubectl. These commands will install Alaz to the Kubernetes cluster by setting the MONITORING_ID and Ddosify Self-Hosted API URL. MONITORING_ID is the unique identifier of the cluster on Ddosify Self-hosted. Ddosify Self-Hosted API URL is the URL of the Ddosify Self-hosted platform. Alaz sends metrics and service traffic to this URL. For detailed installation instructions, you can check Alaz installation documentation.
Alaz eBPF agent runs as a DaemonSet on the Kubernetes cluster. It will collect metrics and network traffic from the cluster and send them to the Ddosify Self-hosted platform. You don't need to change your application code or restart your K8s services, and it doesn't add overhead to the cluster like sidecars.
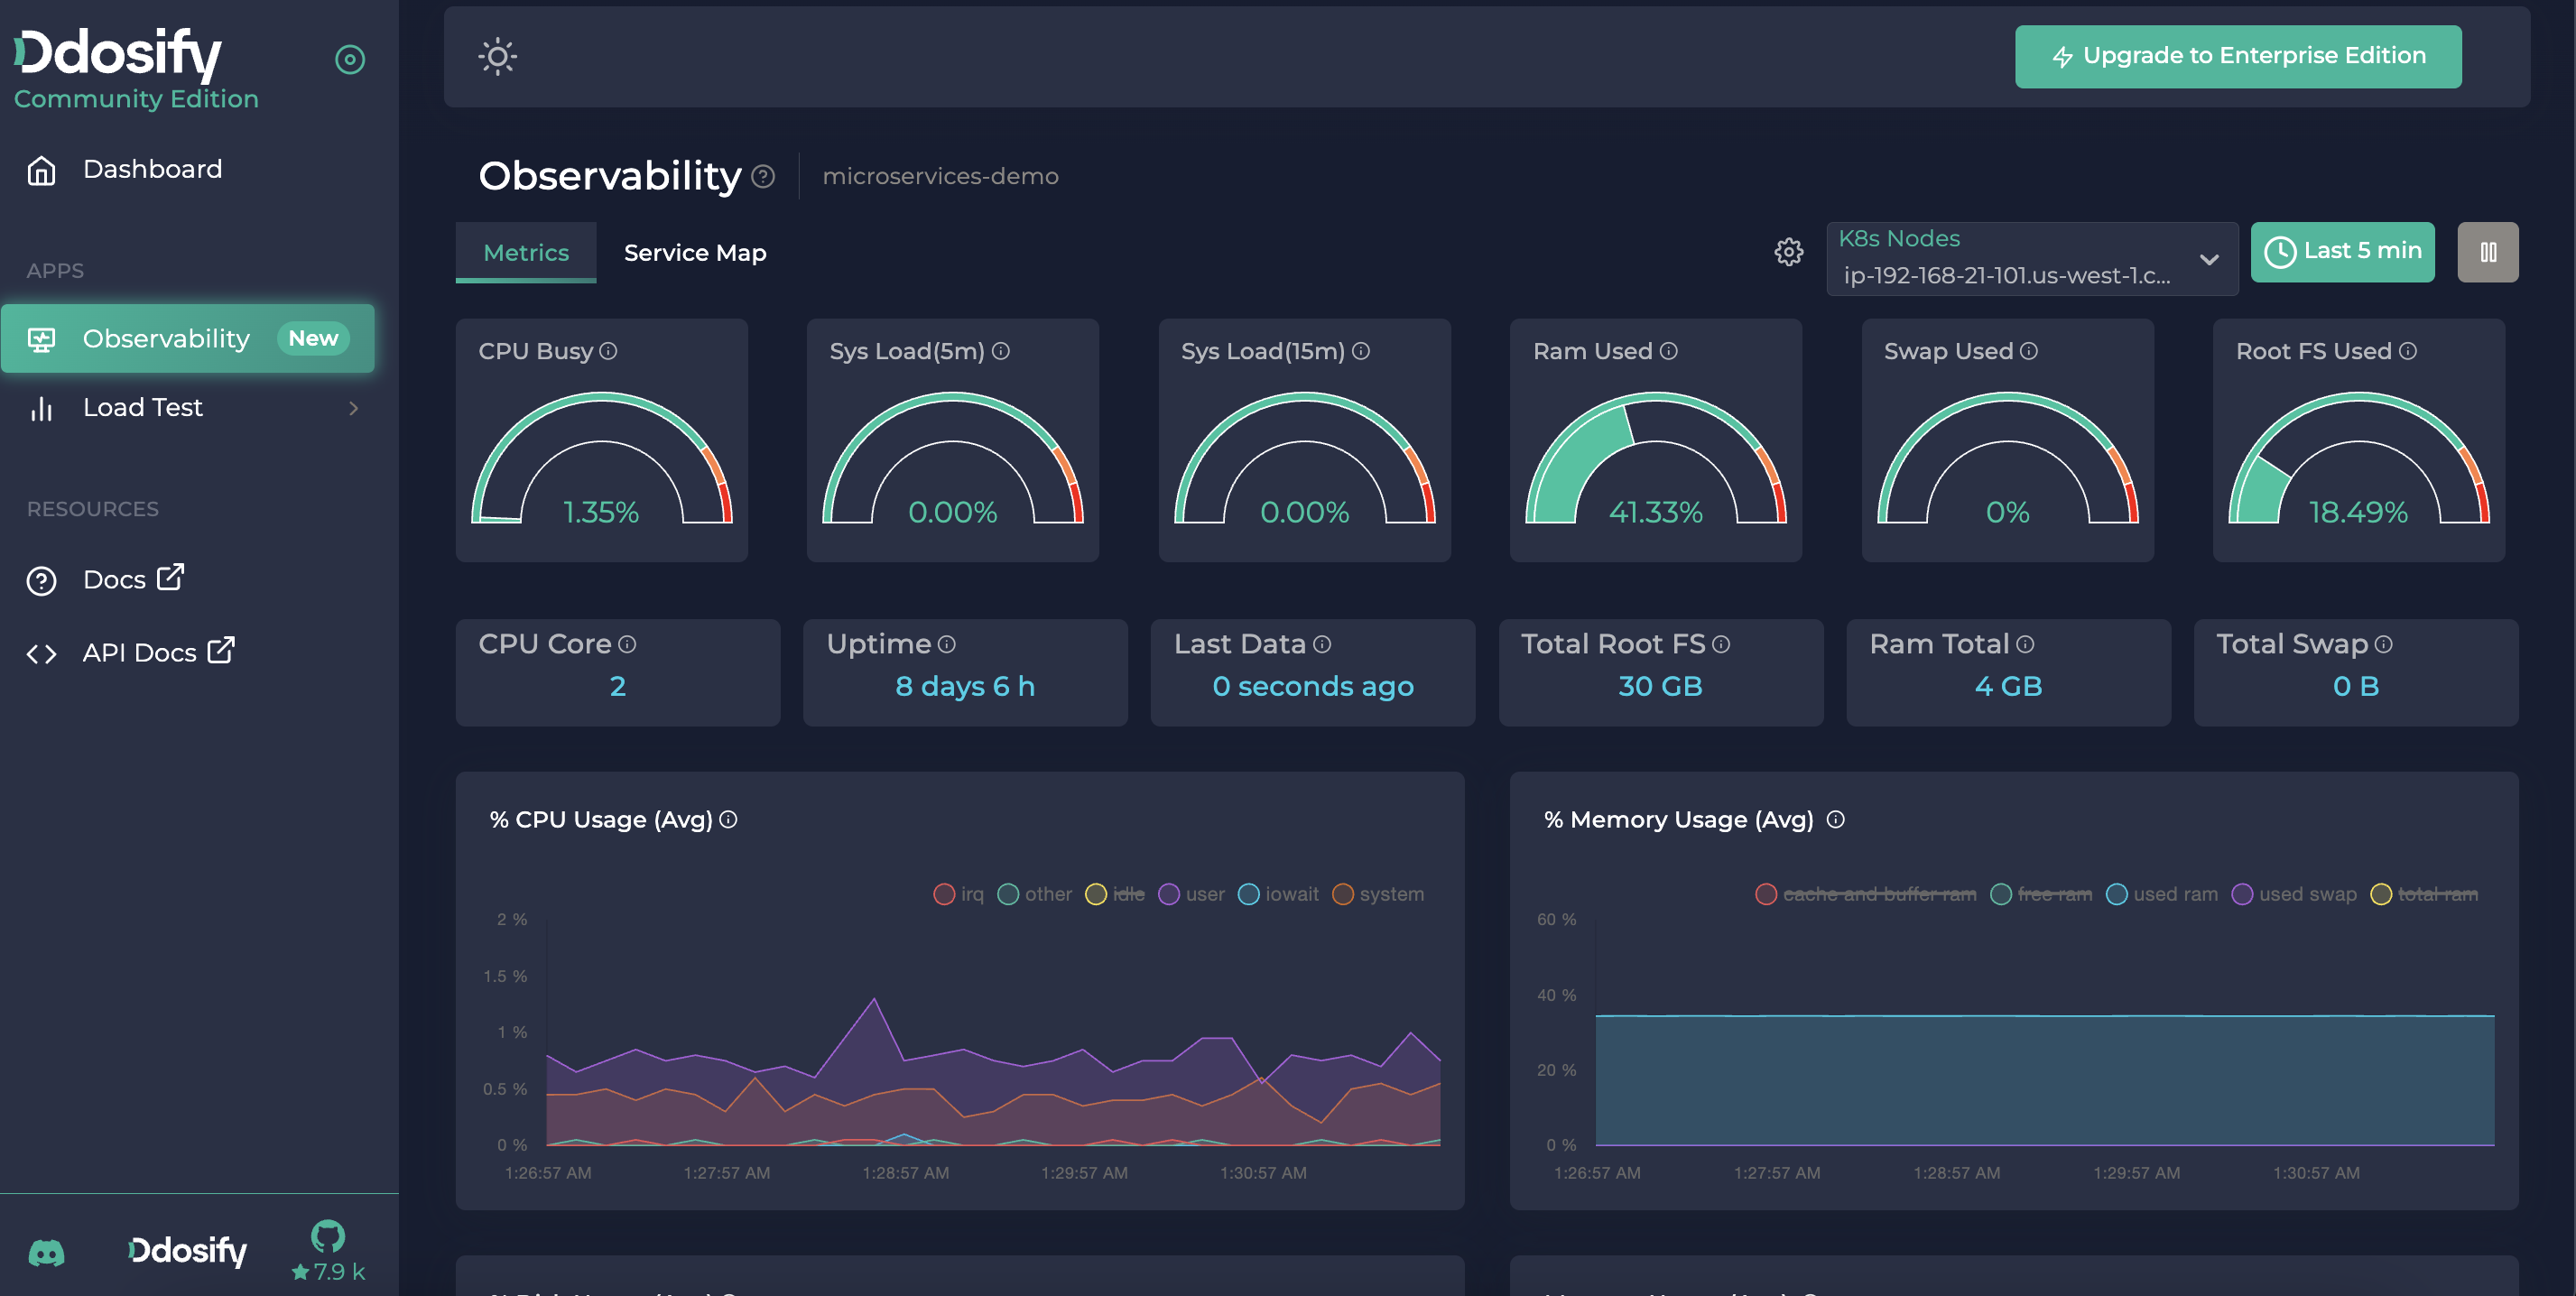
After few seconds, you should see your K8s cluster on the Ddosify Self-hosted platform. On the Metrics tab you can see the CPU, Memory, Disk and Network usage of the cluster.
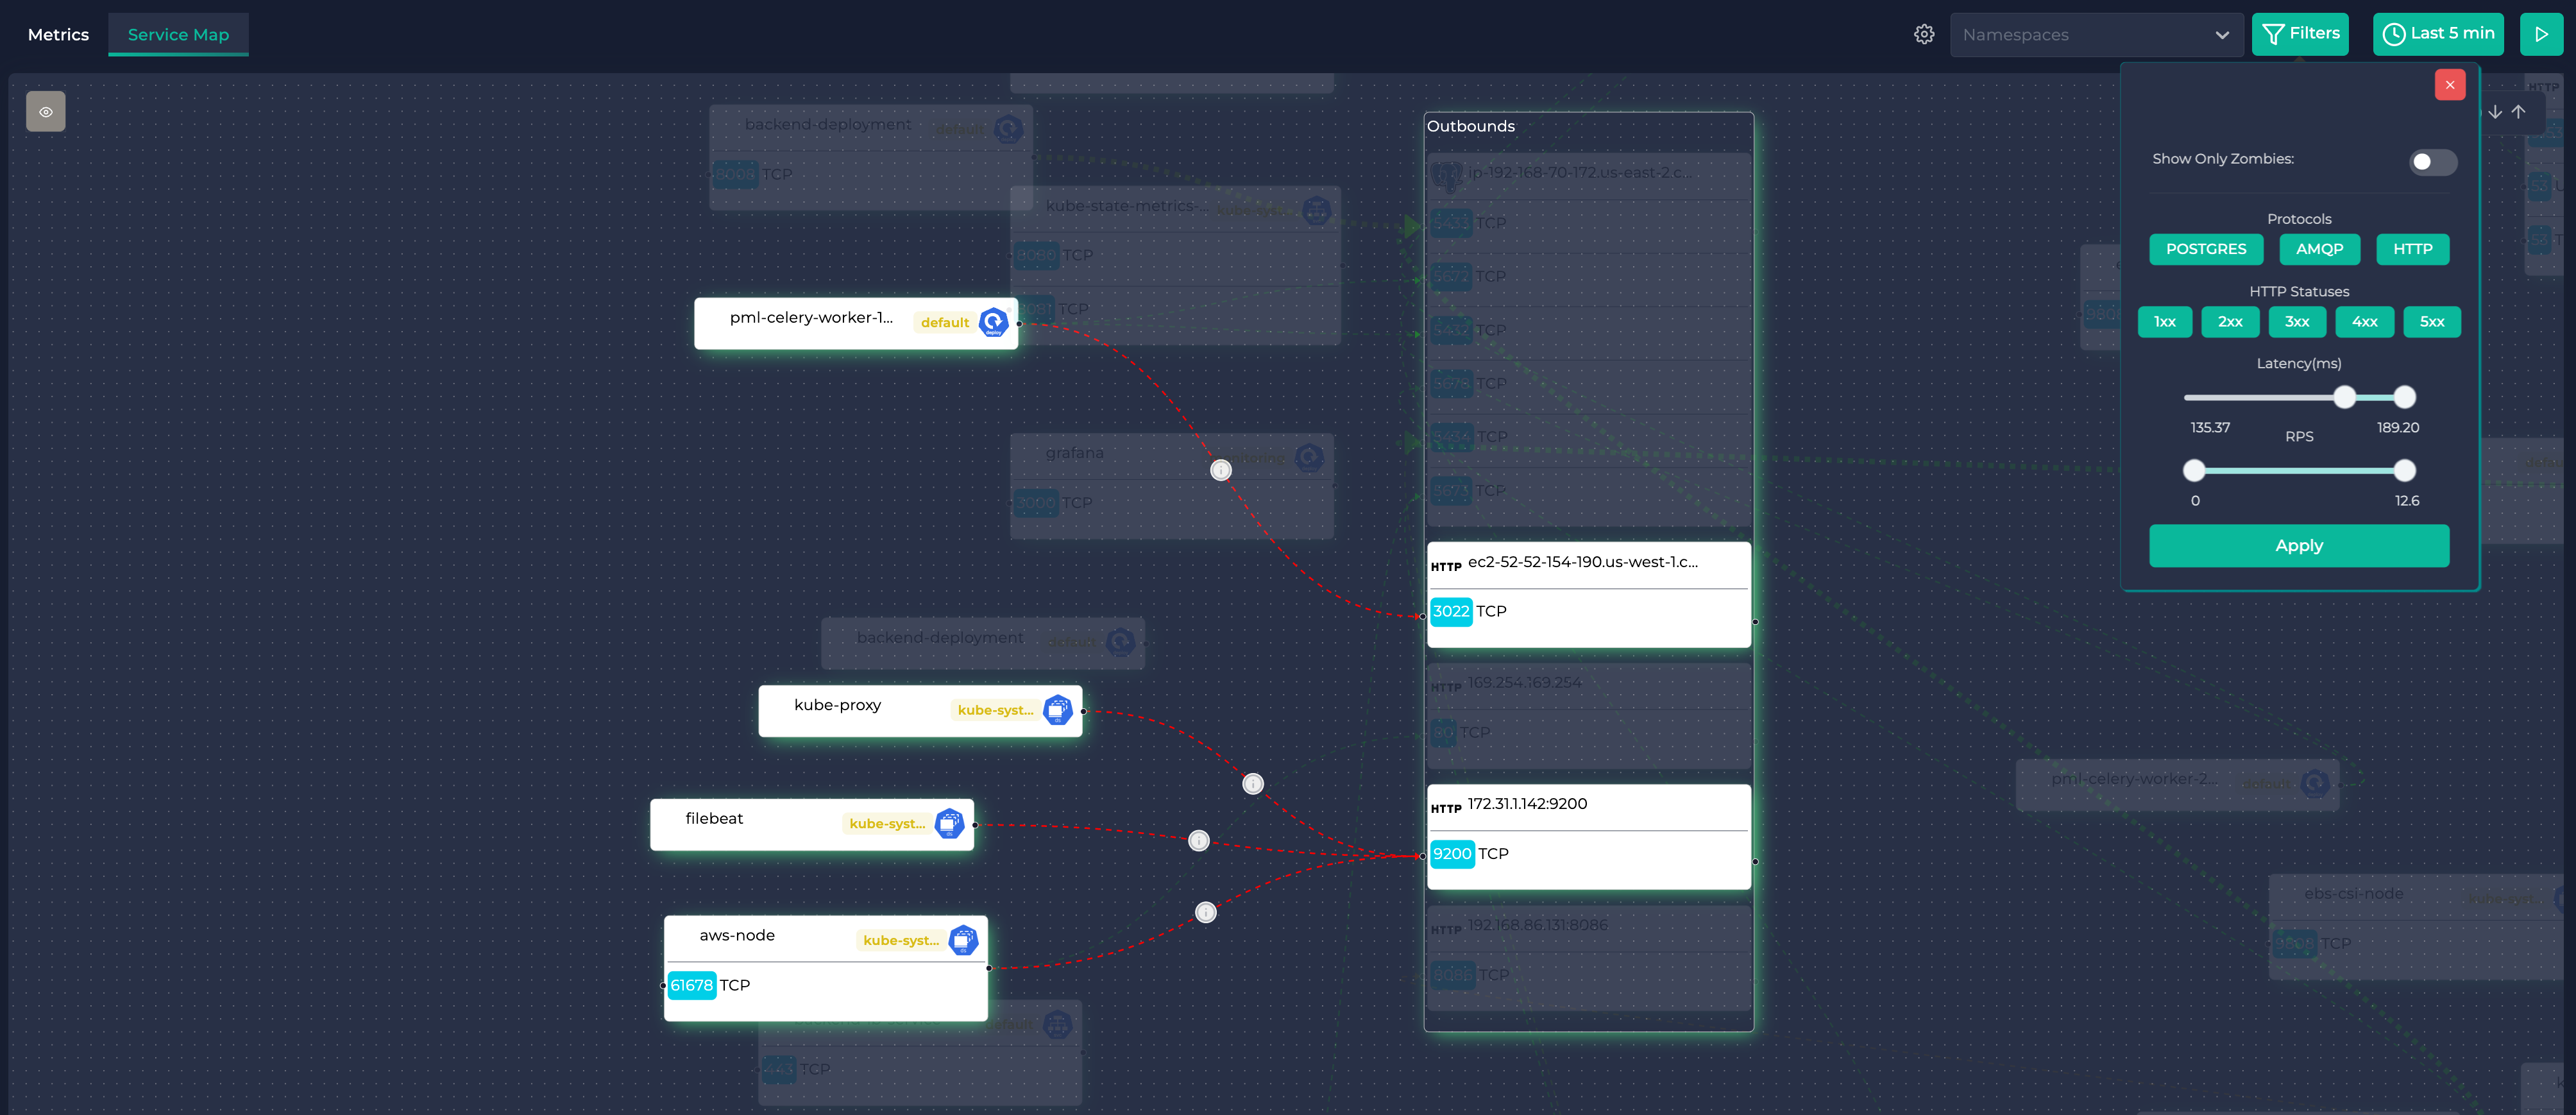
On the Service Map tab you can see the K8s service map. You can see the K8s resources like services, deployments, pods and their relations. The lines between the resources show the traffic between them. The thicker the line, the more traffic between the resources. The more red the line, the more latency between the resources. You can see the latency and RPS between the resources by hovering ℹ️ over the line.
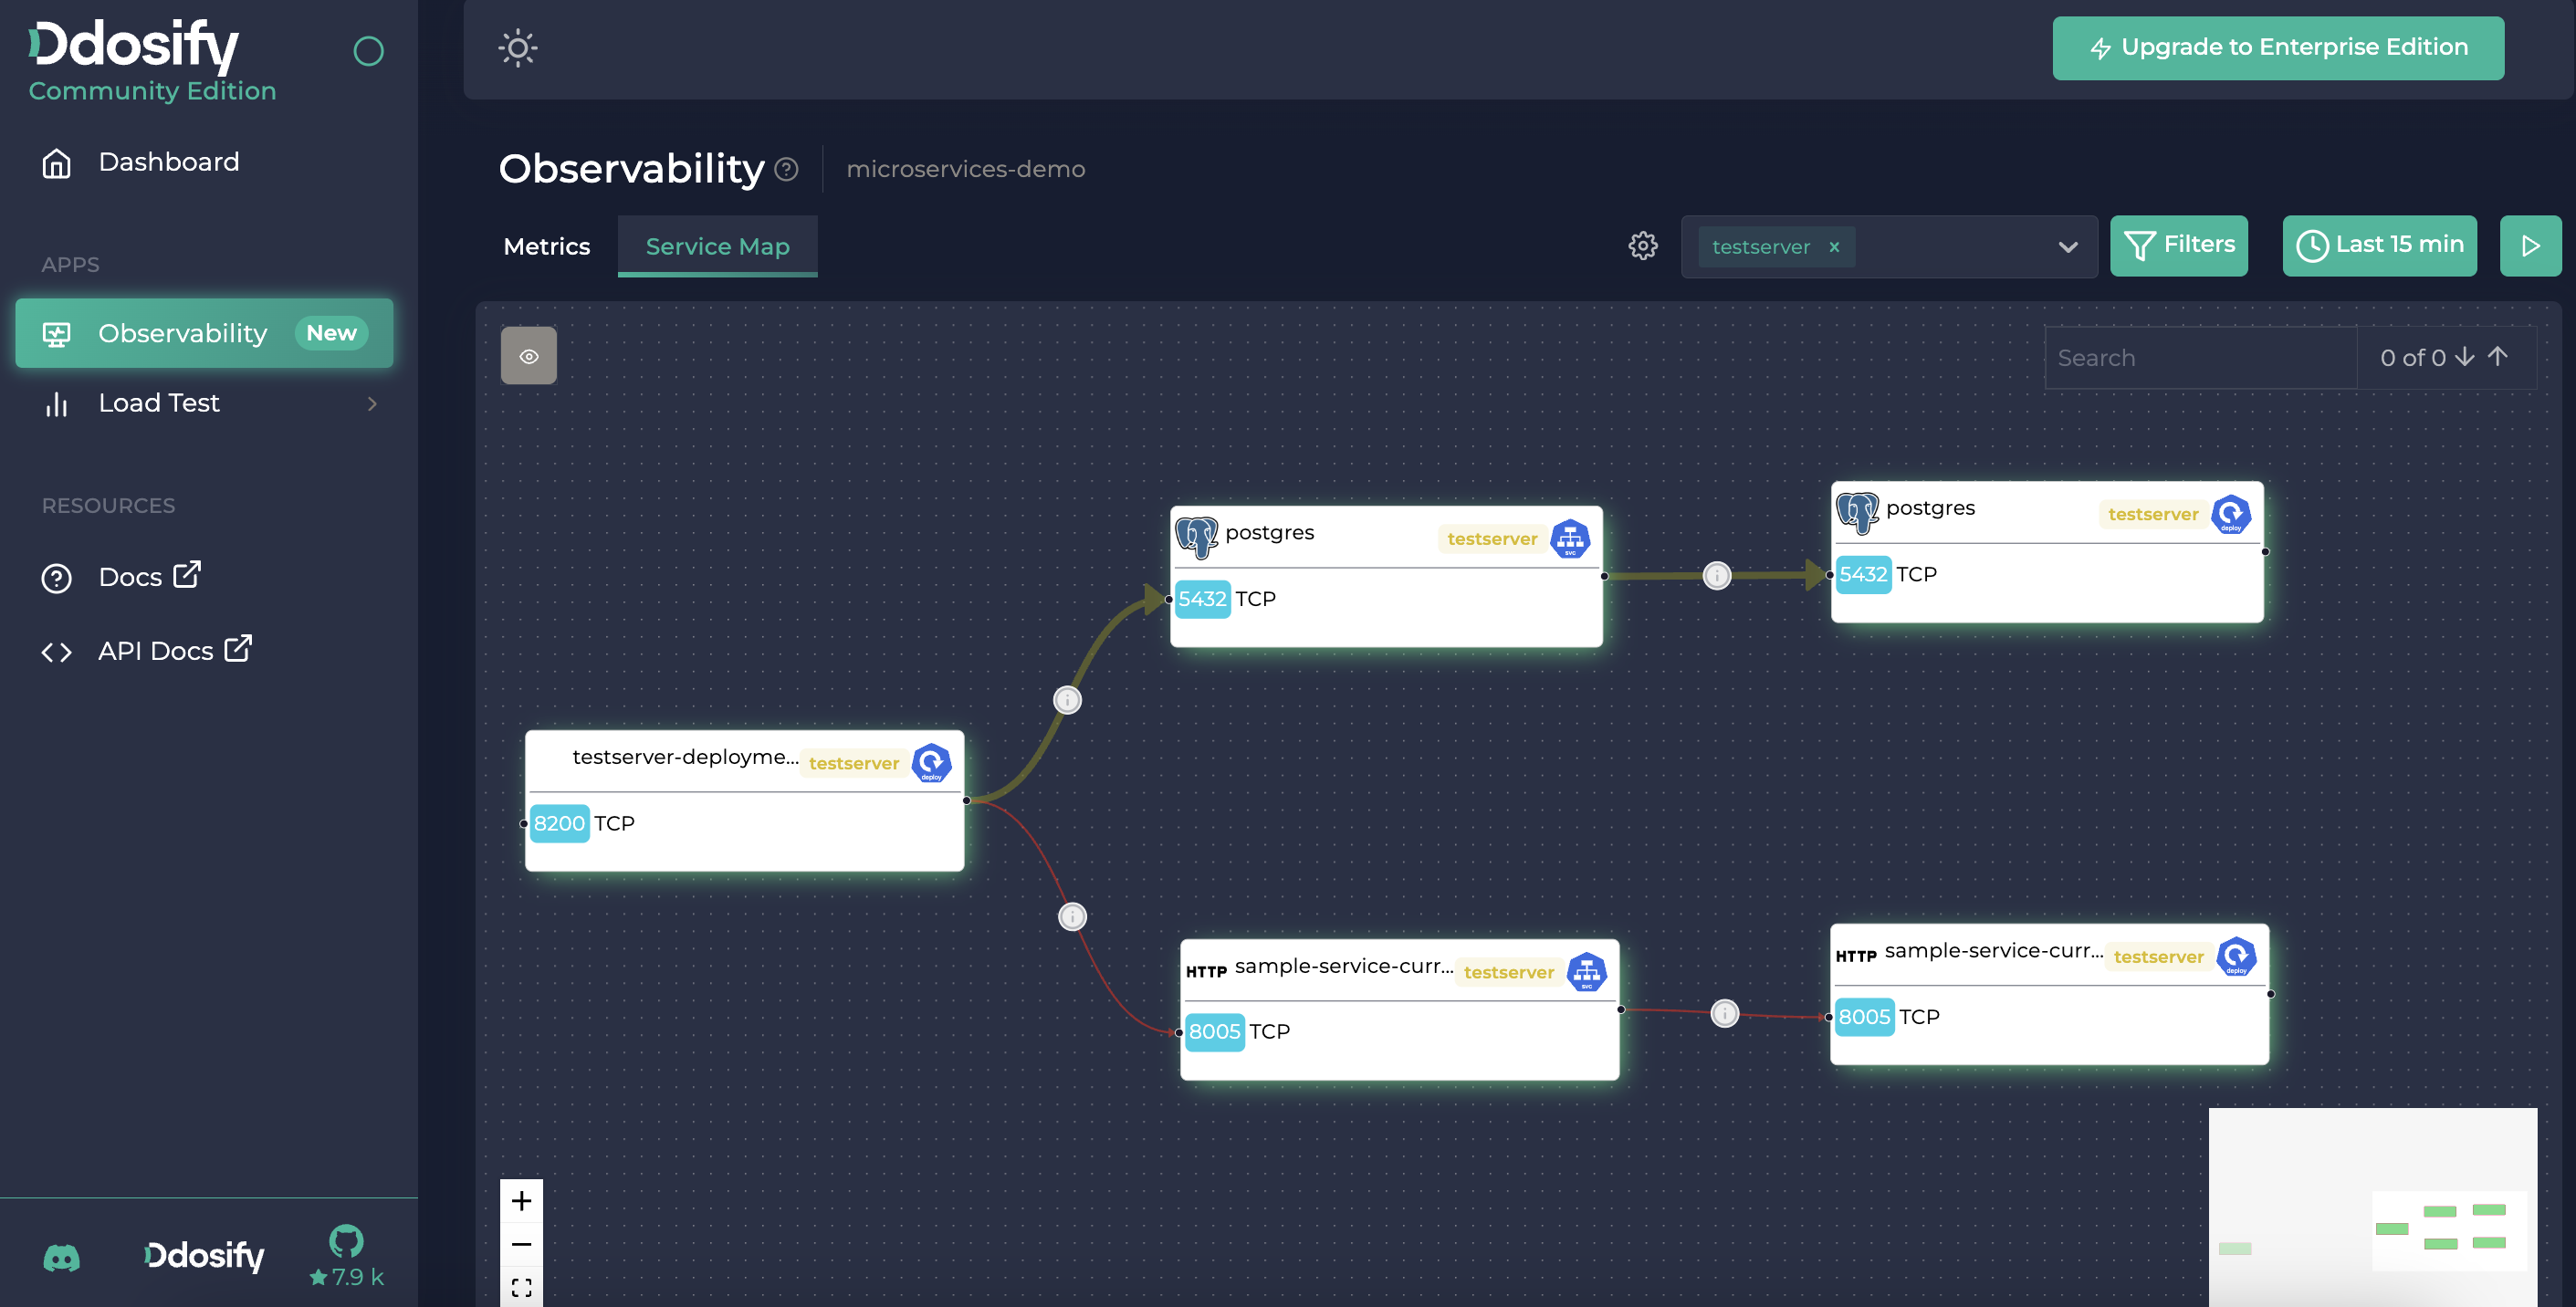
You can also see the K8s resource (deployment, service, pod, etc.) details and the golden signals like slow SQL queries, 5xx errors, idle K8s services, slow HTTP requests, CPU, Memory, Disk and Network and more.
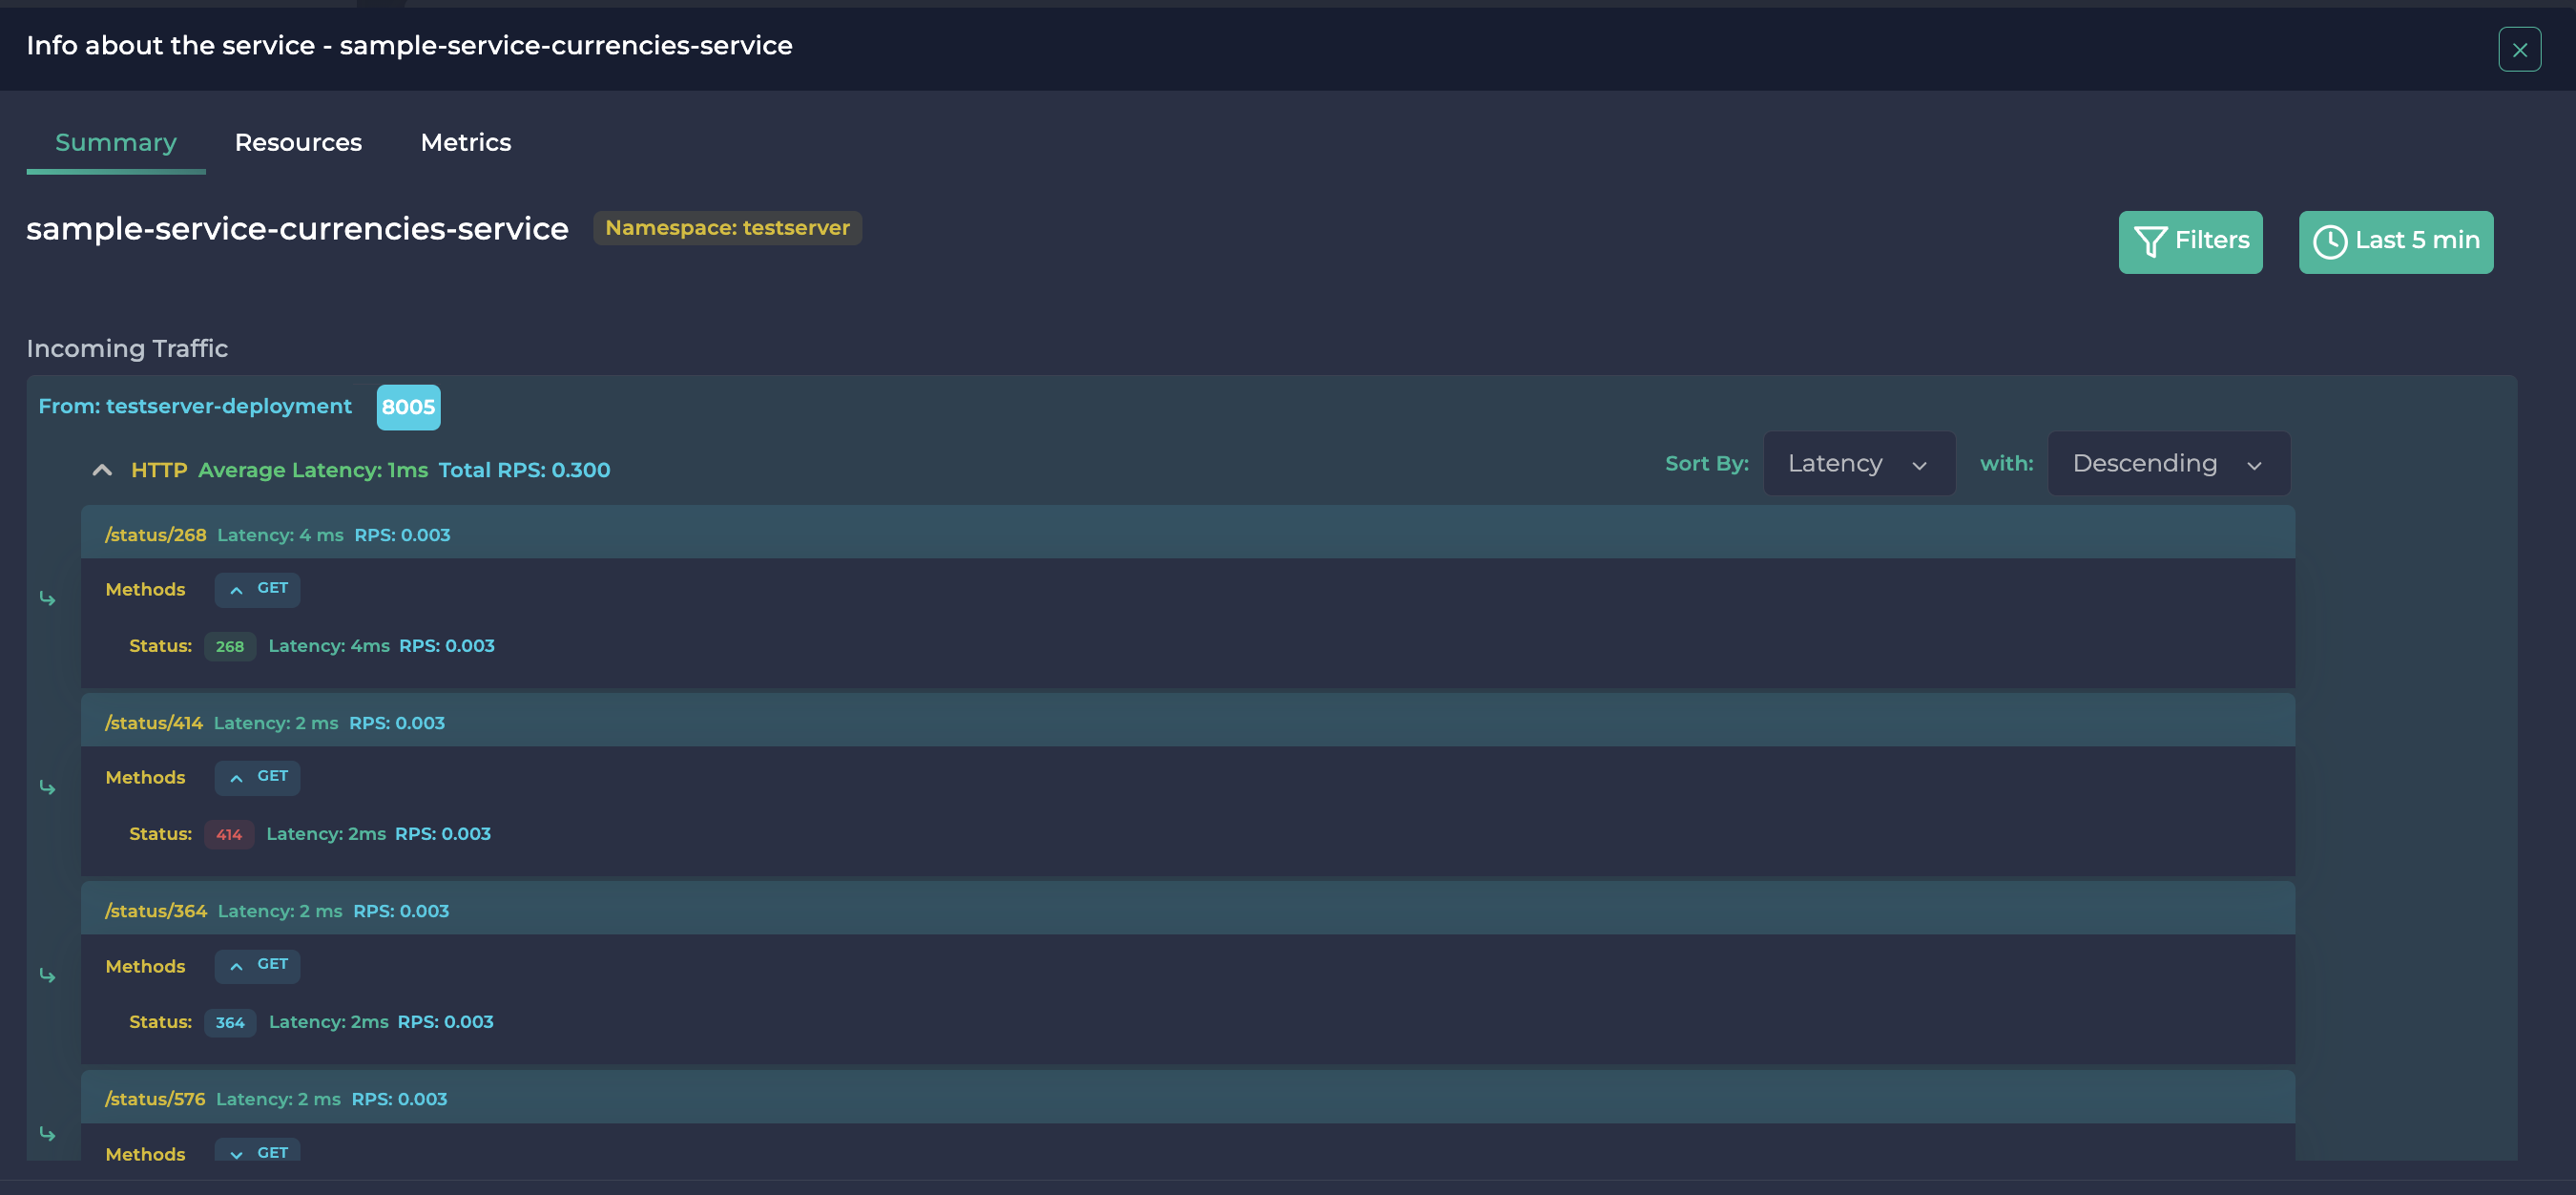
So you can easily find the bottlenecks on your K8s cluster with Ddosify Self-hosted platform and eBPF Agent - Alaz. For example one service is too slow and increasing the latency of other services. You can see the slow HTTP requests on the Ddosify Self-hosted platform. Or you can see the slow SQL queries and 5xx errors on the Ddosify Self-hosted platform.
Conclusion
In this article, we used eBPF to monitor Kubernetes cluster and detect bottlenecks. We deployed Ddosify Self-hosted platform from AWS Marketplace with a single click. Our eBPF Agent (Alaz) collects metrics from a Kubernetes cluster and sends them to the Ddosify Self-hosted platform without instrumentation or service restarts. Then we used Ddosify Self-hosted platform to monitor the cluster and detect bottlenecks.
⭐️ If you found Ddosify Self-hosted platform useful, please star our GitHub repository. You can also check Ddosify eBPF Agent (Alaz).
Share on social media: