

Introduction
We have already demonstrated how to test the Fintech Exchange API in a previous blog post by using the Ddosify Load Engine. In this article, we will demonstrate how to effectively load test a FinTech exchange API using Ddosify Cloud. We will also show how to use CSV test data import to simulate real-world scenarios and optimize performance.
We have organized this write-up into two parts to demonstrate two different features of Ddosify. In the first part, we will perform a load test on a GET endpoint that accepts base and target currency and returns their exchange rate of them. The rand() utility method is used to send different currencies on each request. In the second part, we will test a POST endpoint that performs exchange operations. We will use a CSV file that contains test data stored on our Test App's Database. Then we import this CSV file into Ddosify to replay the same transactions stored on DB, but in high concurrency. In both parts, we will gain insights into the reliability of our exchange API across high traffic.
The Environment
- As in the previous blog post we will again use the Ddosify test API as a backend service.
- We will use Ddosify Cloud for load test.
- The configuration files used in this blog are available in this repository.
Load testing the exchange rate info API
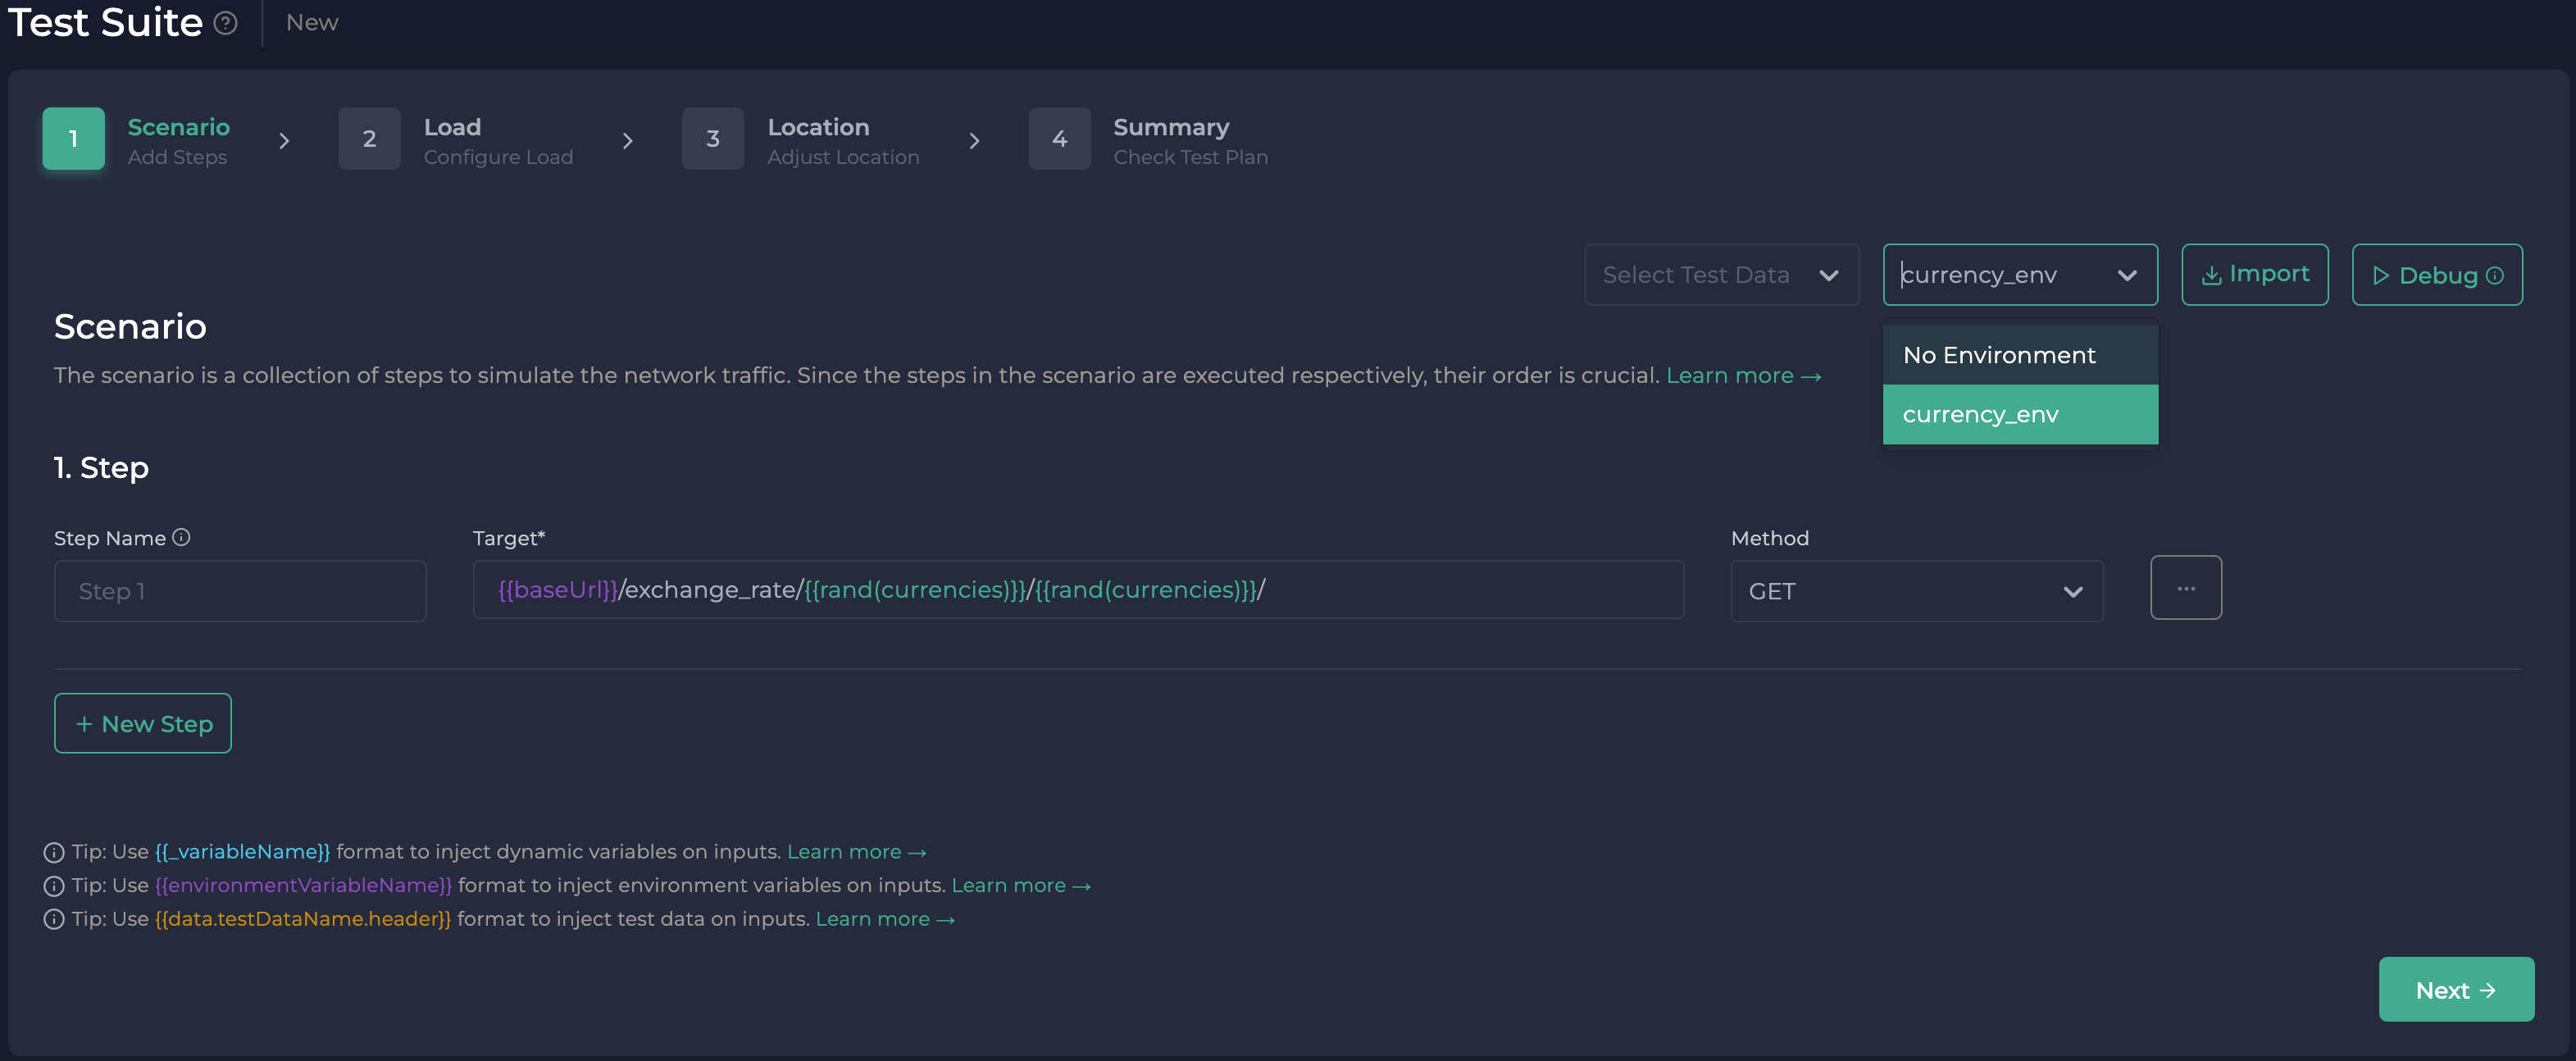
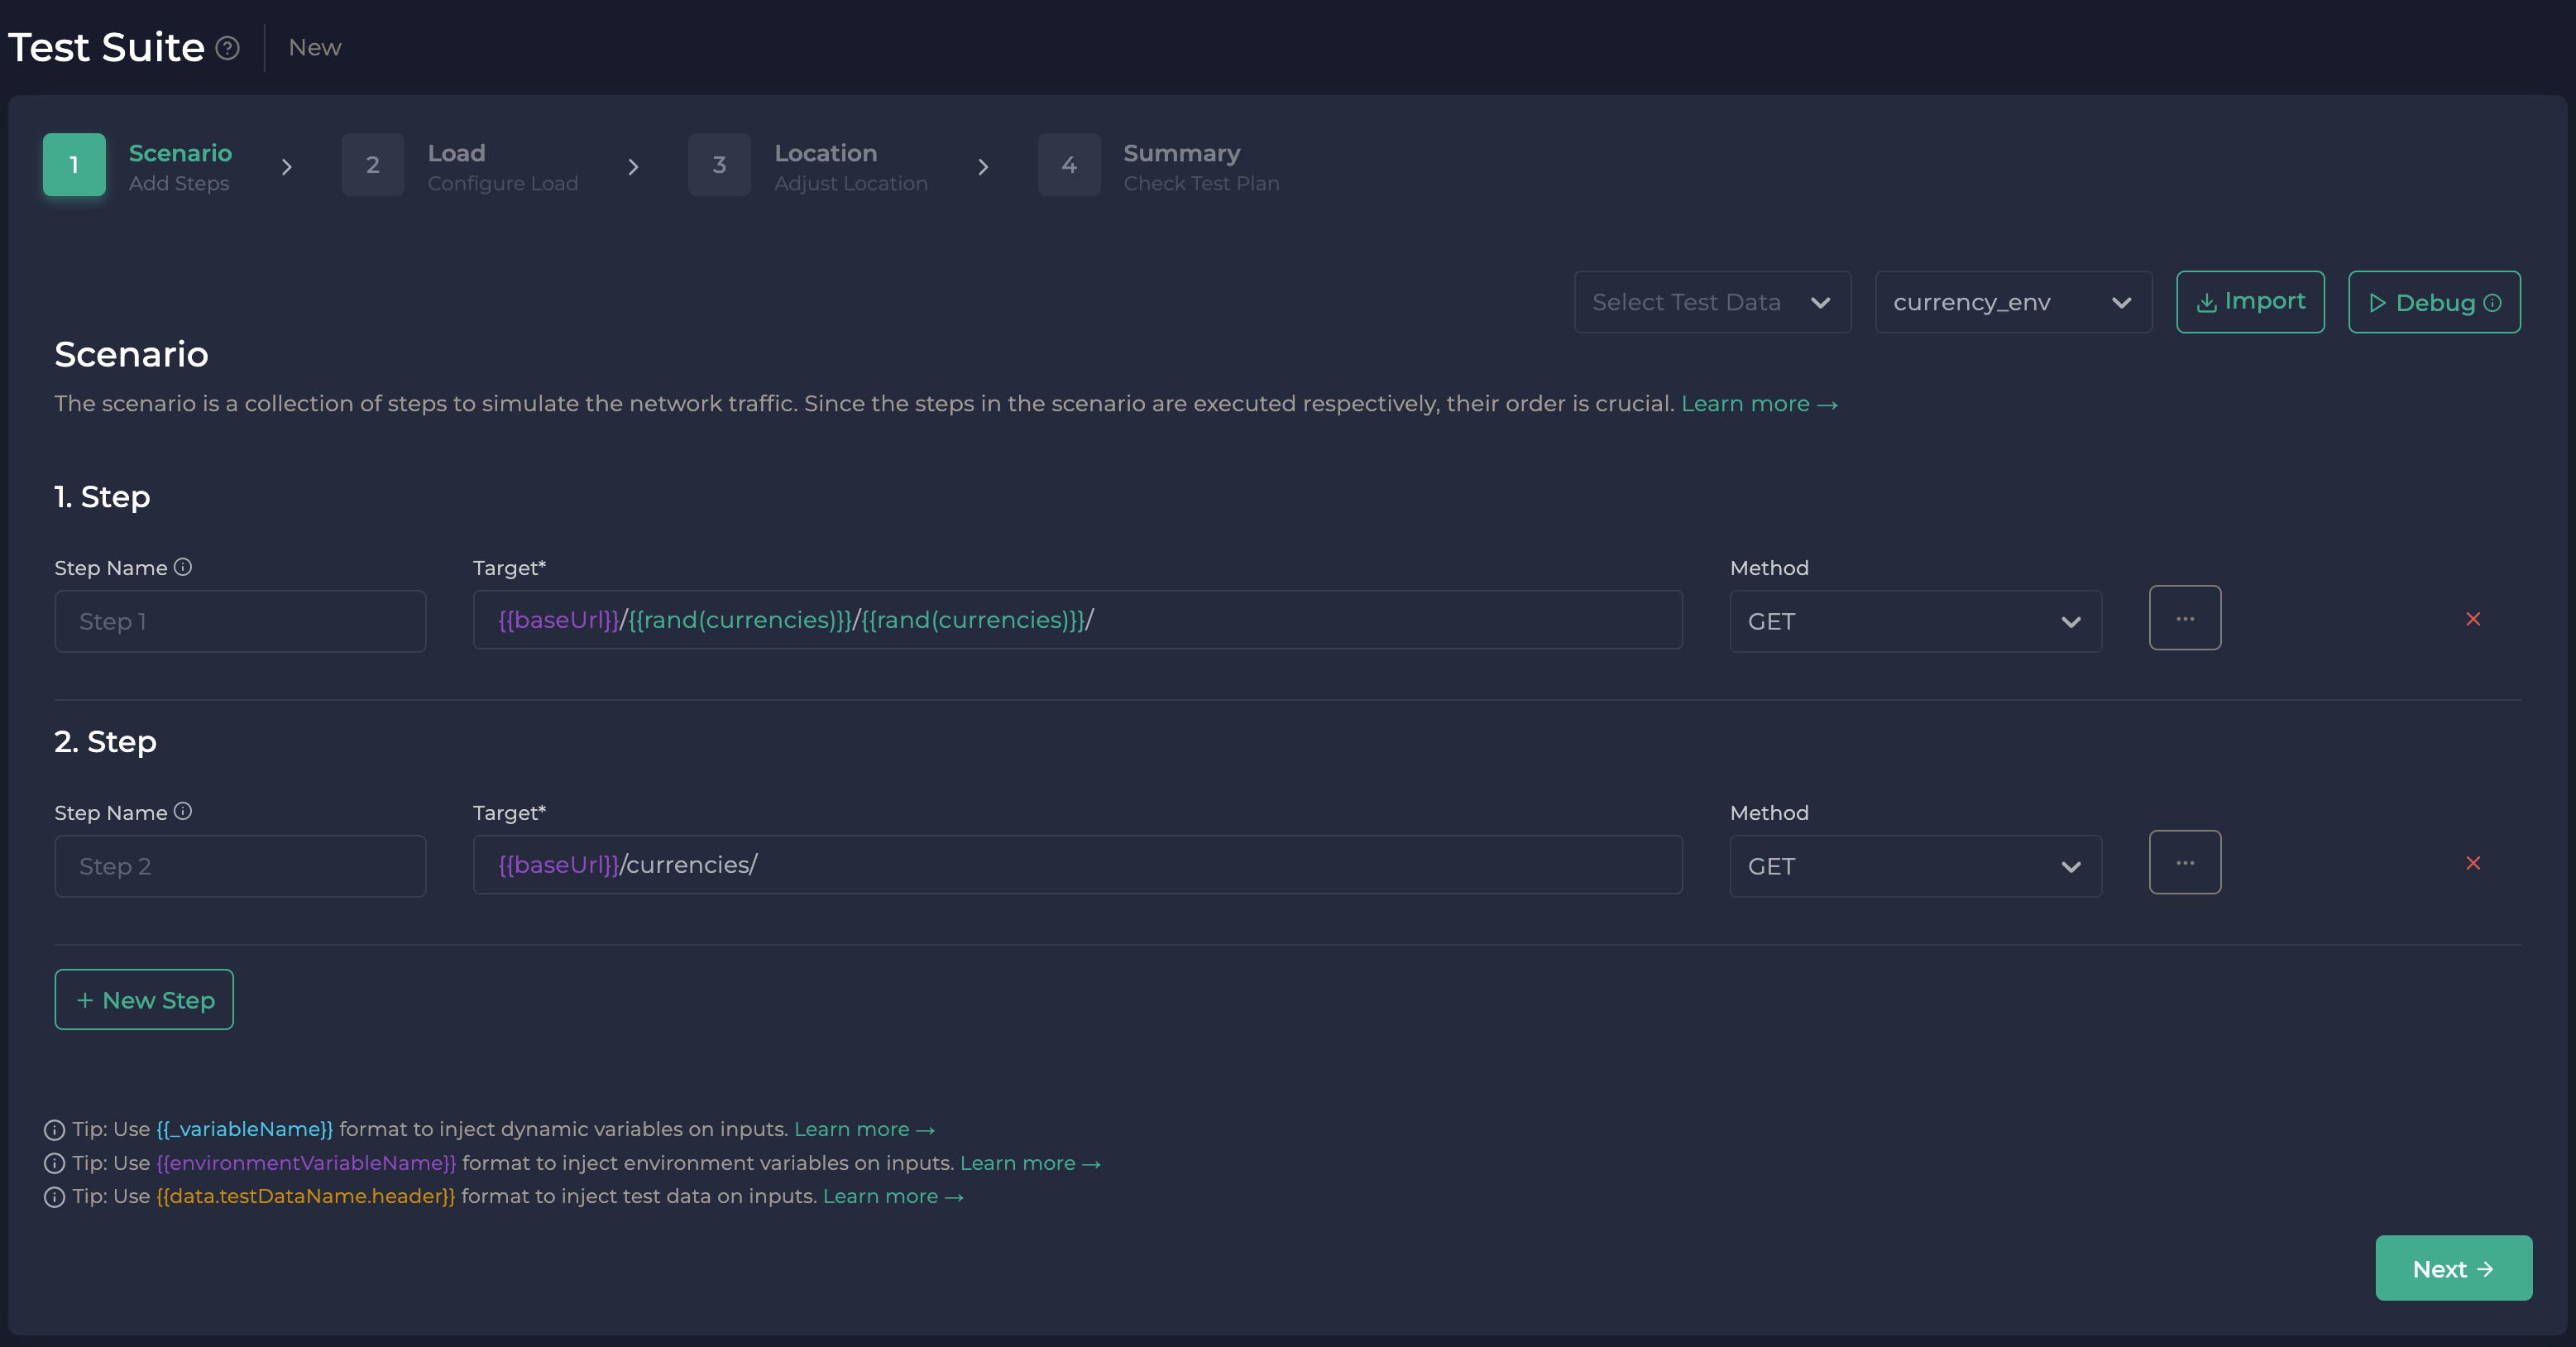
Almost all fintech APIs have an endpoint that provides the exchange rate between two currencies. Our test backend API has a similar one, GET exchange_rate/<base_currency>/<target_currency>/. In this use case, we would like to learn the performance of this endpoint by providing random <base_currency> and <target_currency> on high IPS (iteration per second). Let's go step by step for the configuration in Test Suite, then we will talk about the details of each section.
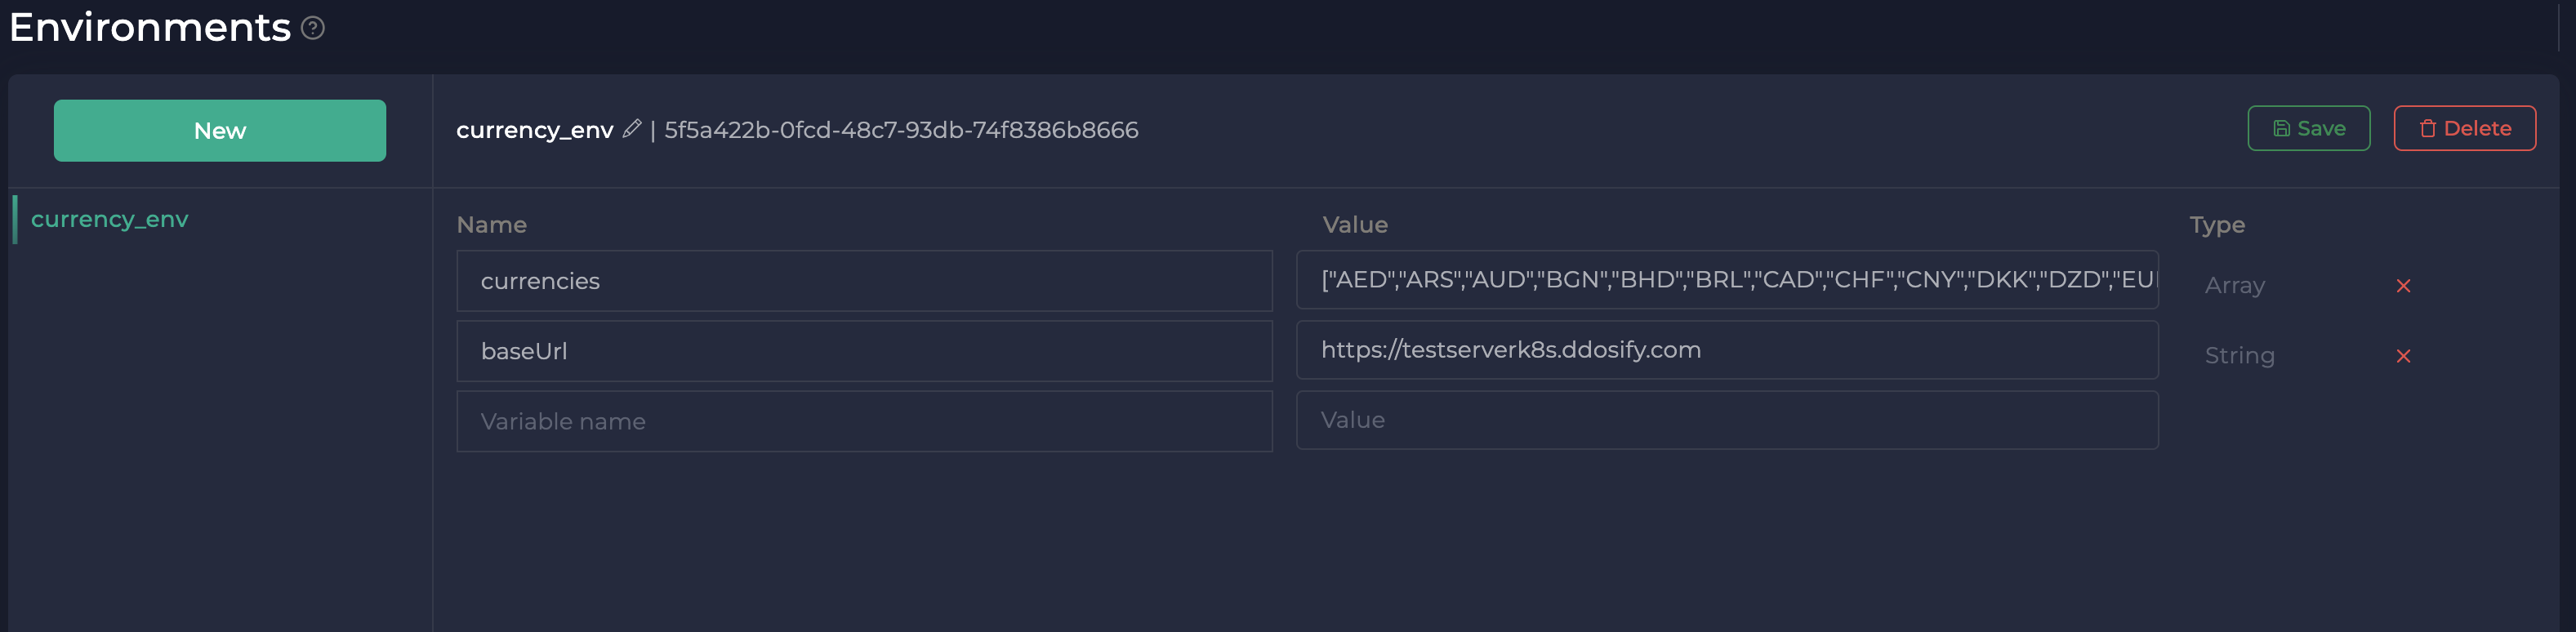
First of all, we have a list of currencies in our environment variables. If you wonder, we have fetched the supported currencies from the https://testserverk8s.ddosify.com/currencies/ endpoint. You can also send a request to same endpoint to get currencies. To create new environment in Ddosify Cloud, go to Environment page. You will create a new env name which is currency_env and add currencies and baseUrl as variable name and save the environment to use them in our request steps in next sections.
In next step, go to Load Test Suite page to configure the steps for load test.
On the top right of the page, we need to select the environment which is currency_env we have just created in the previous section. We use use those environment variables as dynamic variables while configuring our step url.
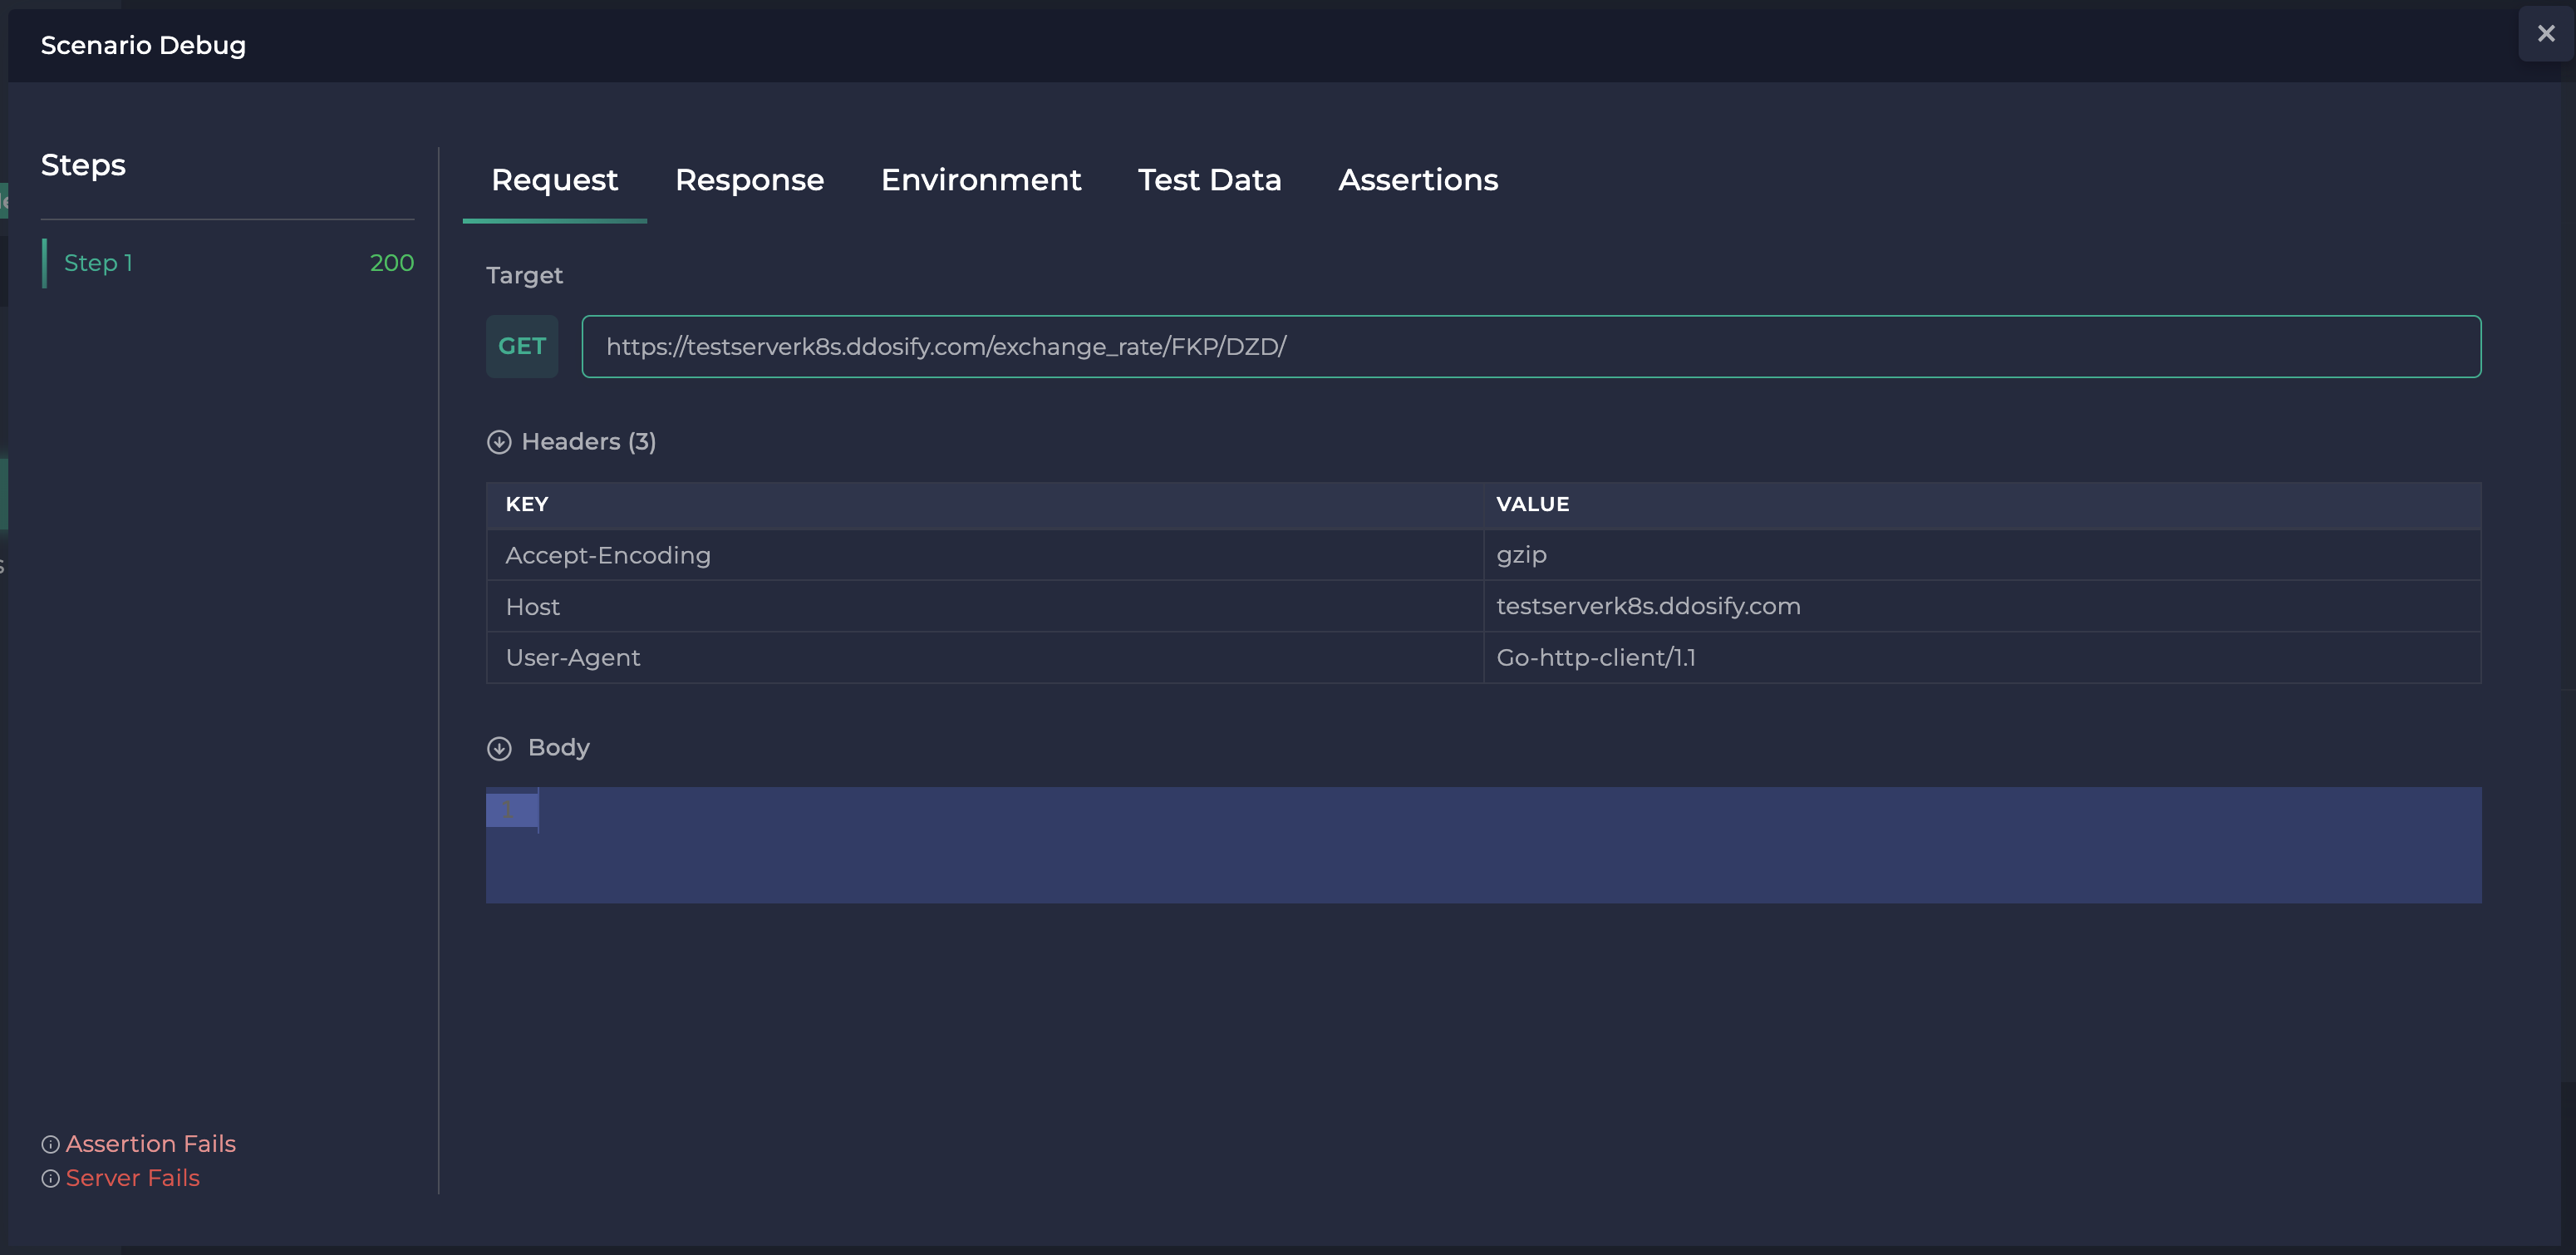
Before starting the test, we will use the Debug mode to inspect request headers, request body, response headers, and response body. Ddosify sends only 1 request in debug mode.
As you see, Debug mode send the request to our test server with rand selected currencies.
Also in the Response tab, we see all the headers and response body which we wanted result of currency convertion.
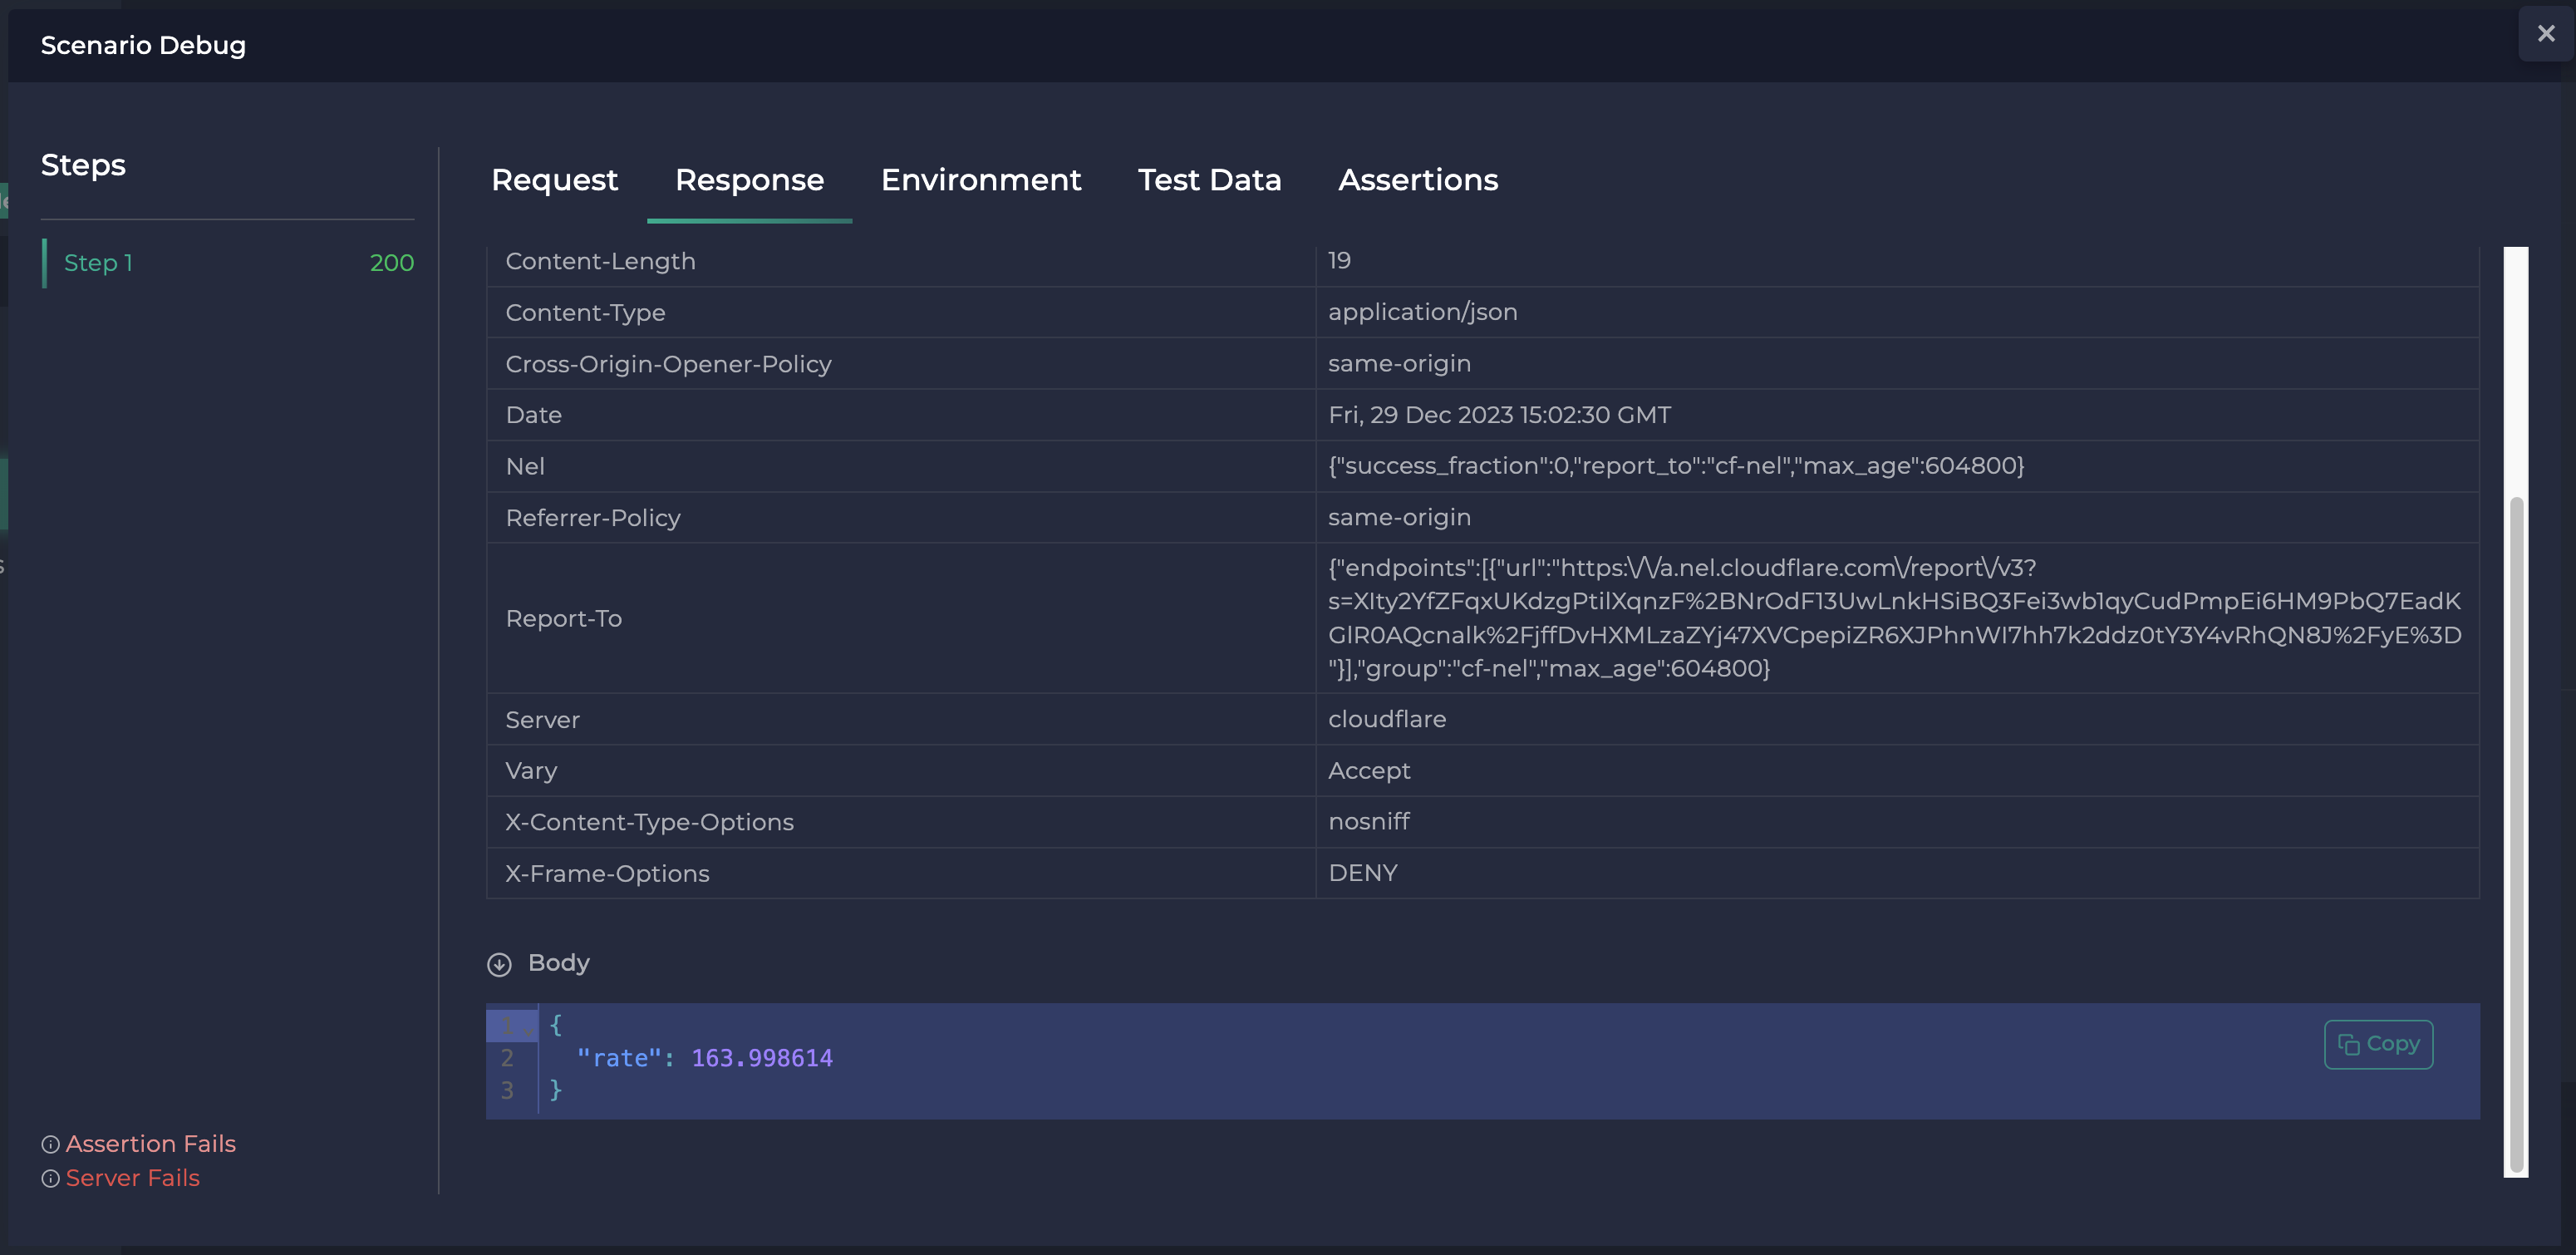
Looks like everything is as expected. We have successfully injected random currencies on the request URL and the response contains the exchange rate 163.998614 along with the 200 HTTP OK status code. We can close the debug modal and continue with the real test scenario.
We will also add /currencies/ endpoint of same baseURL to test our test server with two endpoints in order to make our server fail with more requests from two endpoints.
The next step, configure the load with two different ways to configure the load, Predefined Load and Custom Load. For more information follow the docs.
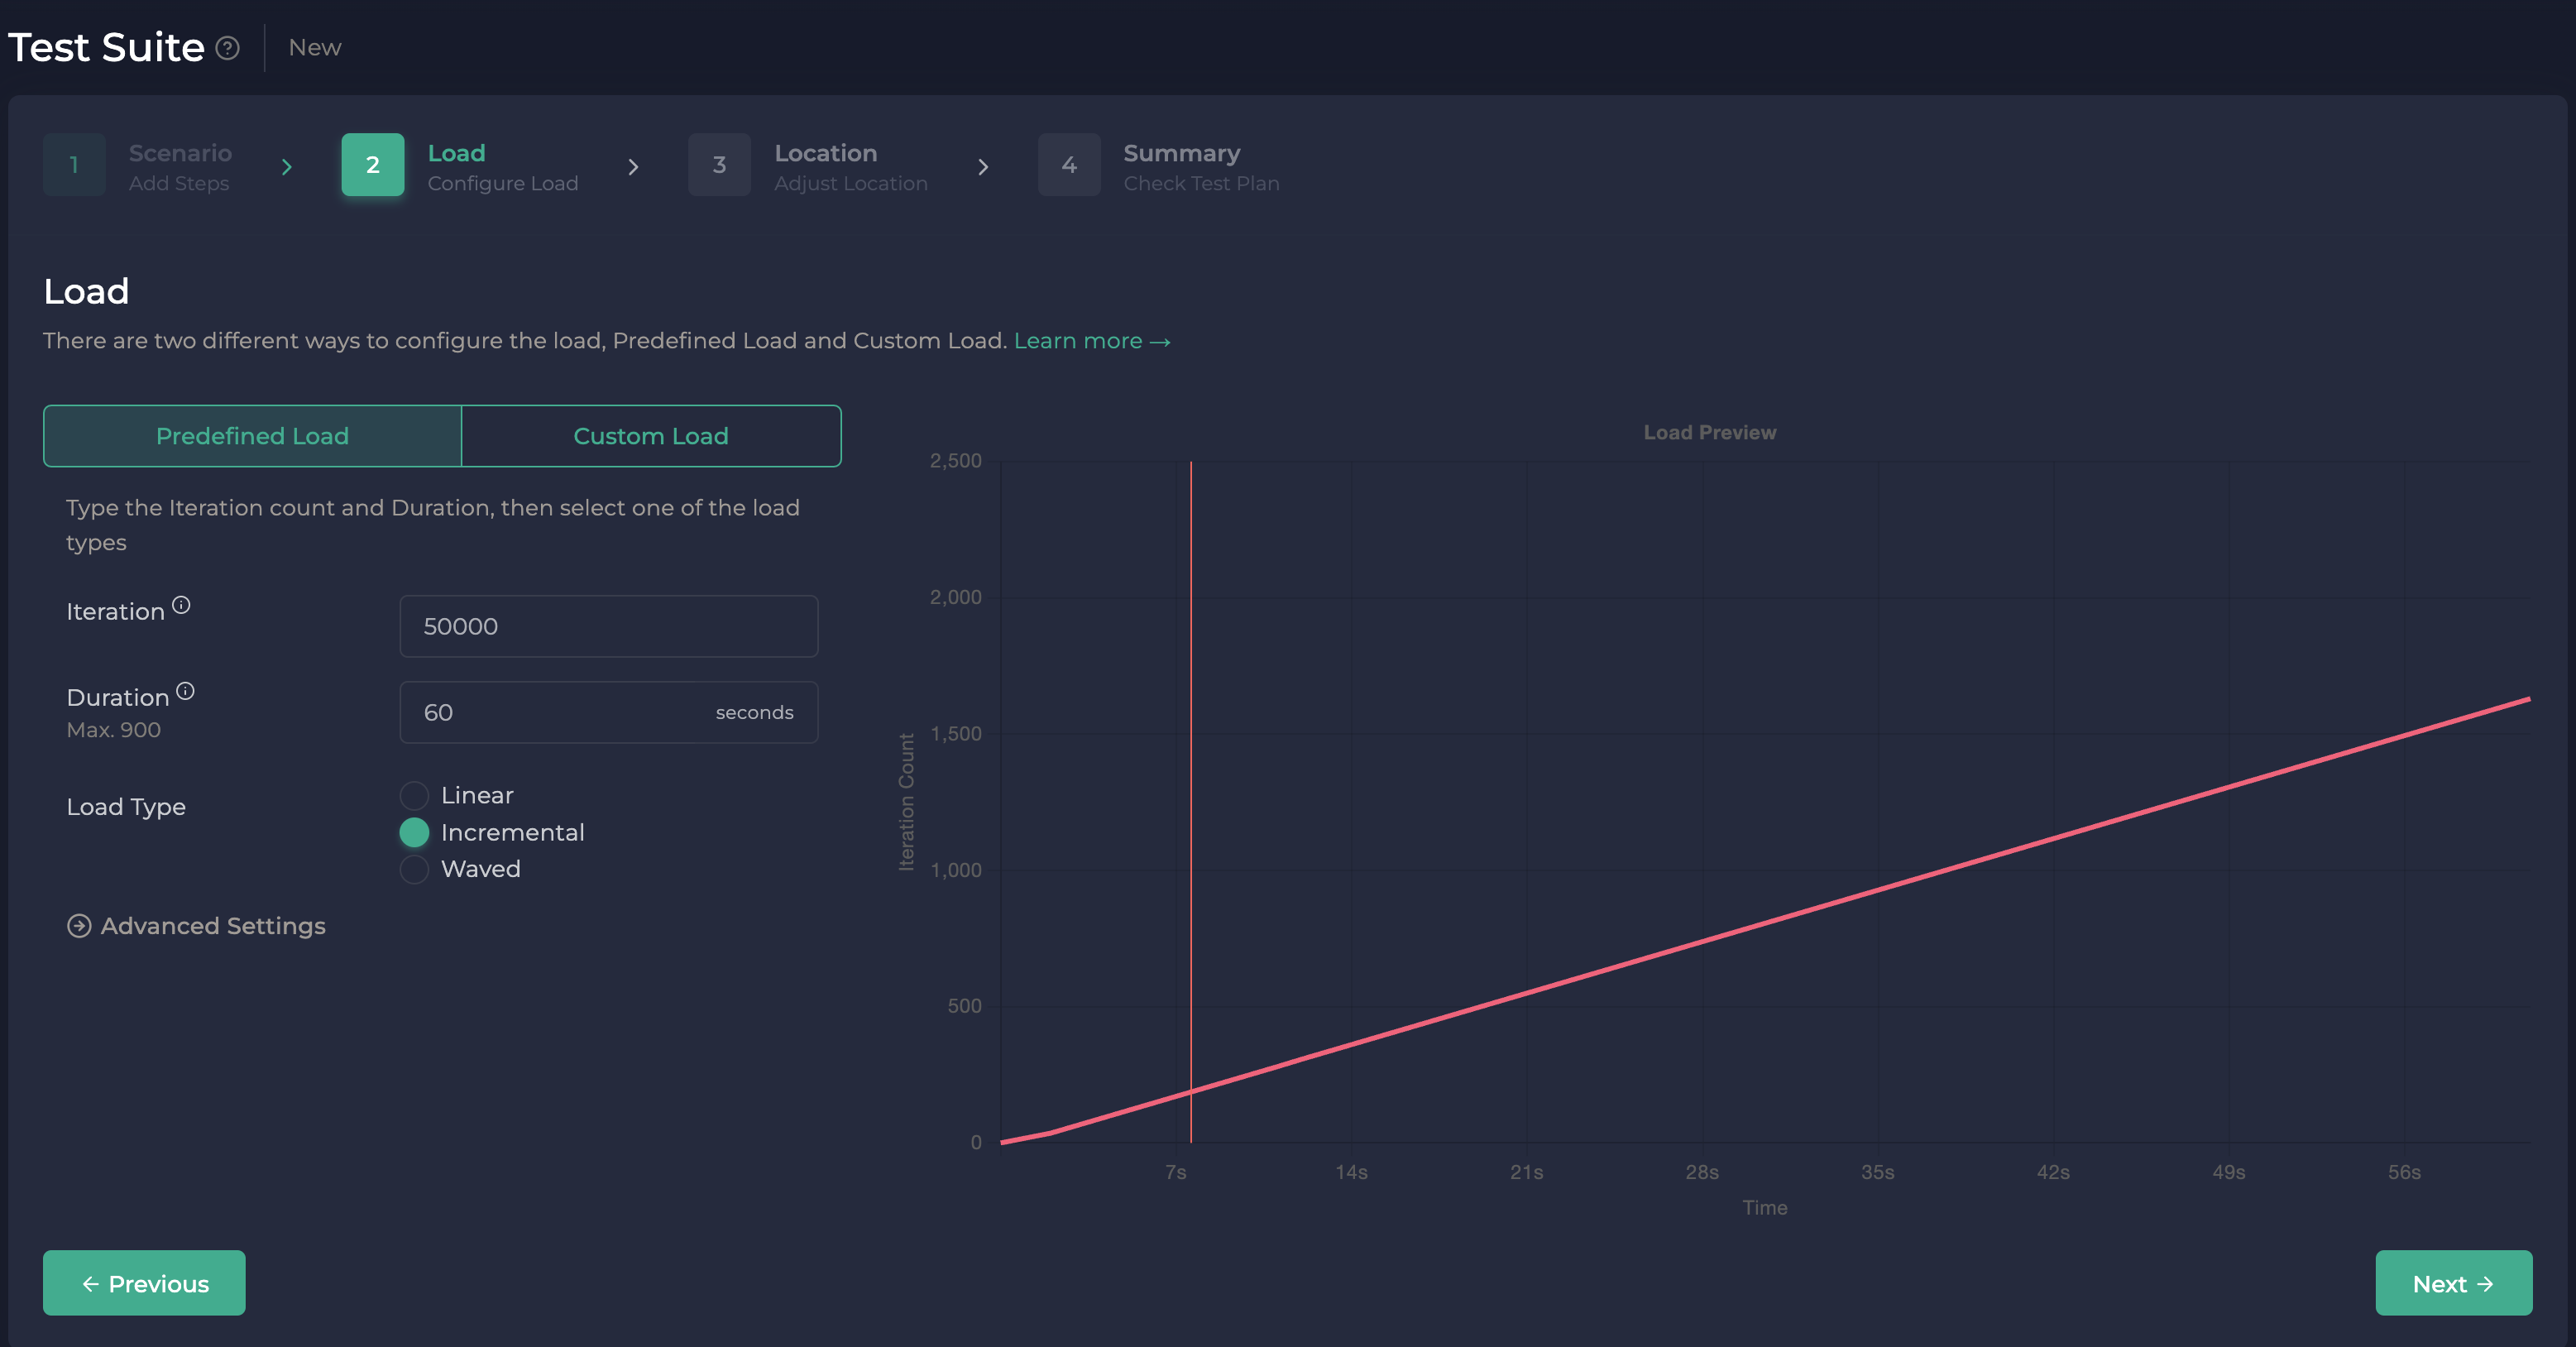
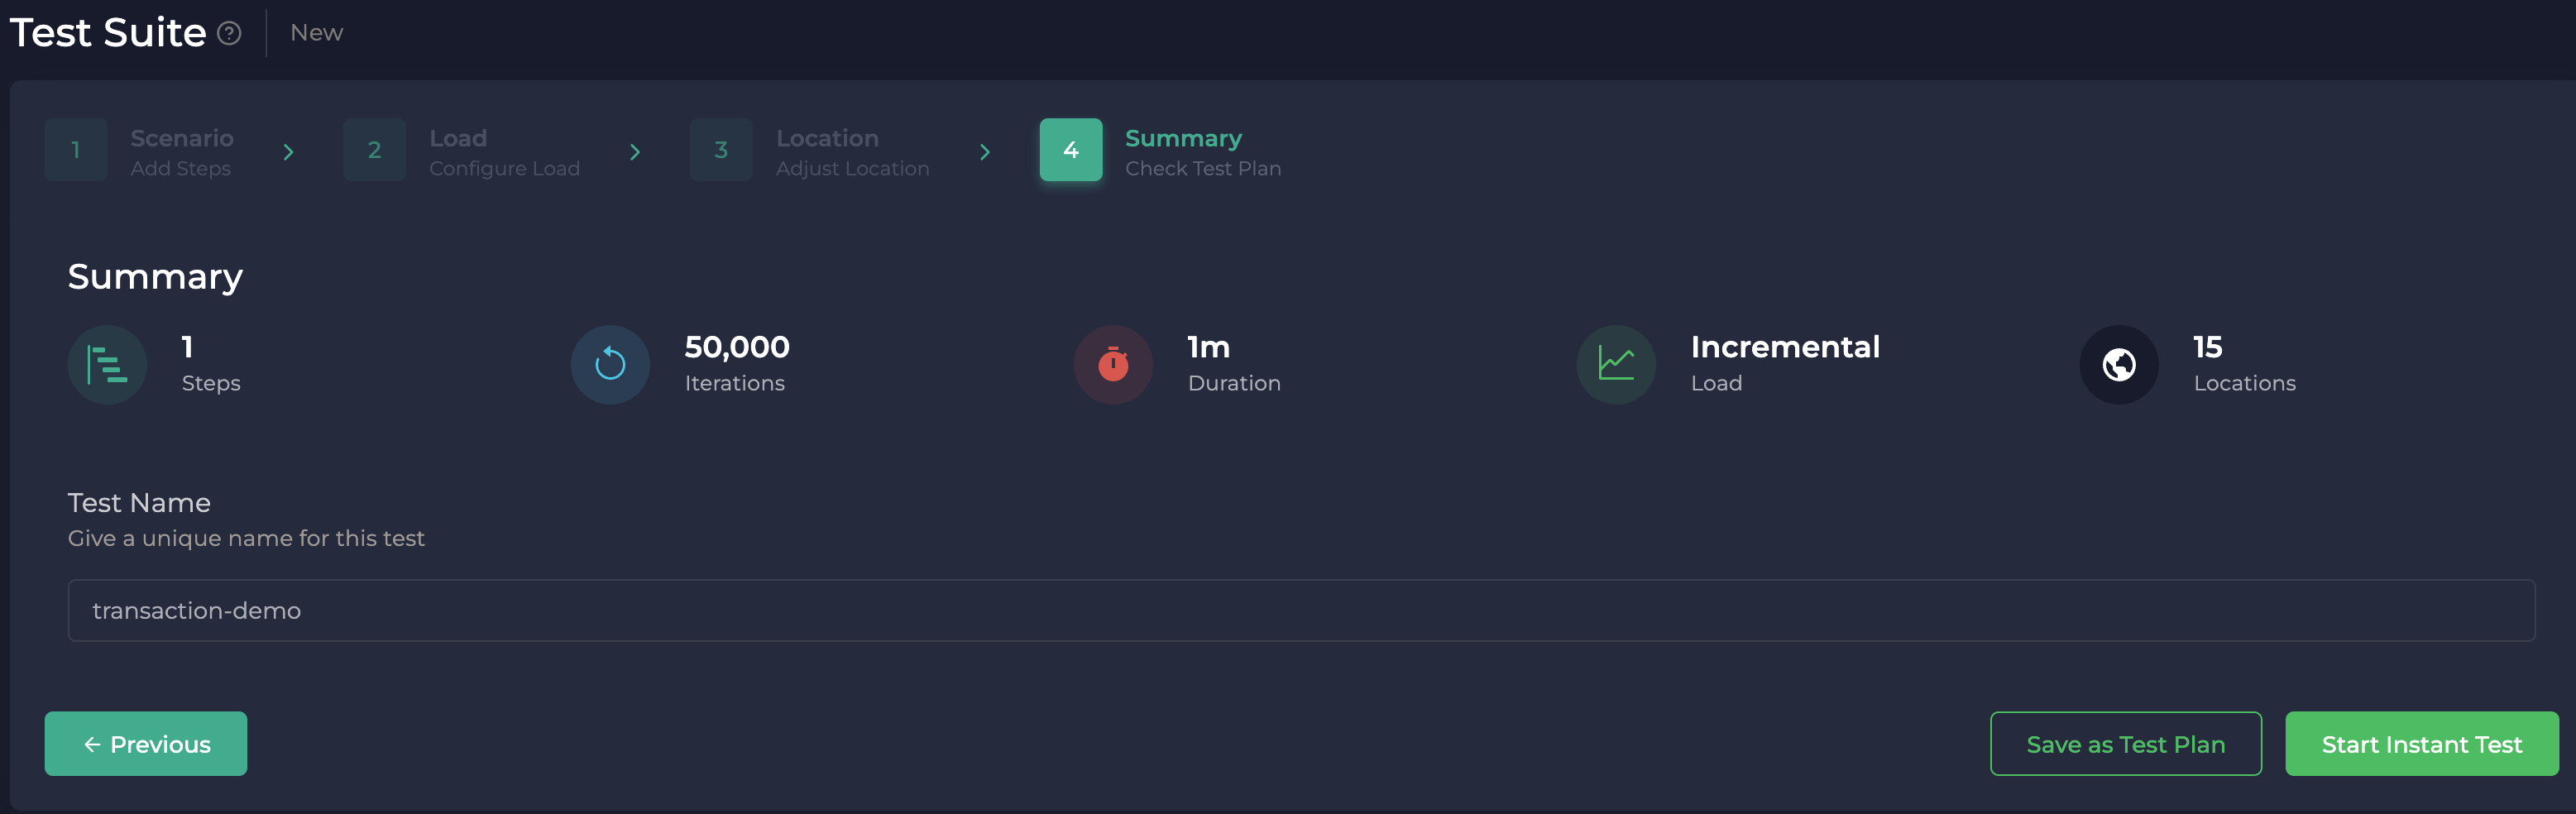
We have selected Iteration as 50000 , Duration as 60 seconds and Load Type as incremental.
That means the iteration count increases every second, so our API receives more and more requests per following second.
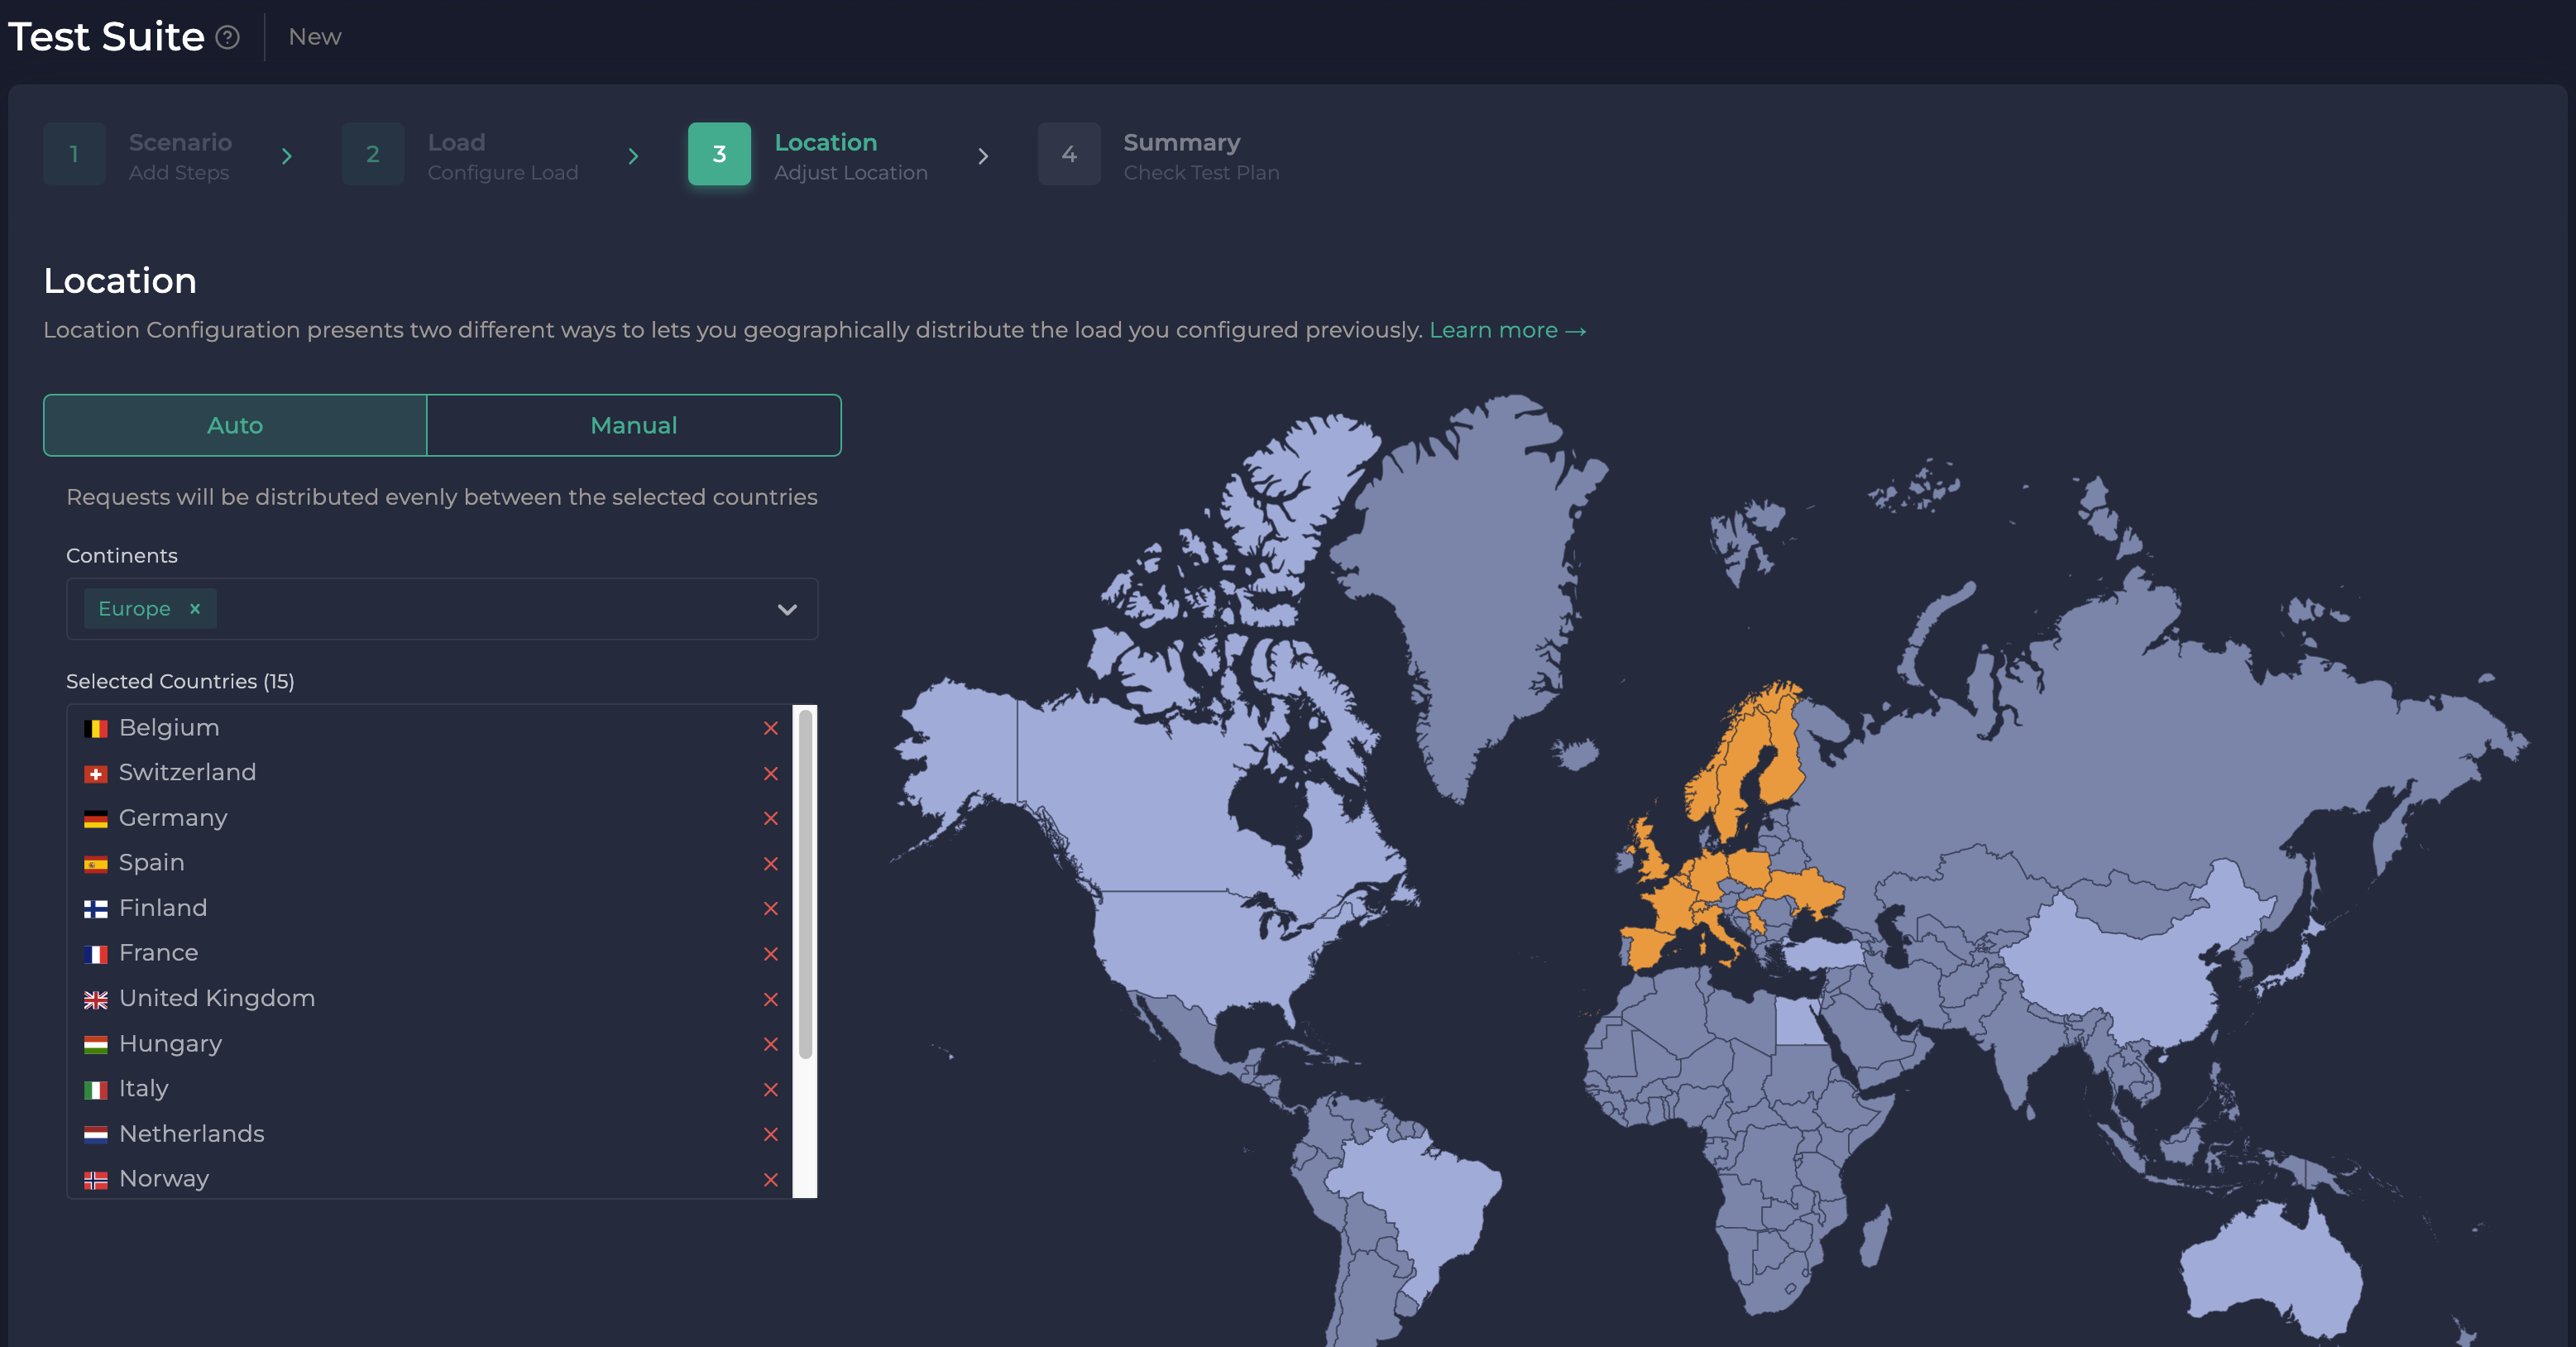
The next step, adjust location with two different ways. One is Auto selection and the other one Manual selection. We have selected Auto option as default and we have selected Europa as Continent. When we select Europa all selected countries are listed below you can also adjust your countries according to your purpose.
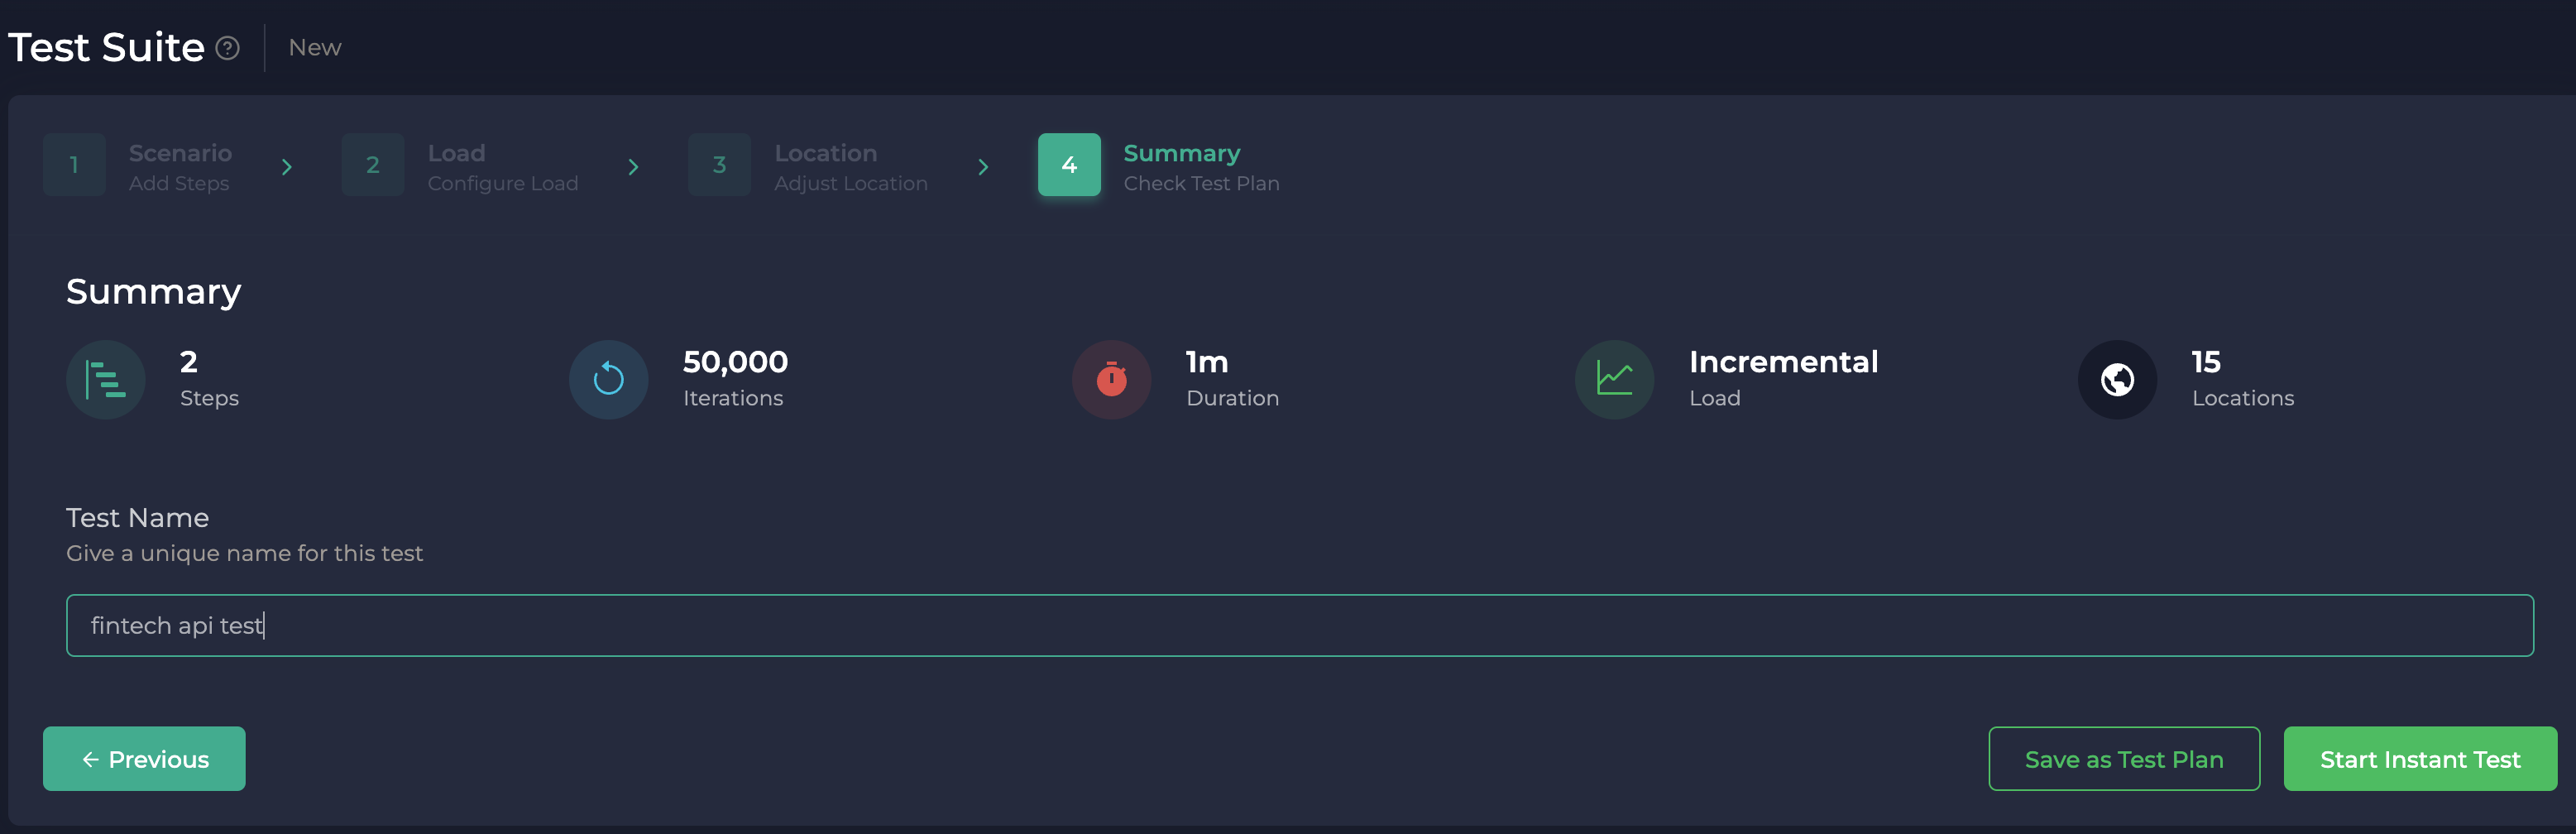
The last step is Check Test Plan. You will see the summary of the steps and you can give a unique name for this test or save it as a Test Plan to reach that configuration from the navigation link called as Test Plan on the left side of the webpage. Click Start Instant Test and you will redirected to Live Test Report page.
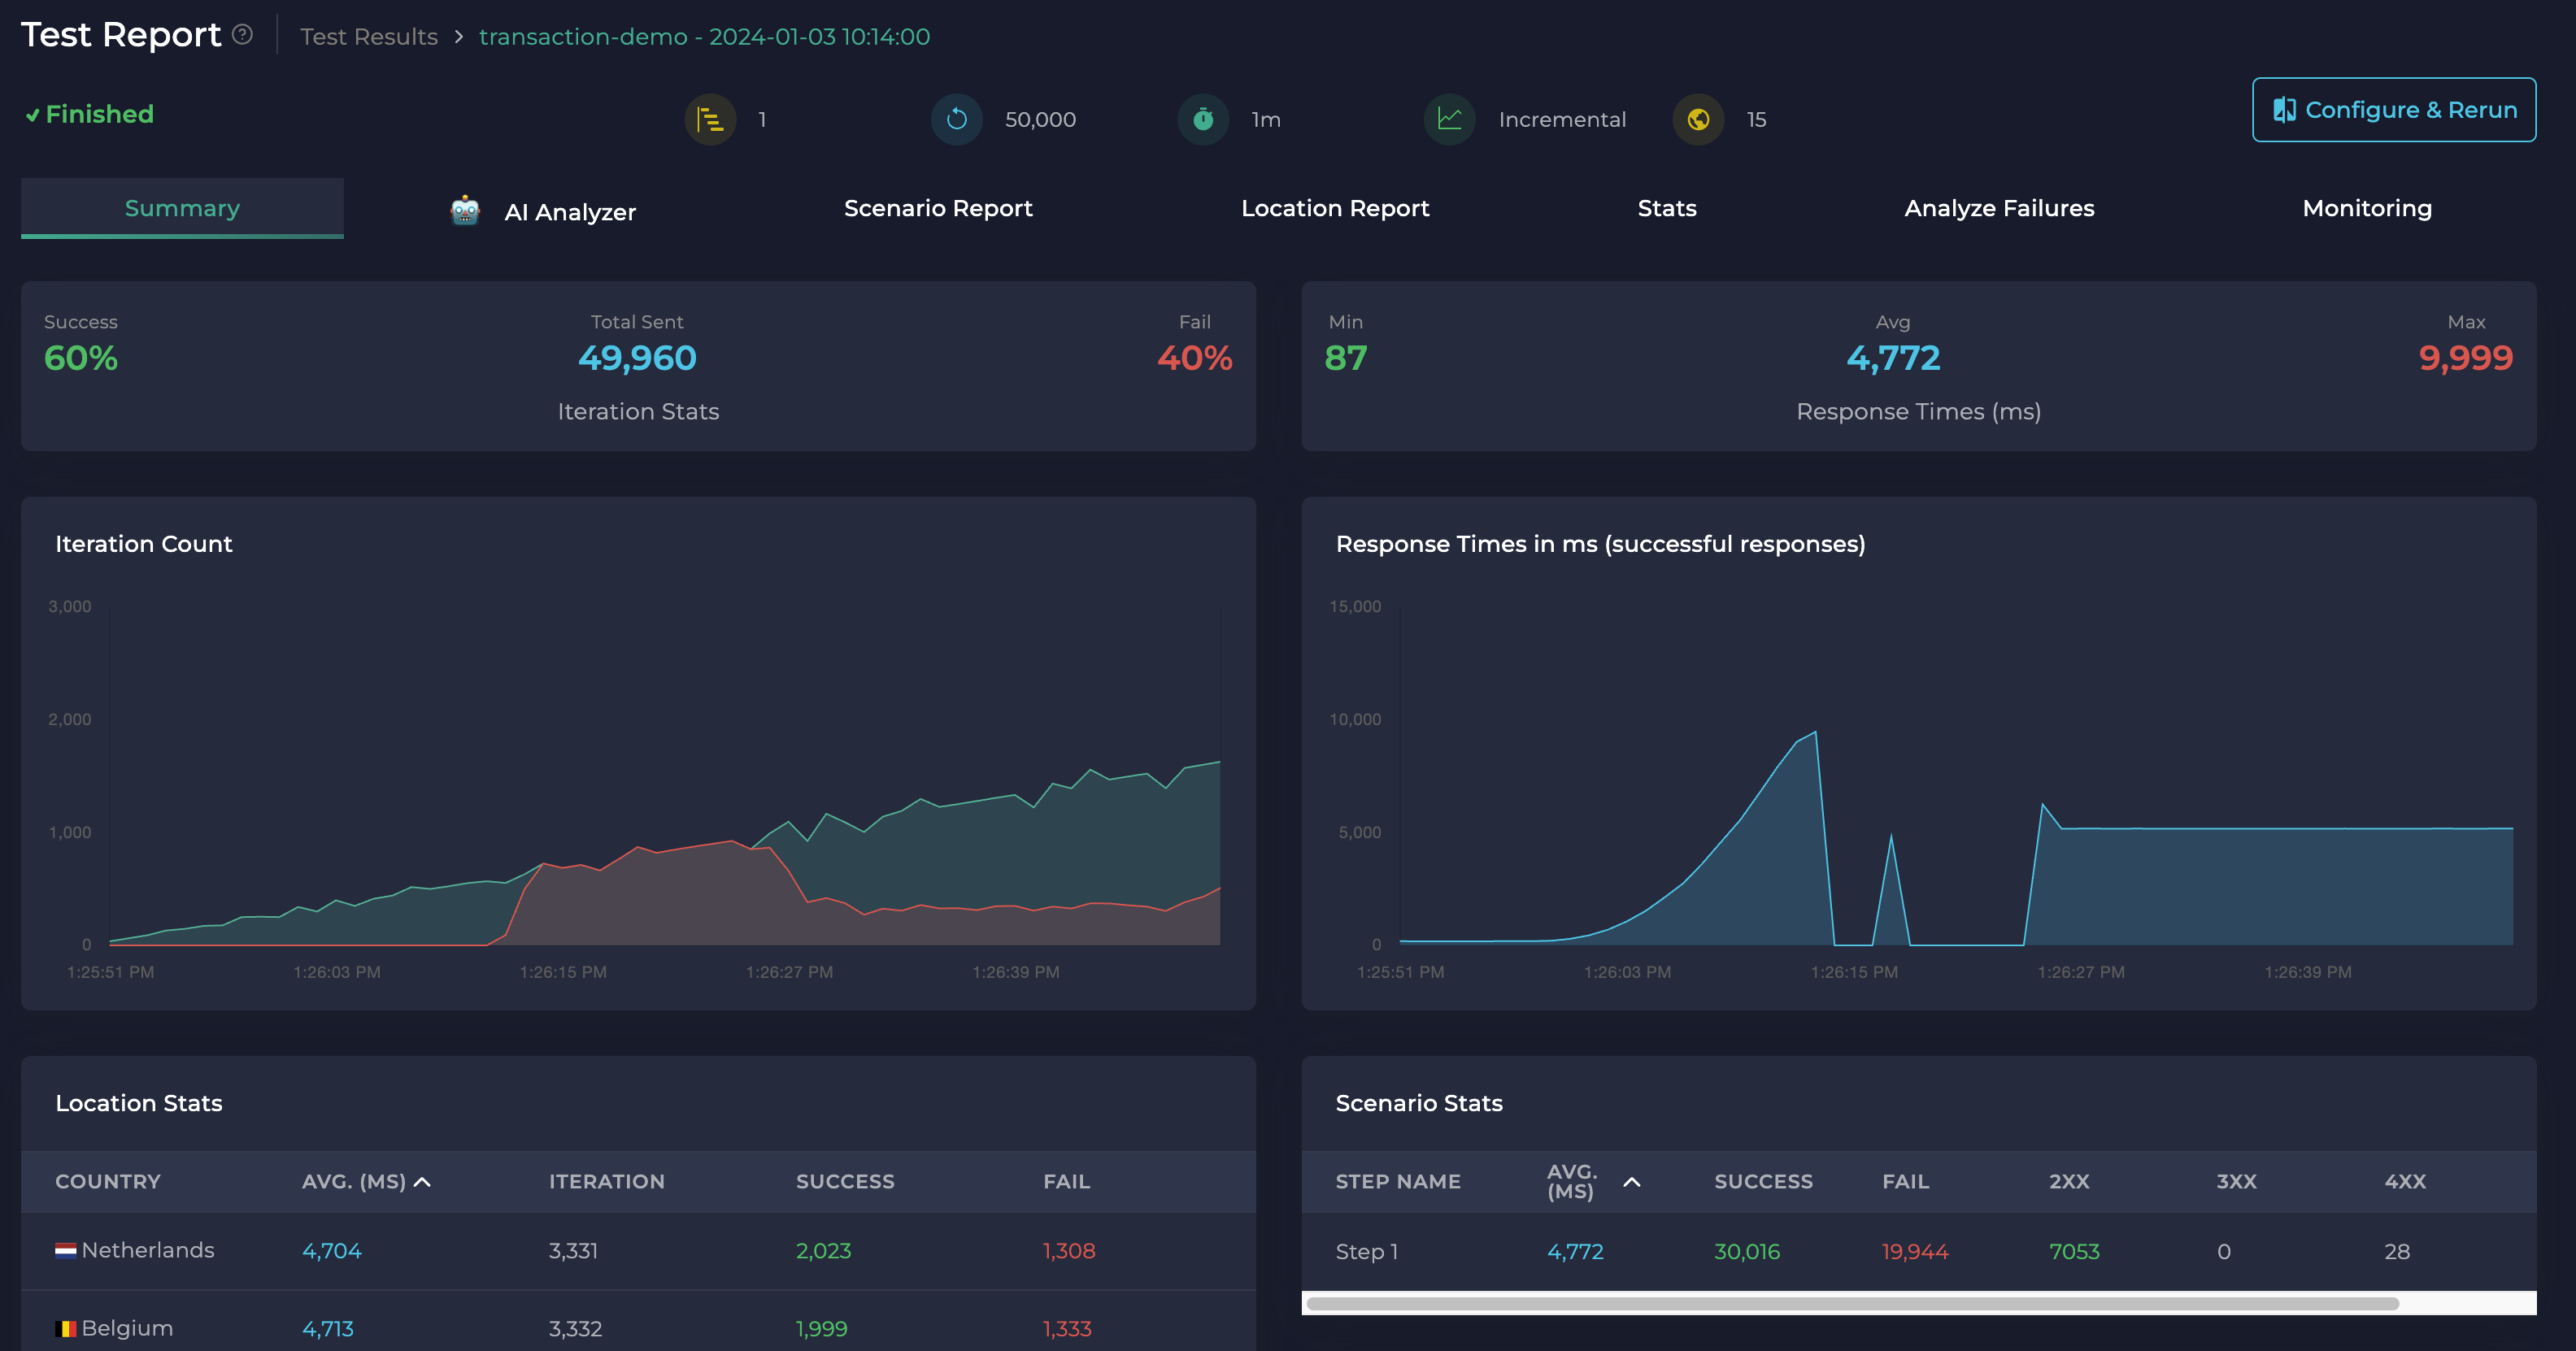
When the test is started, you will see Live Report and Monitoring tabs on the page. In the Live Report tab Total Sent Iterations statistics, Response Time, Location Stats, Scenario Stats, Failures stats show real time results of your test.
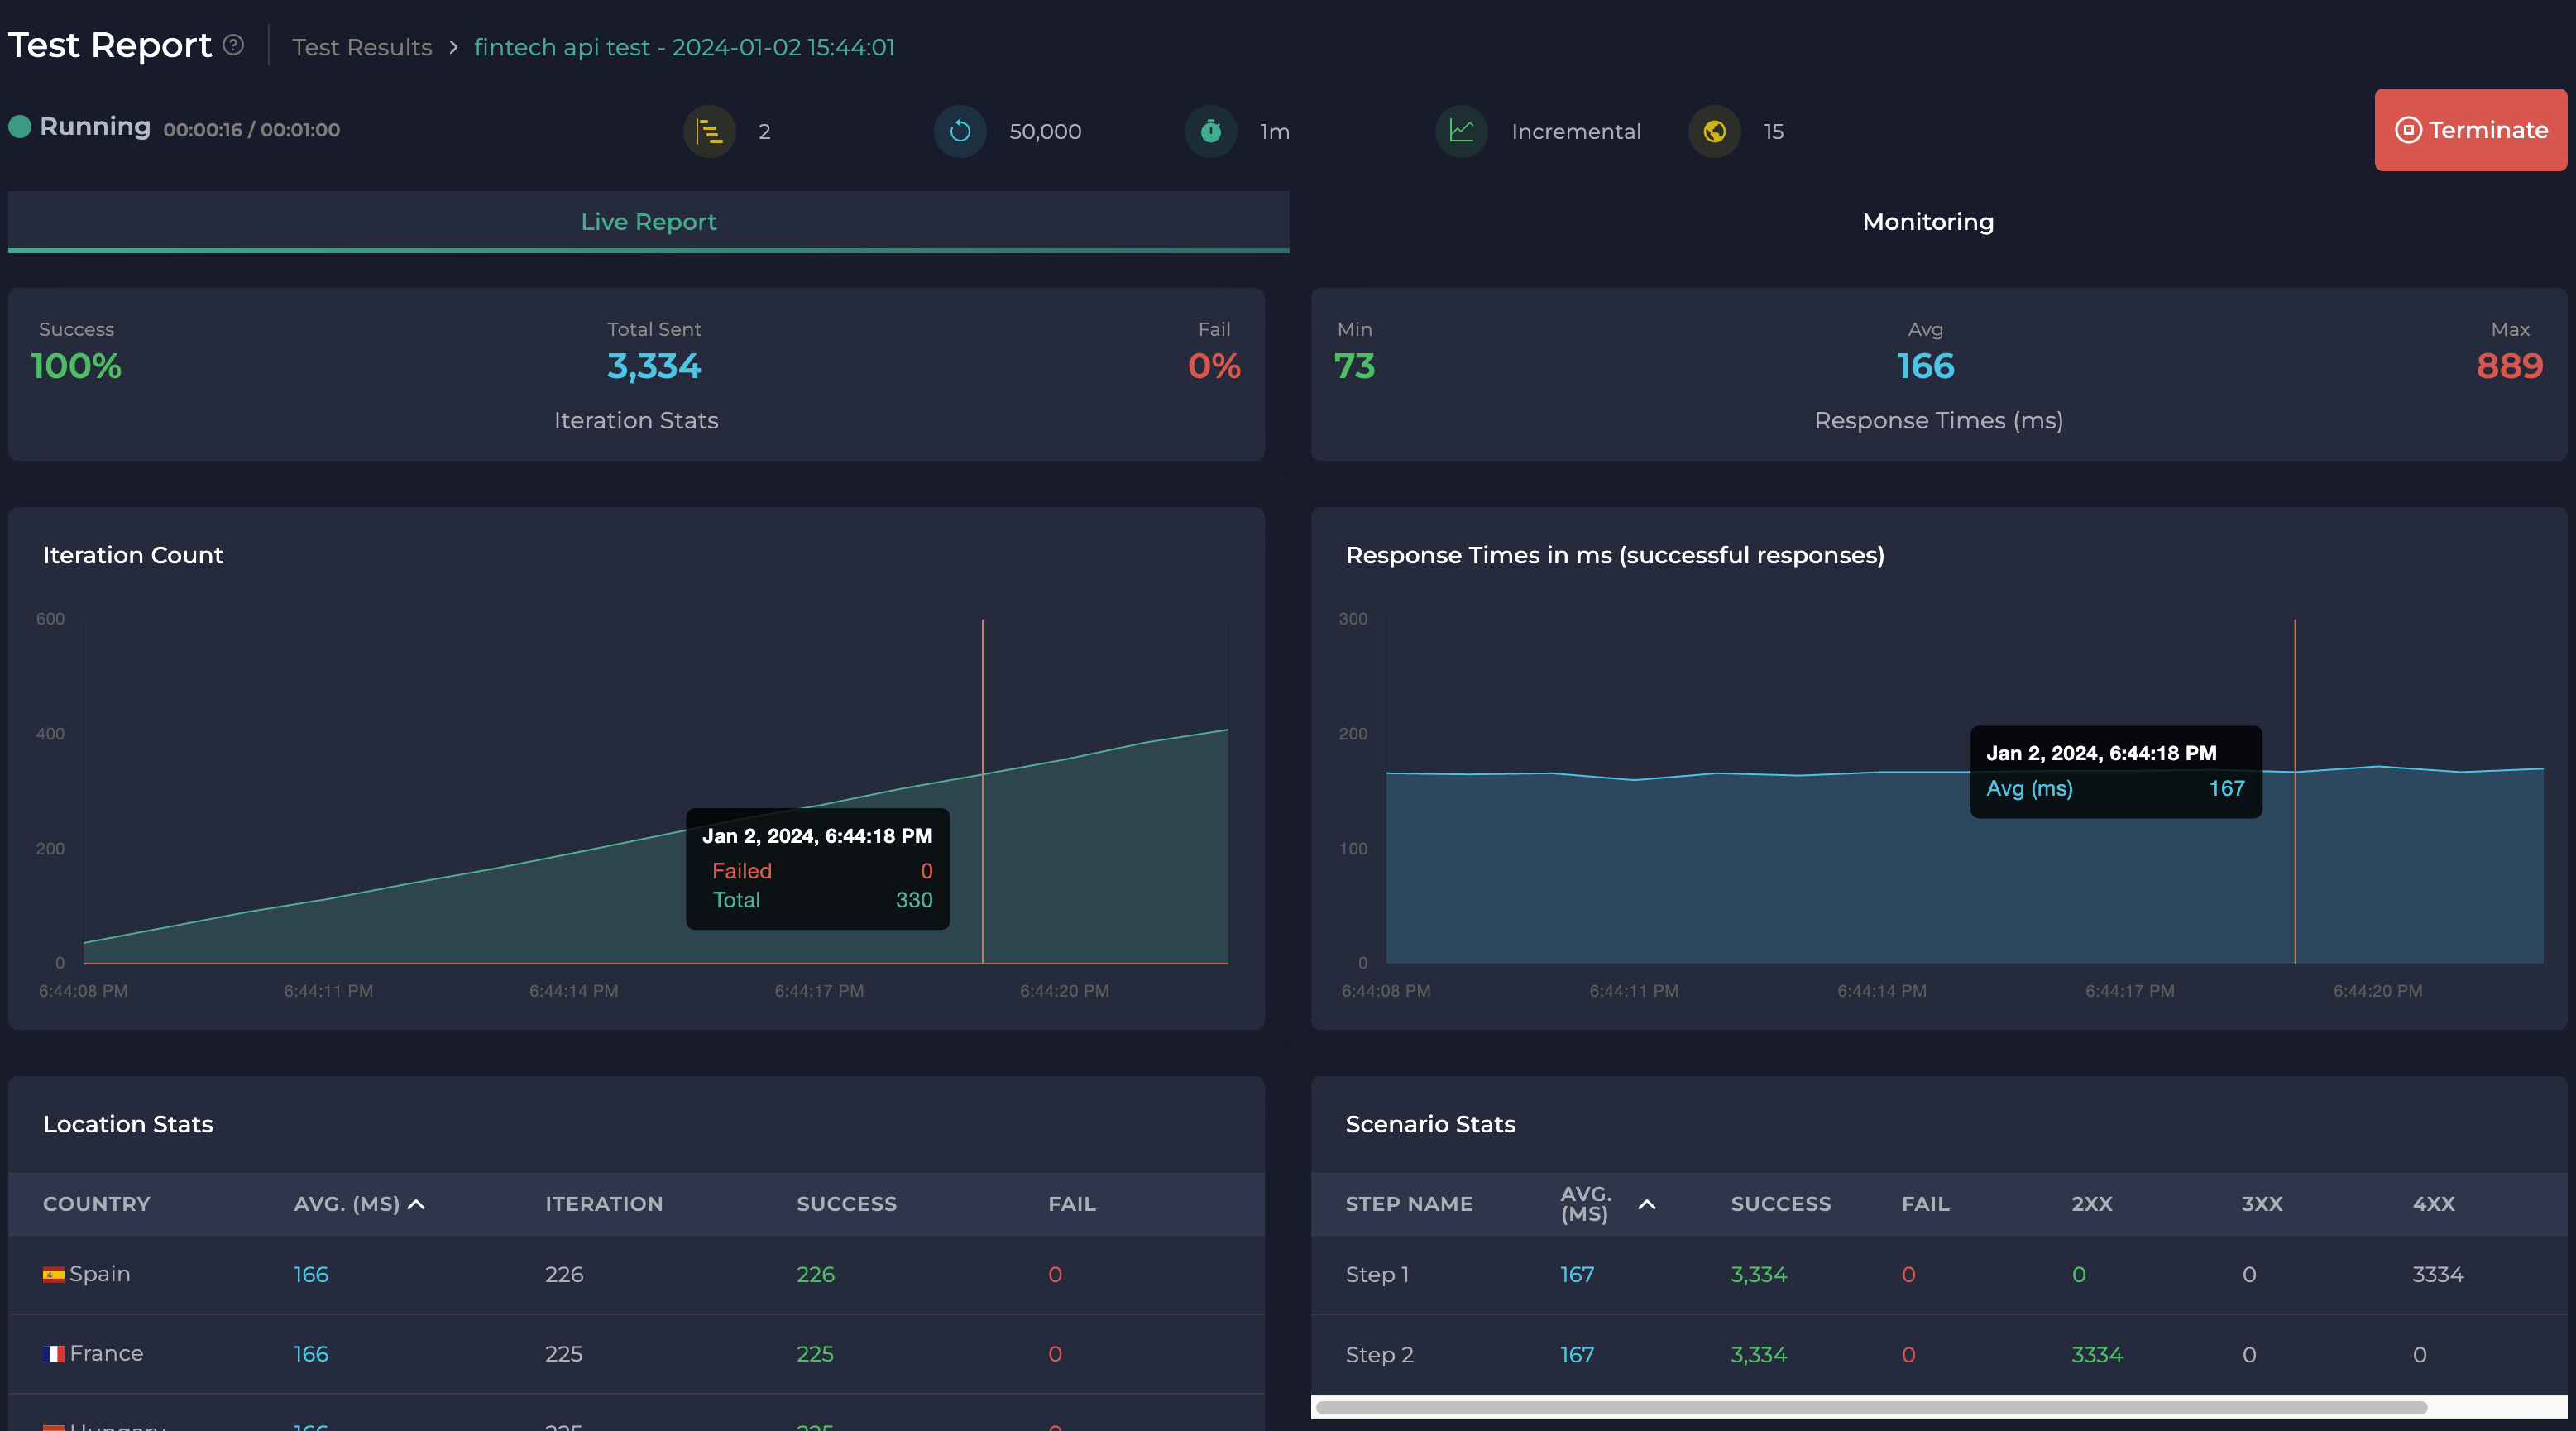
When the test is finished, all the stats are updated according to real test scenario results. Therefore you can see success and fail results in the Iteration results table. As you see all the requests in each iteration were not completed and 21% of iterations are failed because server does not handle 50000 requests in 60 seconds for two steps.

Importing CSV data to replay network traffic
In our test API there is a POST /exchange endpoint that expects the amount, base currency, and target currency as request payload and it exchanges the given amount from the base currency to the target currency. Let's assume that our imaginary customers have used this endpoint many times and our servers started to slow down. The development team did some performance improvements and we would like to replay the last 1000 transactions to test the performance of the new system. This is a great example to demonstrate how to supply test data to Ddosify Engine.
We exported the last 1K transactions from the database and save them to a CSV file called test_data.csv.
e746d910-bece-4c37-8e6b-325f89acc4d2,969.2,DZD,KWD
531dae65-2cf4-4194-867e-71c0ea7b6381,485.04,ARS,KZT
c0ec5795-2c37-4c08-a384-82f3444d445e,750.09,FKP,JEP
ba53bbdc-715d-4b72-99a2-867d4167861d,374.03,RUB,JPY
a087955c-3dbc-4164-b5a1-9def635107c7,971.02,SGD,SEK
<.. truncated ..>
The CSV file consists of 4 columns. These are api_key for authenticating the user for the transaction, amount, base currency, and target currency.
Lets import this test_data.csv file to our application as Test Data.
Go to Load Test -> Test Data and click the Upload CSV on the right side of the page.
Select the test_data.csv you have downloaded from the our repository link.
Select the
Nooption for Does this CSV include a header?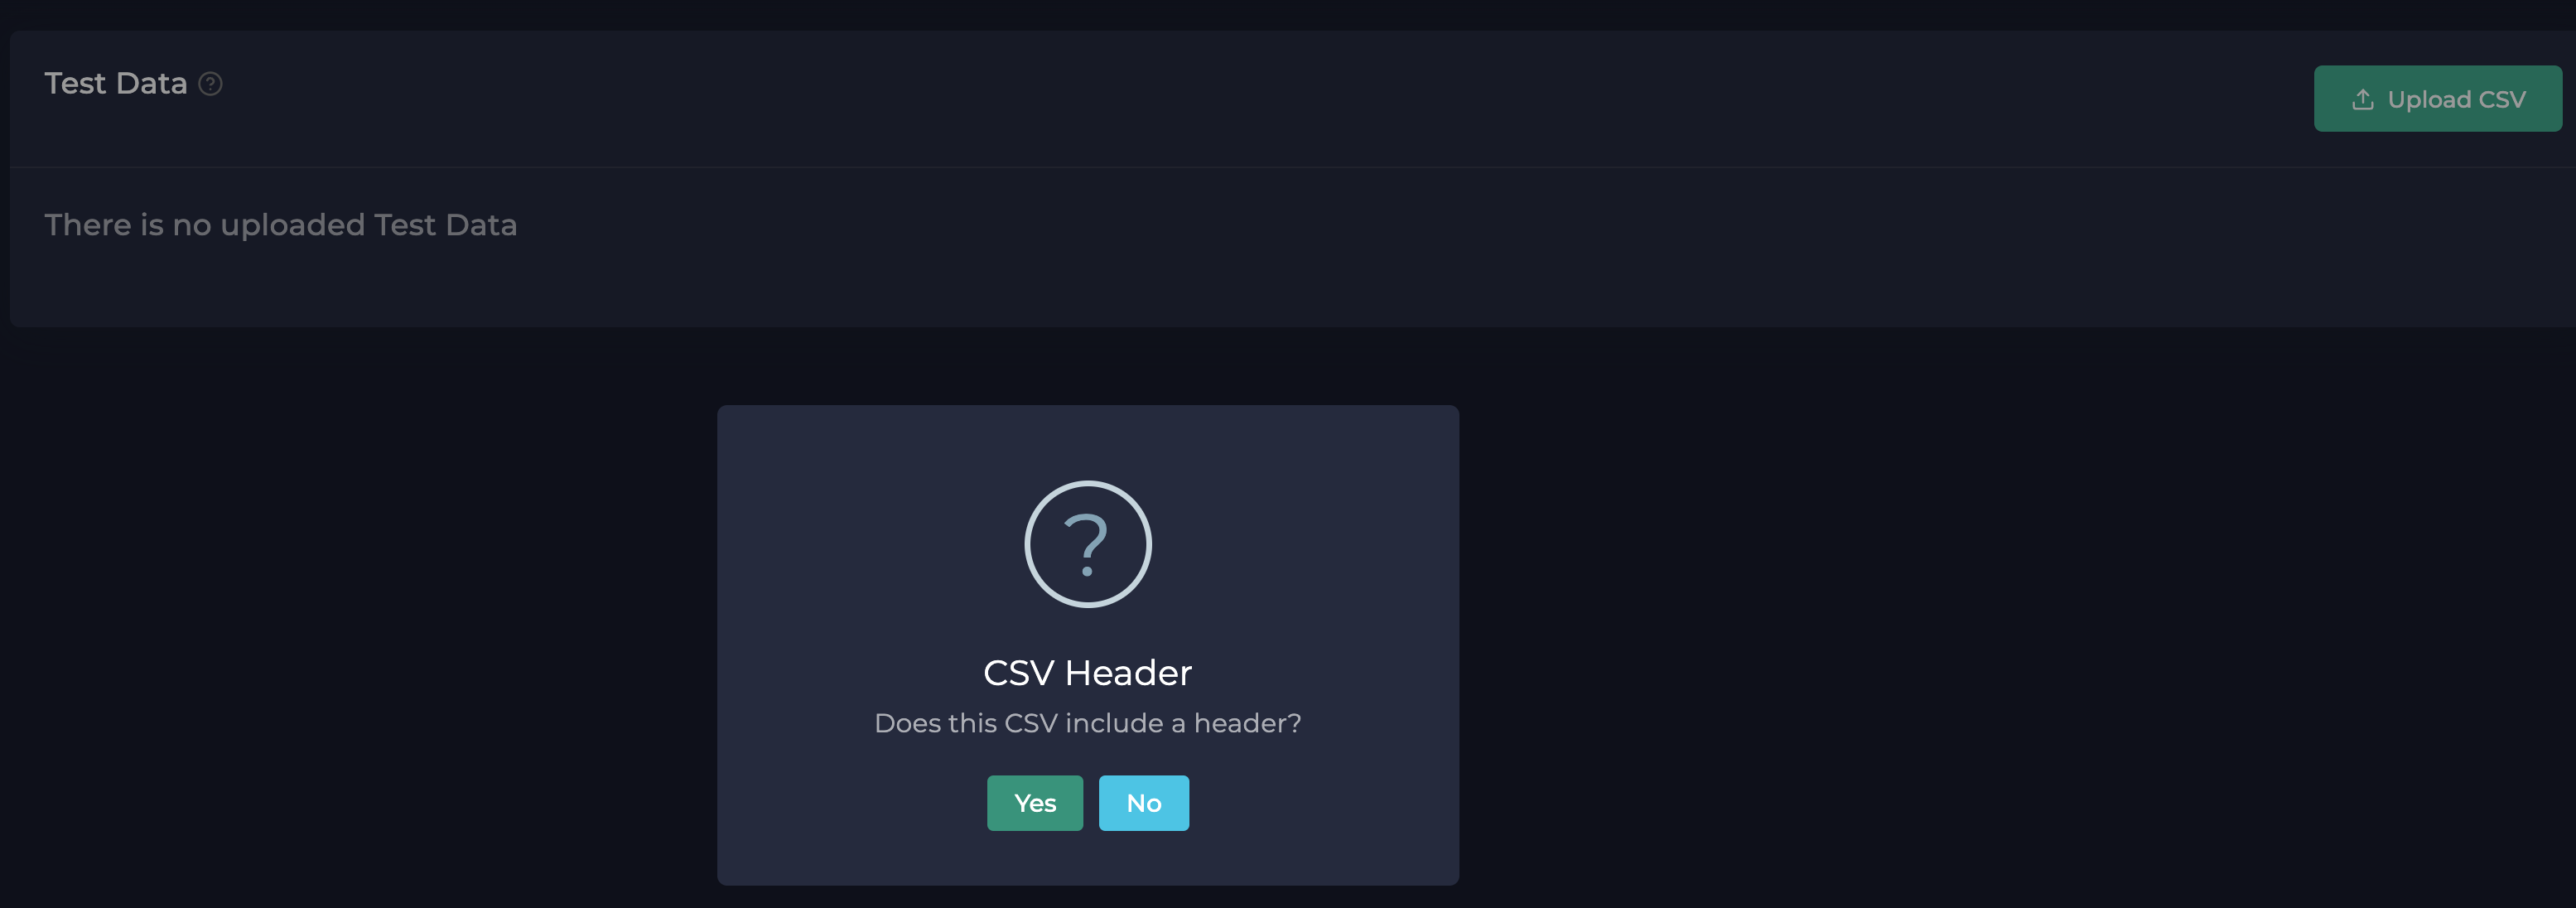
Write all headers as you see in the image below.
Write file name as test_data_csv.
We named the first column in the CSV as
api_keythen we use it in theheaderssection of the Step, likeX-API-KEY": "{{data.test_data_csv.api_key}}. Note that we also assigned the type of the second column as float since we want that Ddosify should treat amount values as a float instead of a string.delimiteris the delimiter character of the CSV. While the default value of it is "," we type it to show you can use a custom delimiter.allow_quotaenables the situation if a quote may appear in an unquoted field and a non-doubled quote may appear in a quoted field. Default is false. We put it to show this option. In our case, we don't expect quoted data in our CSV.We set the the
orderassequentialsince we want to fetch the lines in the same order that is located in the CSV. The default israndom, in that case, Ddosify fetches lines randomly from the CSV.We set
skip_first_lineasfalsebecause thetest_data.csvhas no headers in the first line.Although we don't have any empty lines on our CSV file, we configured
skip_empty_lineto show that there is an option like this.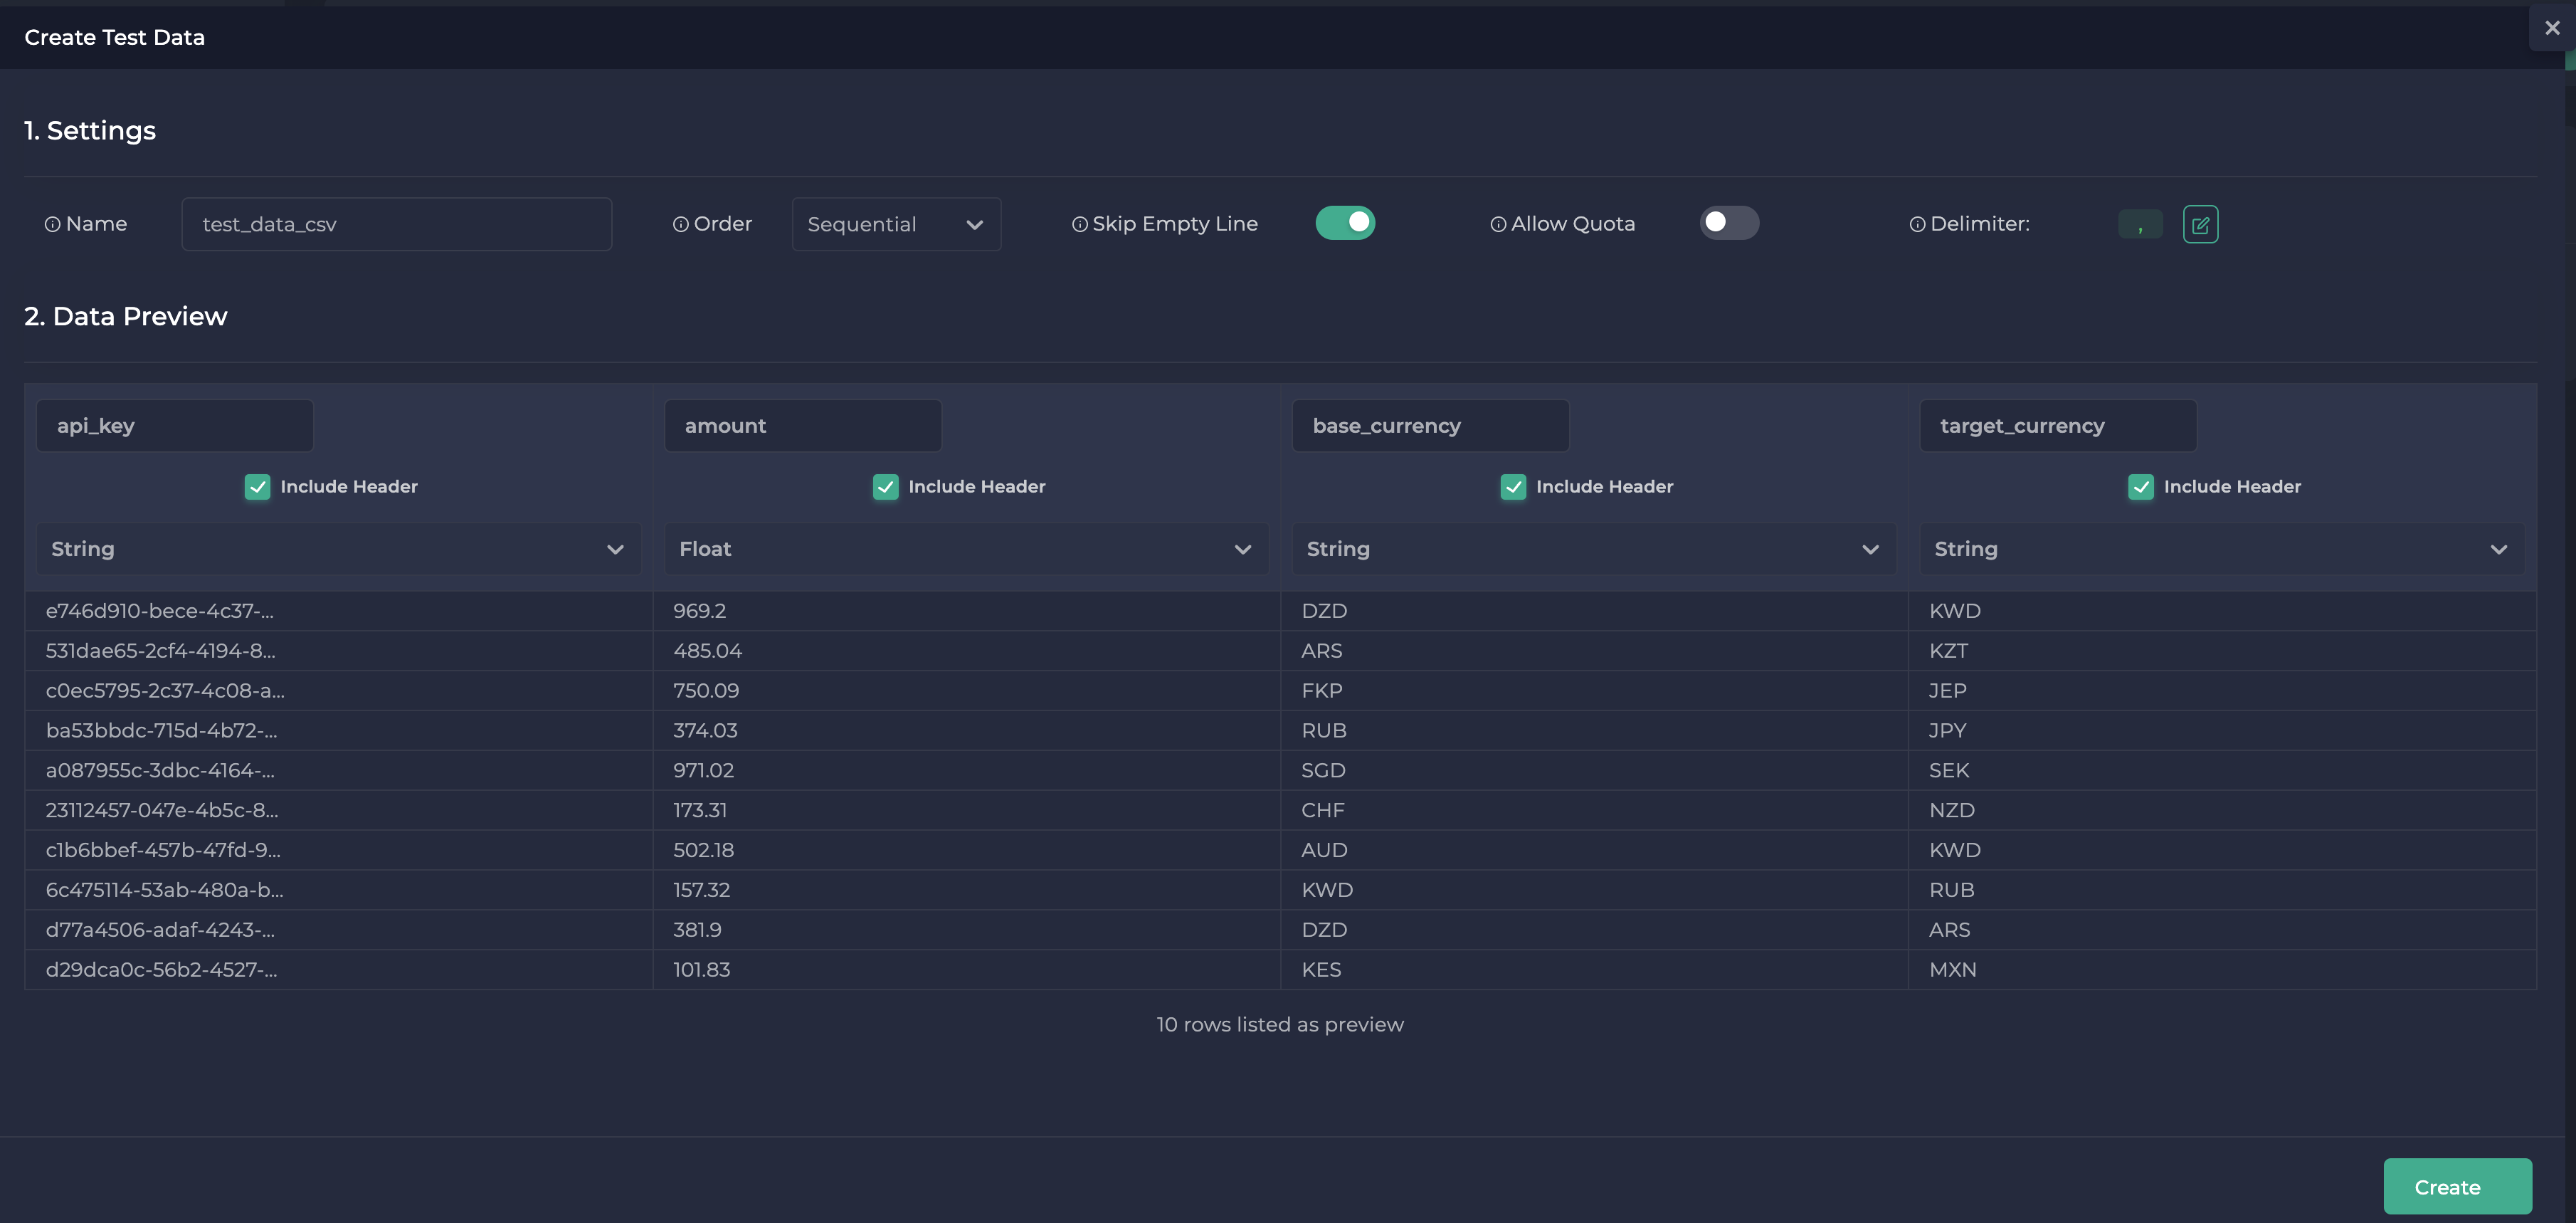
Click Create button when you are sure that all settings are same as above.
You wil see the details of uploaded test_data_csv file in the table as below.

Configure the load Test
As we did our previous test, we will configure the load test scenario with same test server url and /exchange/ endpoint. We will select the test data we have just uploaded which is test_data_csv and will will select the environment as currency_env to use baseURL from the environment as dynamic variable. In this page select the method of Step 1 as POST.
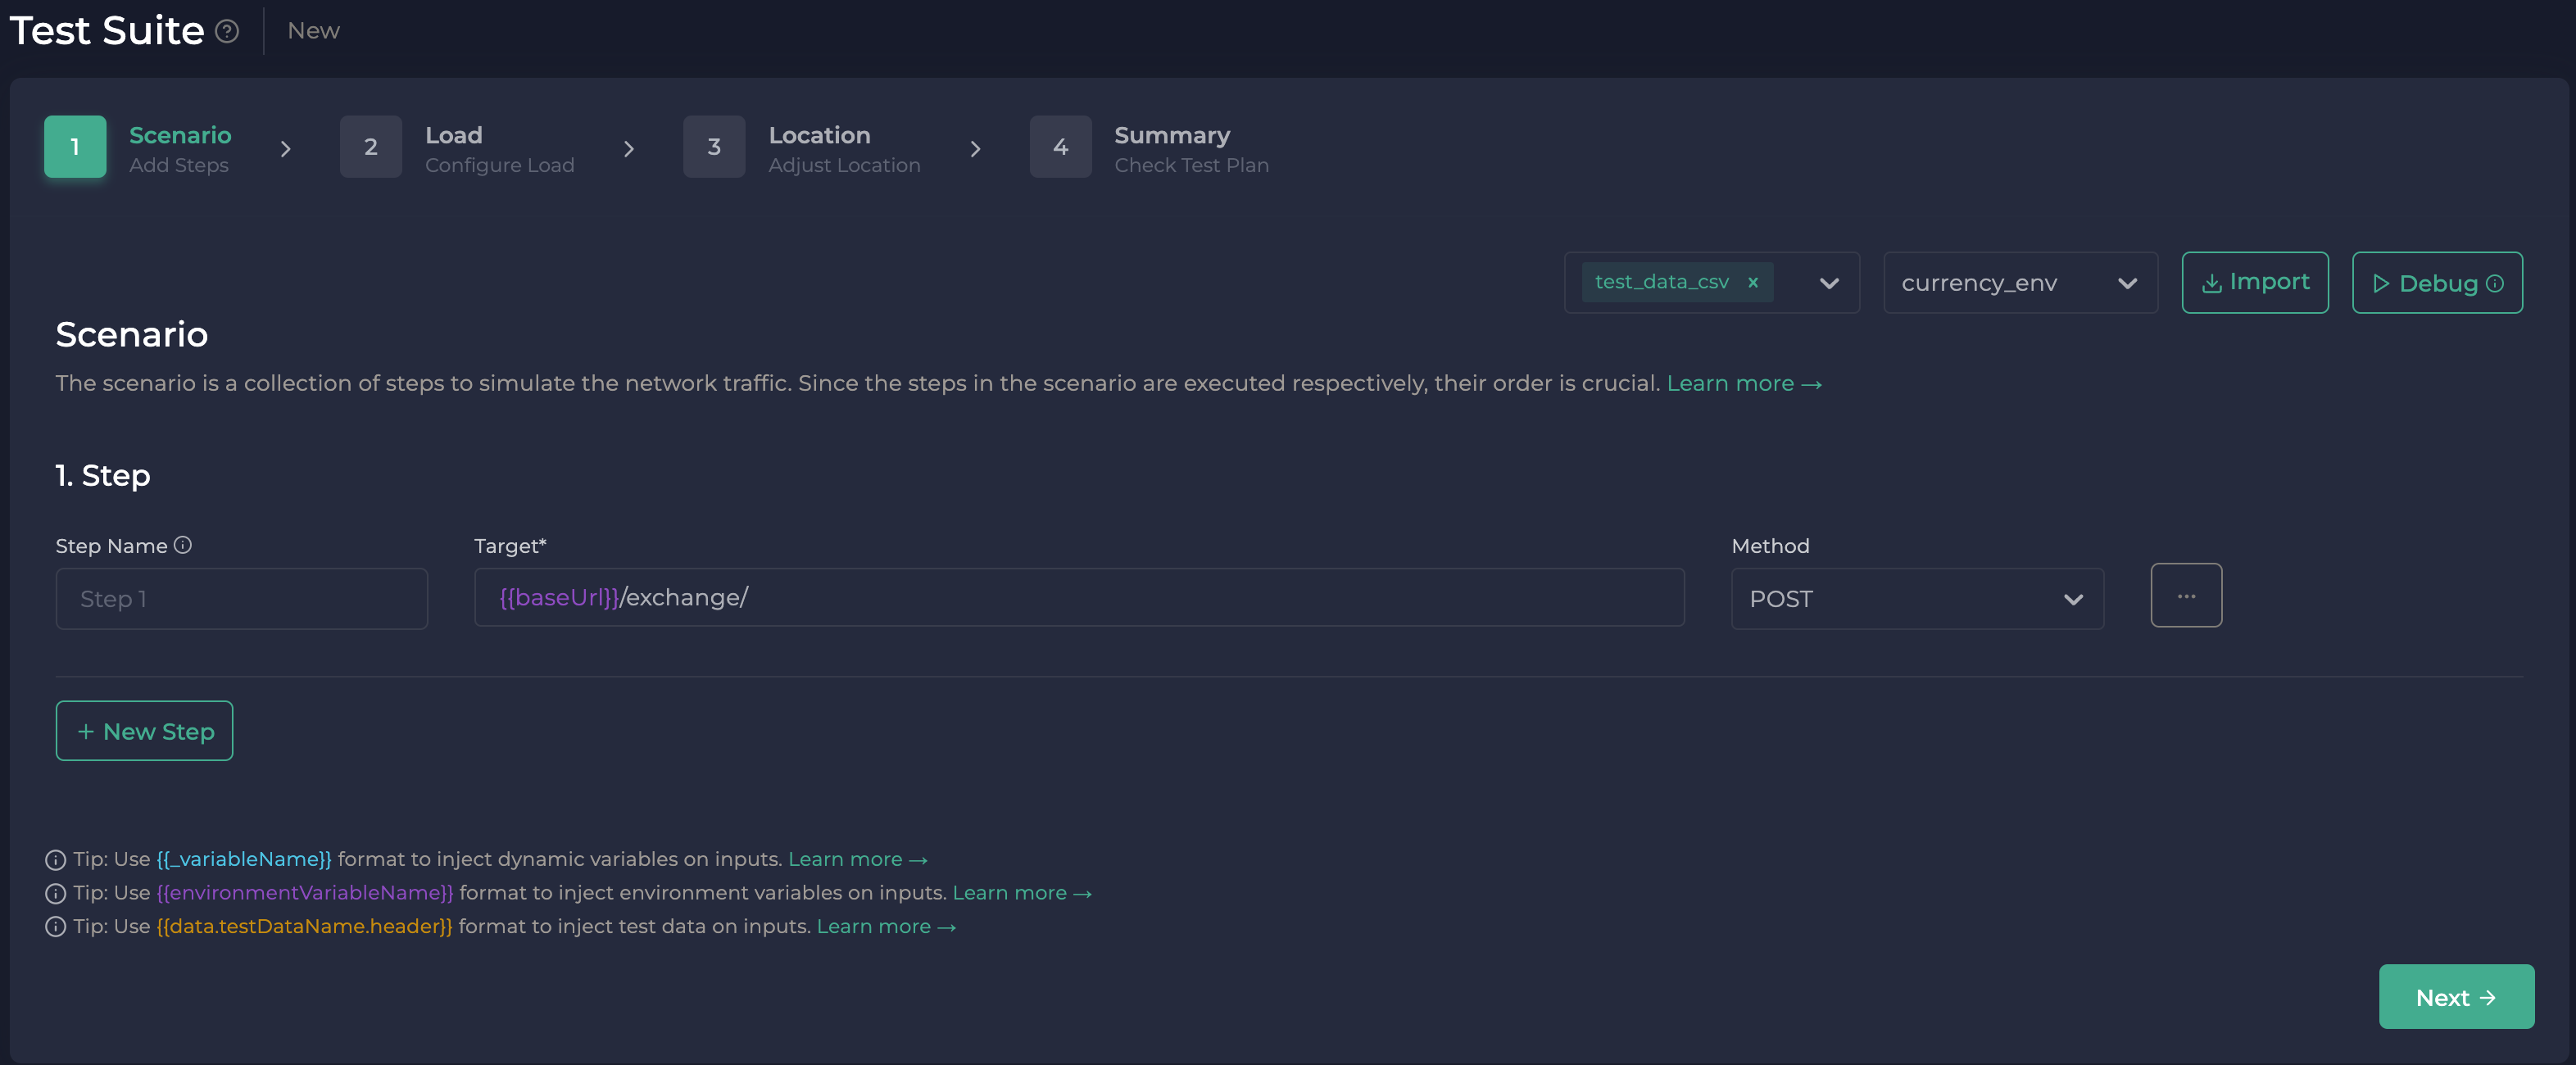
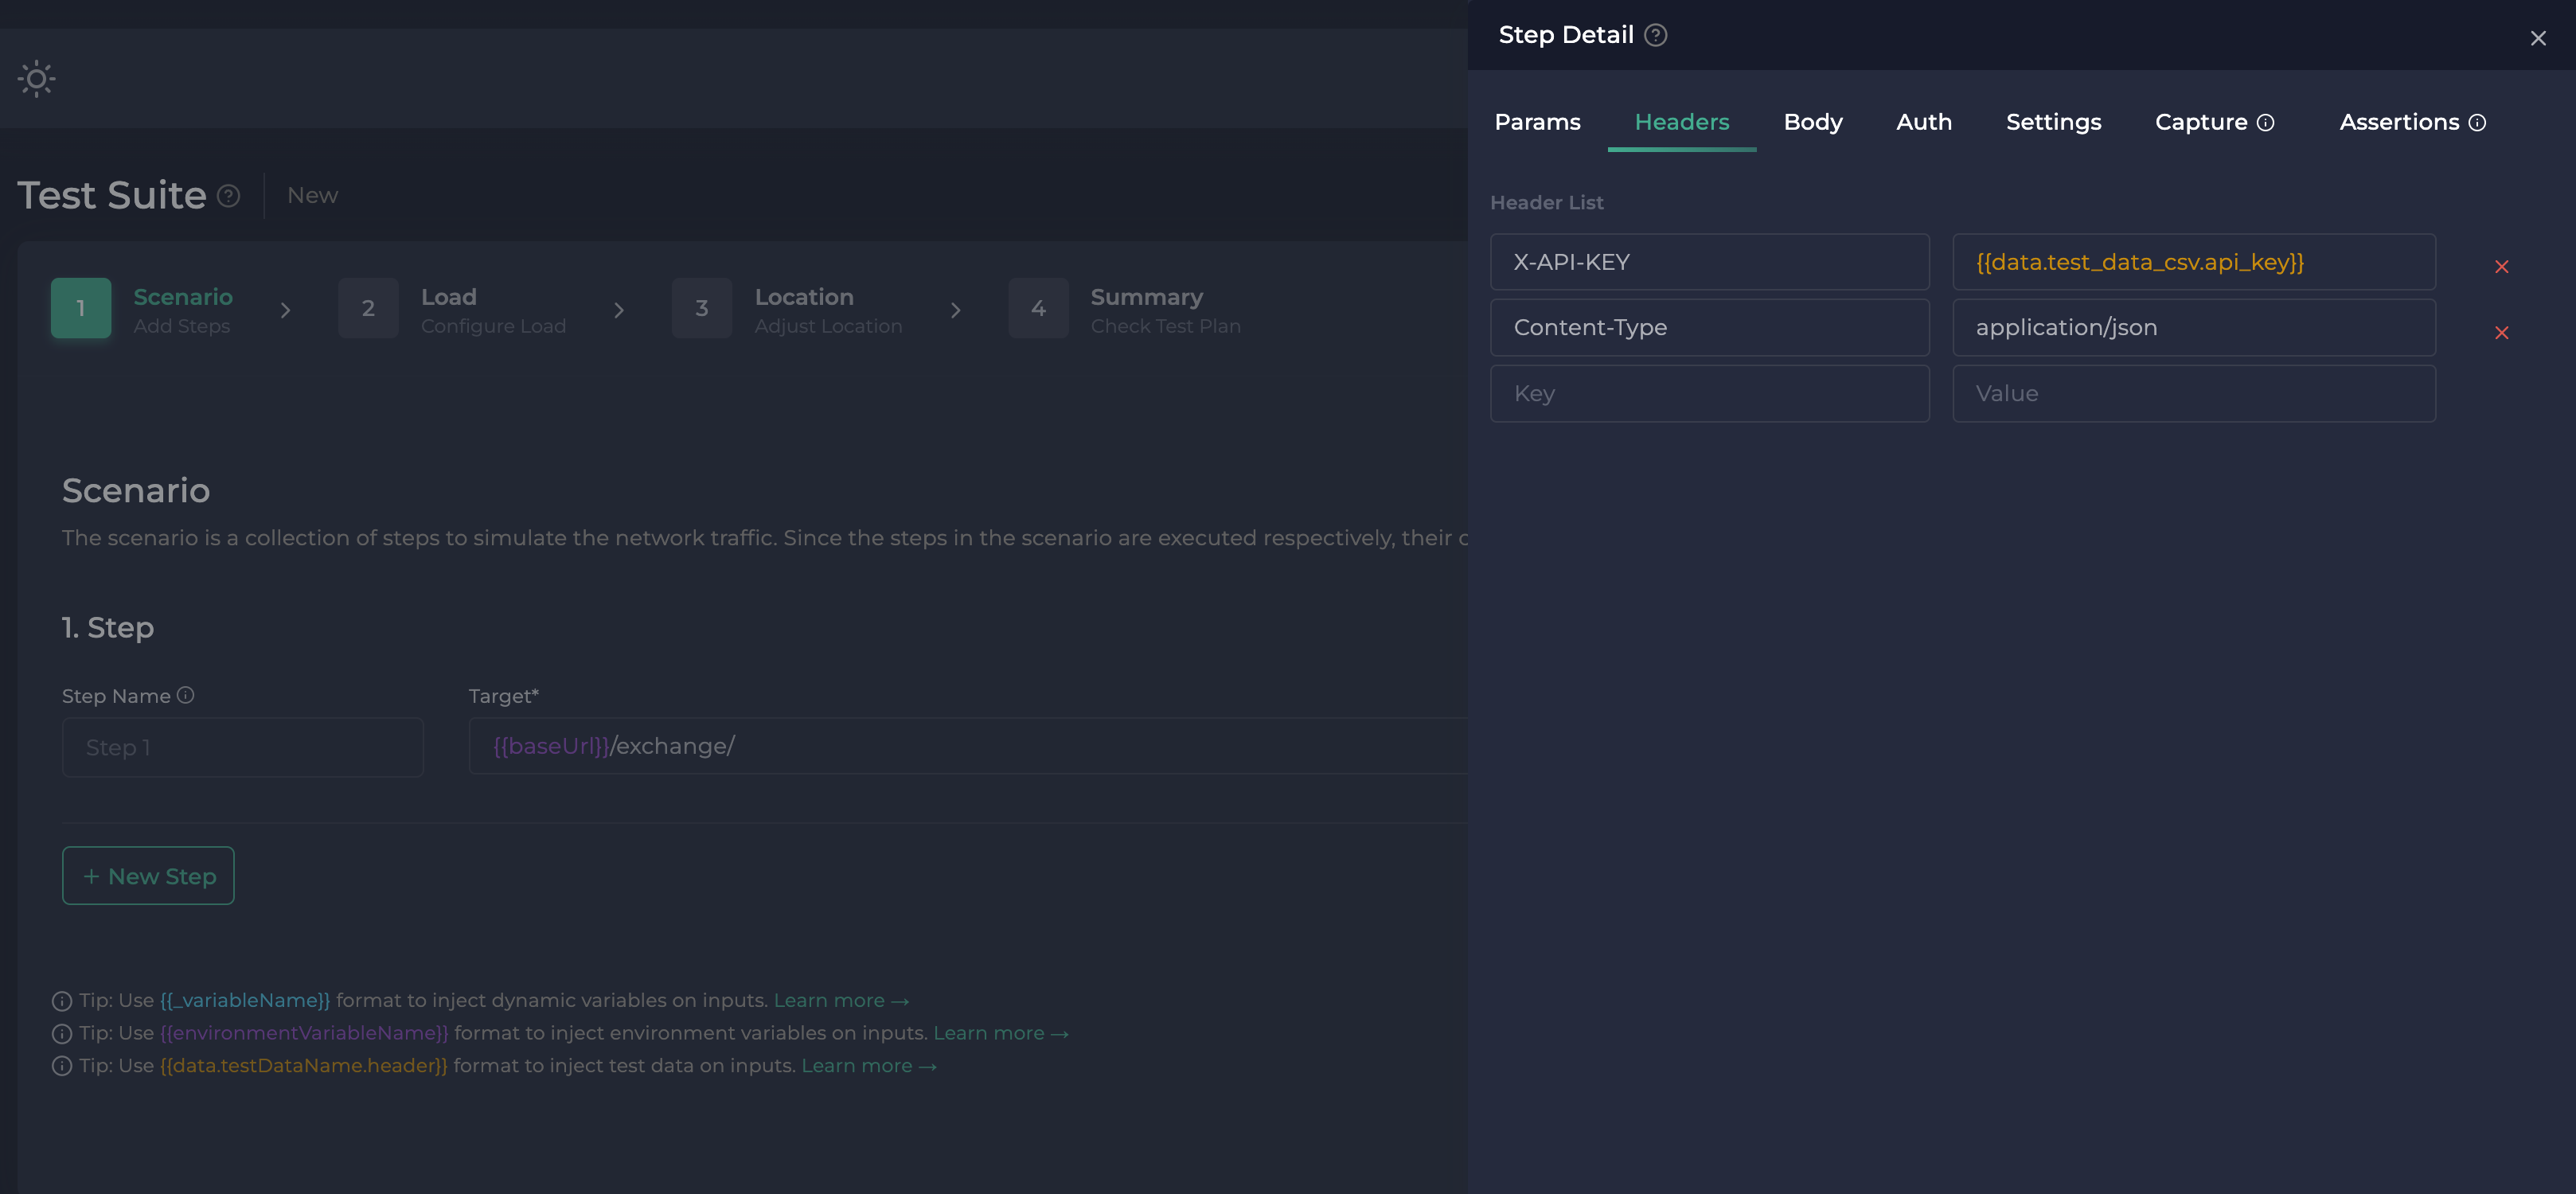
Click the three dots ... which are at the right side of the Step 1 to configure request Header and request Body sections.
In the header section, write X-API-KEY as key and {{data.test_data_csv.api_key}} as value. api_key will be selected from the test_data_csv file's column. Also Content-Type will be application/json.
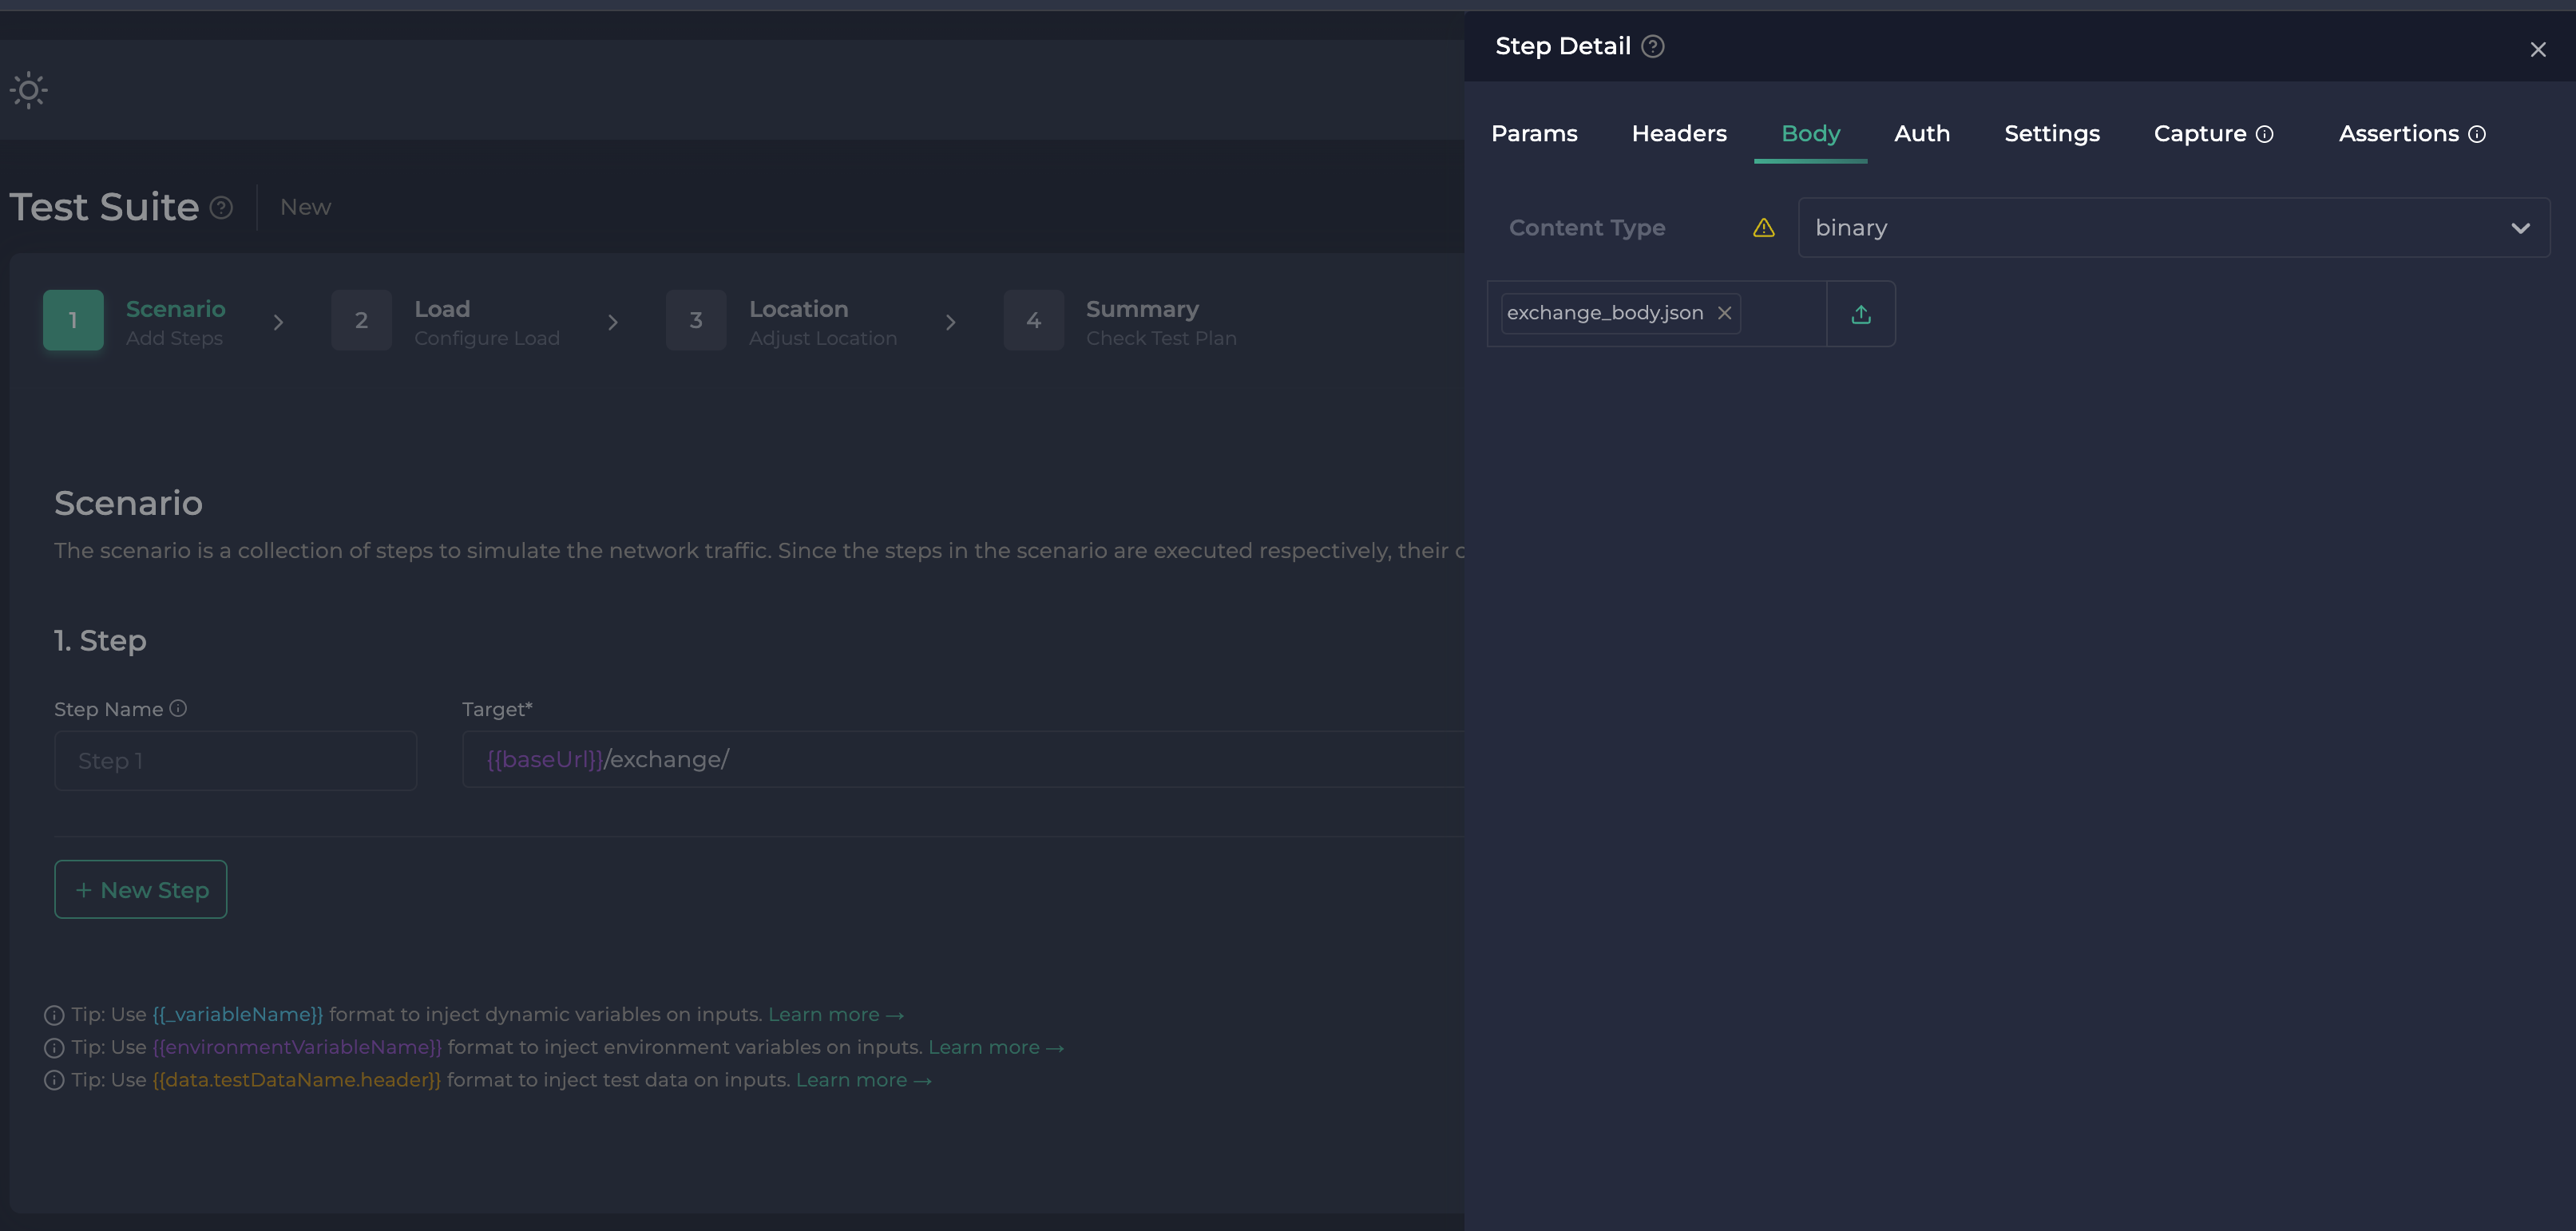
In the body section of Step Details, upload the exchange_body.json we have prepared already and uploaded to our repository. The data structure format of the file as following;
{
  "amount": "{{data.test_data_csv.amount}}",
  "base": "{{data.test_data_csv.base_currency}}",
  "target": "{{data.test_data_csv.target_currency}}"
}
exchange_body.json is our POST payload, we will fill the fields with the test data fetched from the CSV file.
Let's debug our scenario and see what will happen.
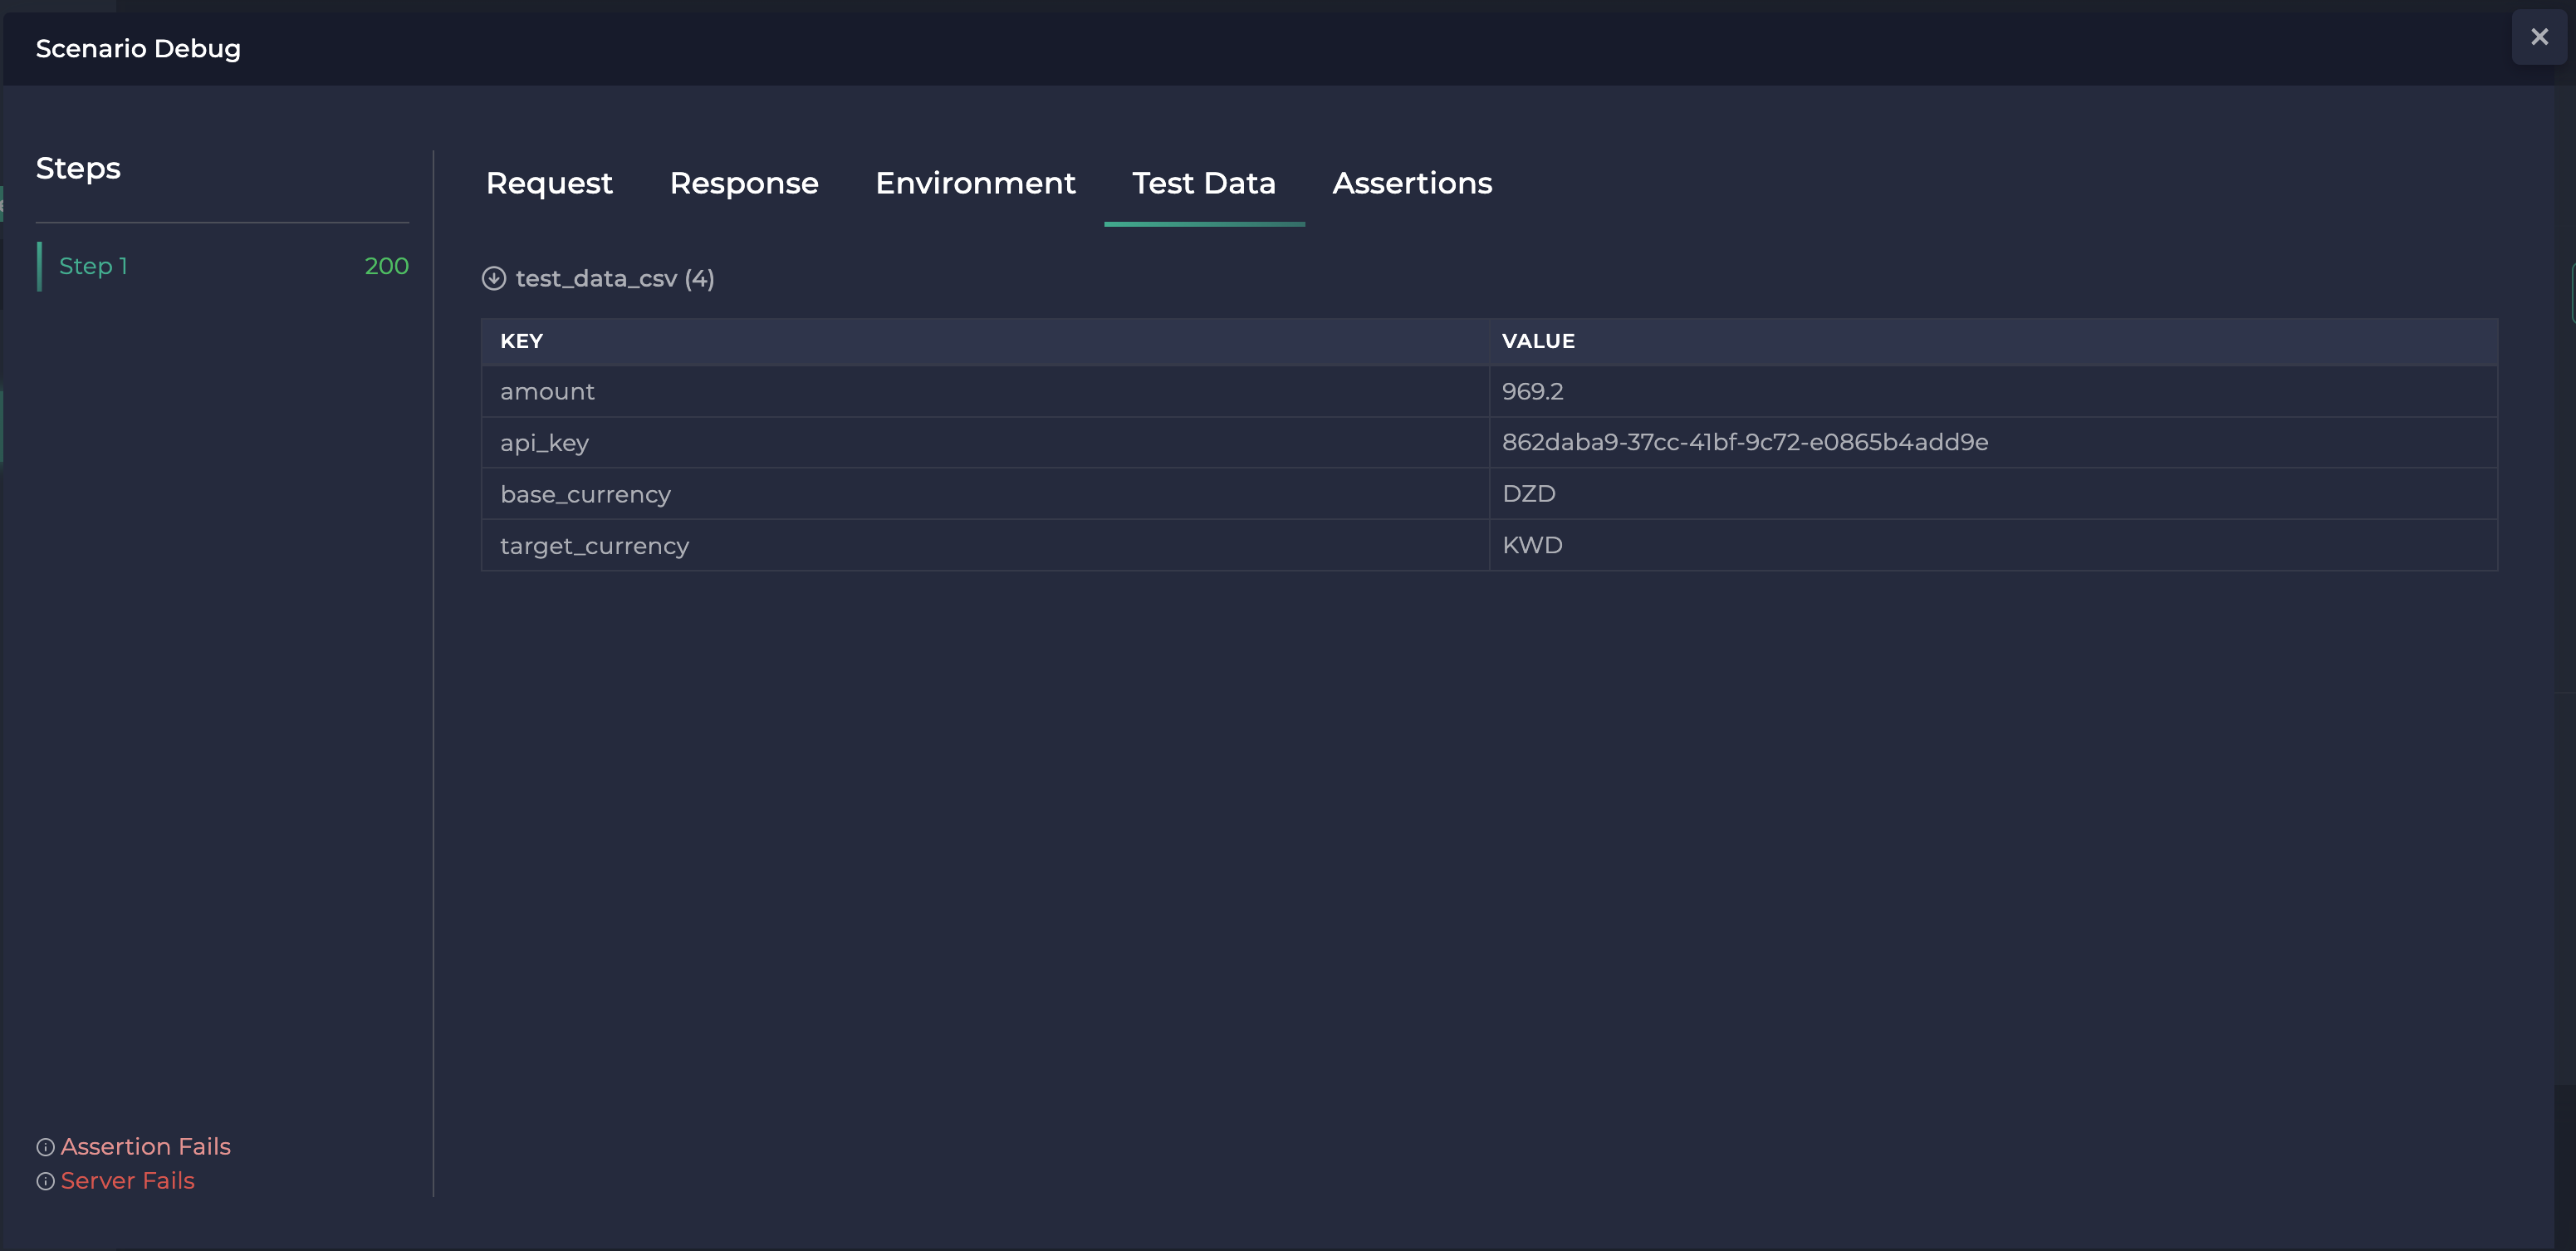
The Test Data section in the Debug result shows that we have successfully fetched the first row of our CSV file.
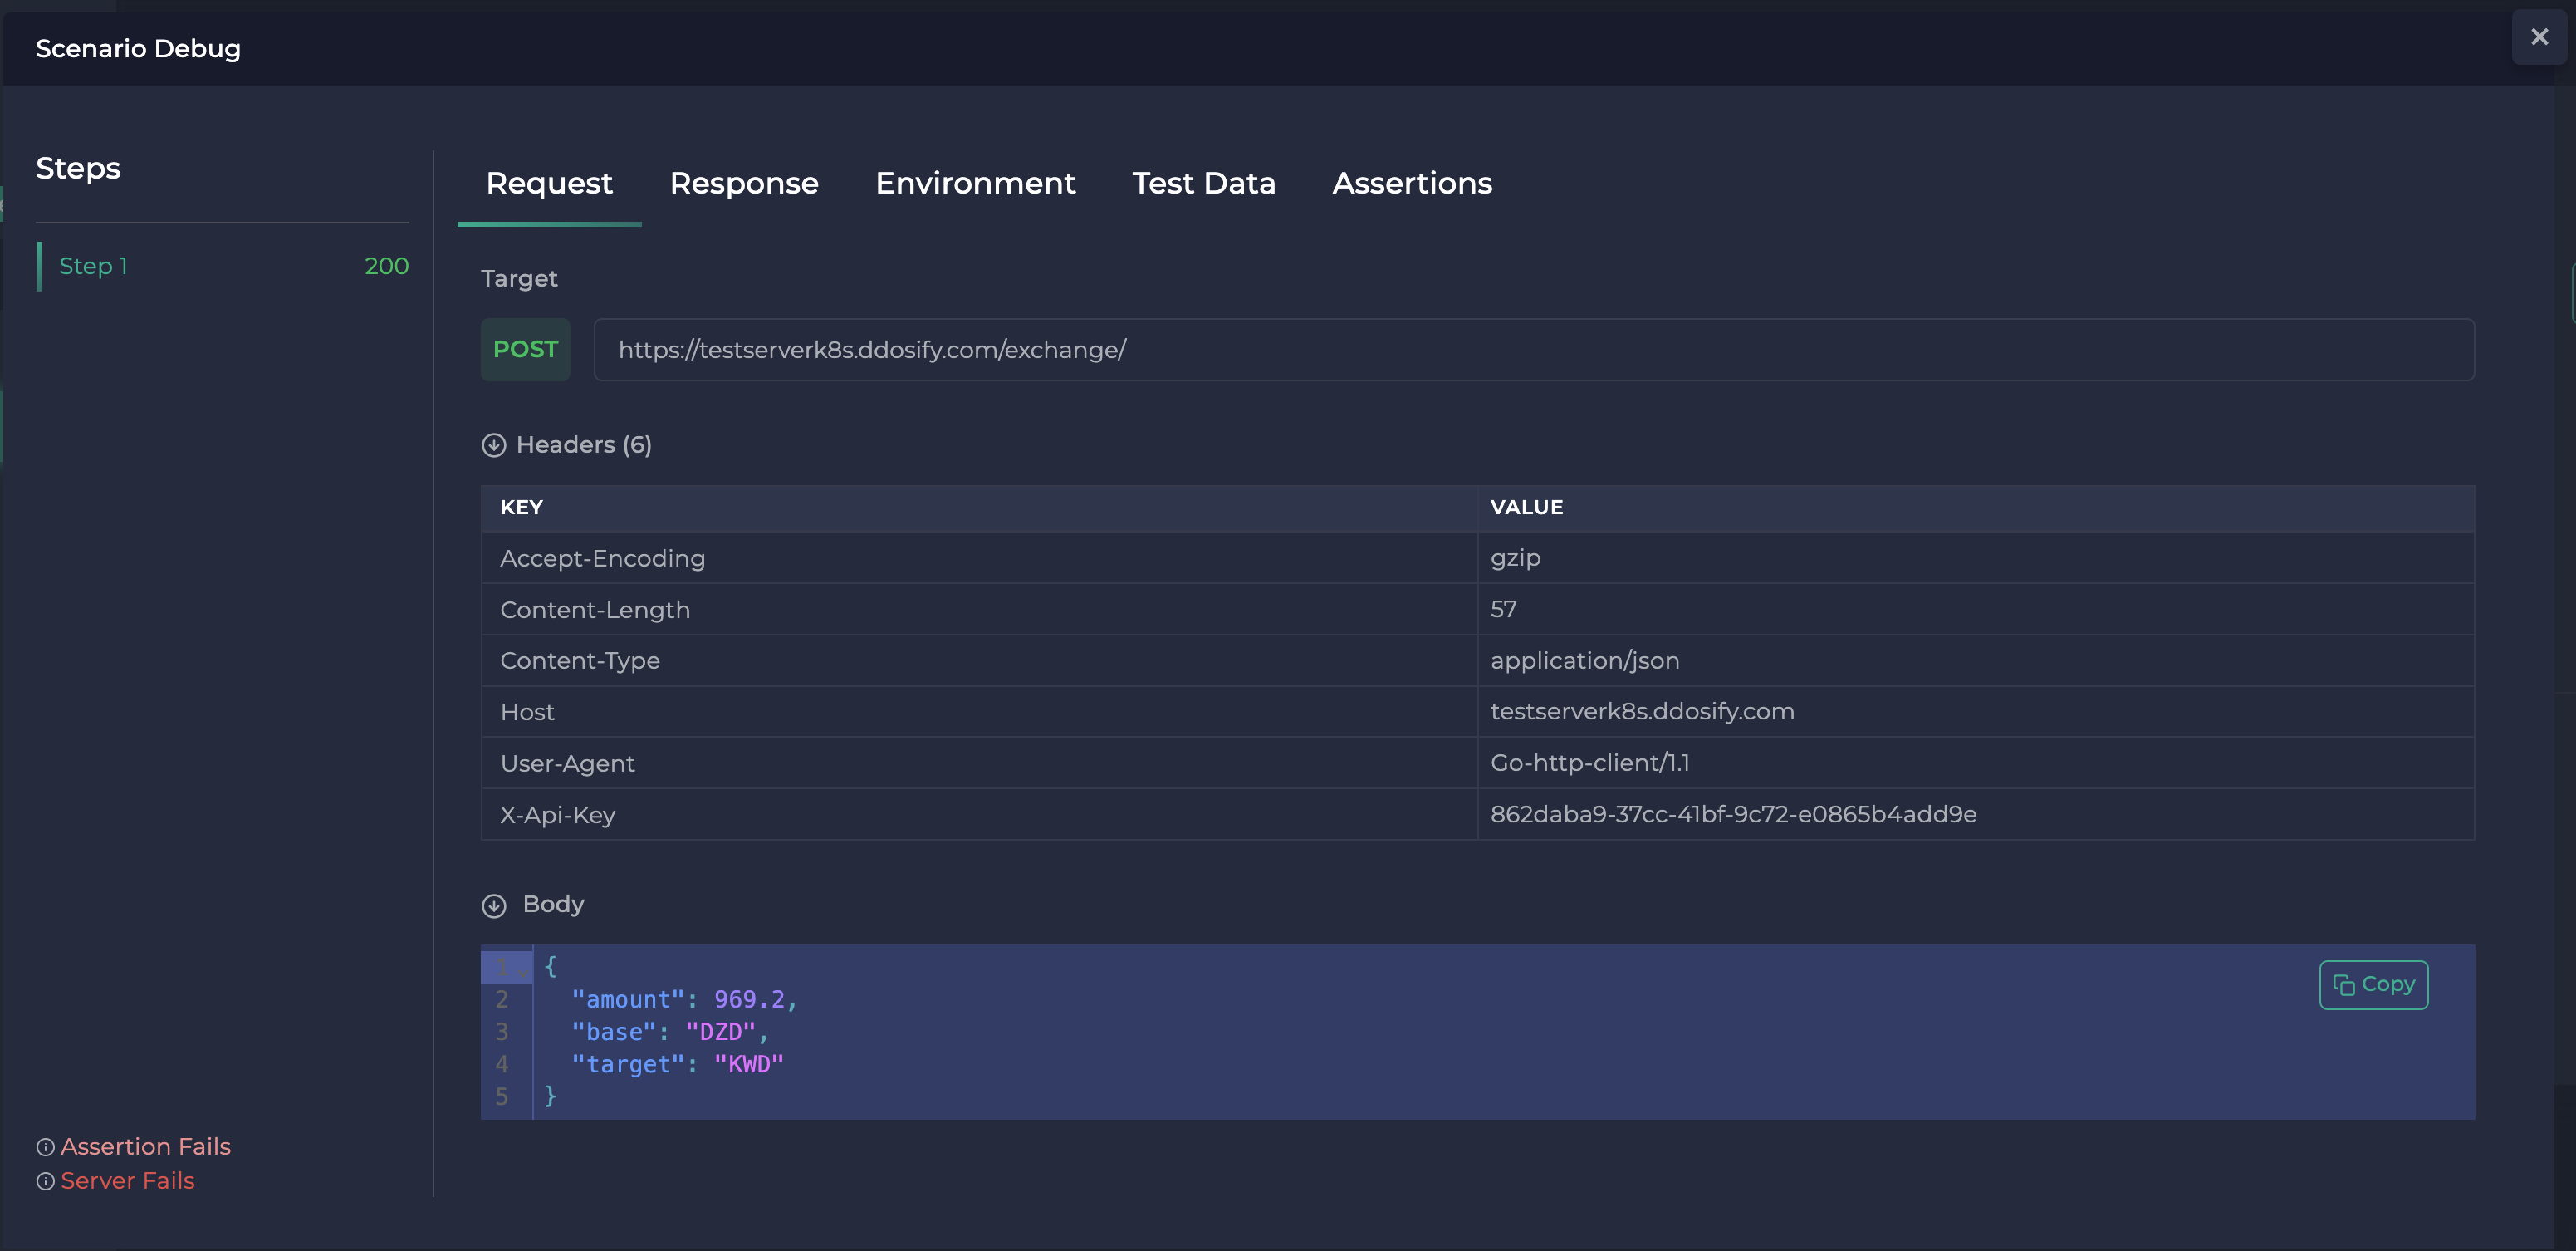
Also, everything looks correct on the request payload and X-Api-Key header value. Since we receive the 200 HTTP OK status code we can start the actual test.
In the response part of the Debug result, we got the success, amount , and currency.

Lets continue with the rest of the configuration of the load test.
The next step, configure the load with two different ways to configure the load, Predefined Load and Custom Load. For more information follow the docs.
We have selected Iteration as 50000 , Duration as 60 seconds and Load Type as waved instead of incremental to simulate more realistic network traffic..
The next step, adjust location with two different ways. One is Auto selection and the other one Manual selection. We have selected Auto option as default and we have selected Europa as Continent. When we select Europa all selected countries are listed below you can also adjust your countries according to your purpose.
The last step is Check Test Plan. You will see the summary of the steps and you can give a unique name for this test or save it as a Test Plan to reach that configuration from the navigation link called as Test Plan on the left side of the webpage. Click Start Instant Test and you will redirected to Live Test Report page.
When the test is finished, all the stats are updated according to real test scenario results. Therefore you can see success and fail results in the Iteration results table. As you see all the requests in each iteration were not completed and 40% of iterations are failed because server does not handle 50000 requests in 60 seconds for two steps.
We can test the system under different conditions by changing duration, load_type, and iteration_count parameters.
Conclusion
At first, we showed how to use rand() utility method of Ddosify Engine to use environment variables in advance. Then we demonstrated the usage of Test Data import via CSV file along with a traffic replay scenario.
Ddosify Cloud has more capabilities on each release, follow us on GitHub to stay updated.
You can find the files we used in this article at Ddosify Blog Examples repository. If you need assistance, you can join our Discord channel.
Share on social media: