

The Importance of Monitoring Frontend Performance Metrics
In today's digital world, having a smooth frontend is crucial for engaging users effectively. By keeping an eye on performance metrics, you can ensure my website or app runs well and provides a good user experience. It's important to monitor these metrics to keep your site healthy and make sure your users are happy with their experience.
Why Monitor Frontend Performance Metrics?
Frontend performance metrics offer a window to understand the user's experience from their perspective. They help measure how quickly users can see and interact with your website. Decreased loading time, reduced latency, smooth transitions, all contribute to a more seamless UX, lower bounce rates and higher user engagement.
Monitored regularly, these metrics show how effectively changes like new features, design updates or infrastructure tweaks have been. Unexpected changes in performance can signal issues requiring immediate attention. Further, understanding these metrics can help you identify areas that need enhancement and key performance indicators (KPIs) to meet your business goals.
Based on various studies, it's evident that if my website takes longer than 3 seconds to load, users are more likely to leave. This high bounce rate signals to search engines that visitors are not finding the site valuable, impacting its ranking. This blog post discusses 21+ Website Load Time Statistics and Facts with infographics and how Speed Affects Your Website.
What Impact Does Performance Have?
User Experience: Having a website that loads quickly and smoothly is key to providing a great user experience. When the pages display sharply, respond promptly to clicks, and transition effortlessly, it significantly impacts how users feel and how satisfied they are.
Engagement and Conversion: If the site content appears and becomes interactive quickly, users are more likely to stay, explore, and eventually convert. Furthermore, improved performance directly links to better SEO rankings, bringing more traffic.
Lowering Bounce Rates: Slow sites often lead to visitors abandoning their activity and going elsewhere, increasing your bounce rate. Monitoring metrics can enable optimization strategies that retain users, ensuring they stay on your page long enough to consider your offering.
Metrics to Monitor with Lighthouse:
Lighthouse is an open-source, automated tool by Google for improving the quality of web pages. It includes several performance metrics that help understand the user experience. Below are some key frontend performance metrics measured by Lighthouse:
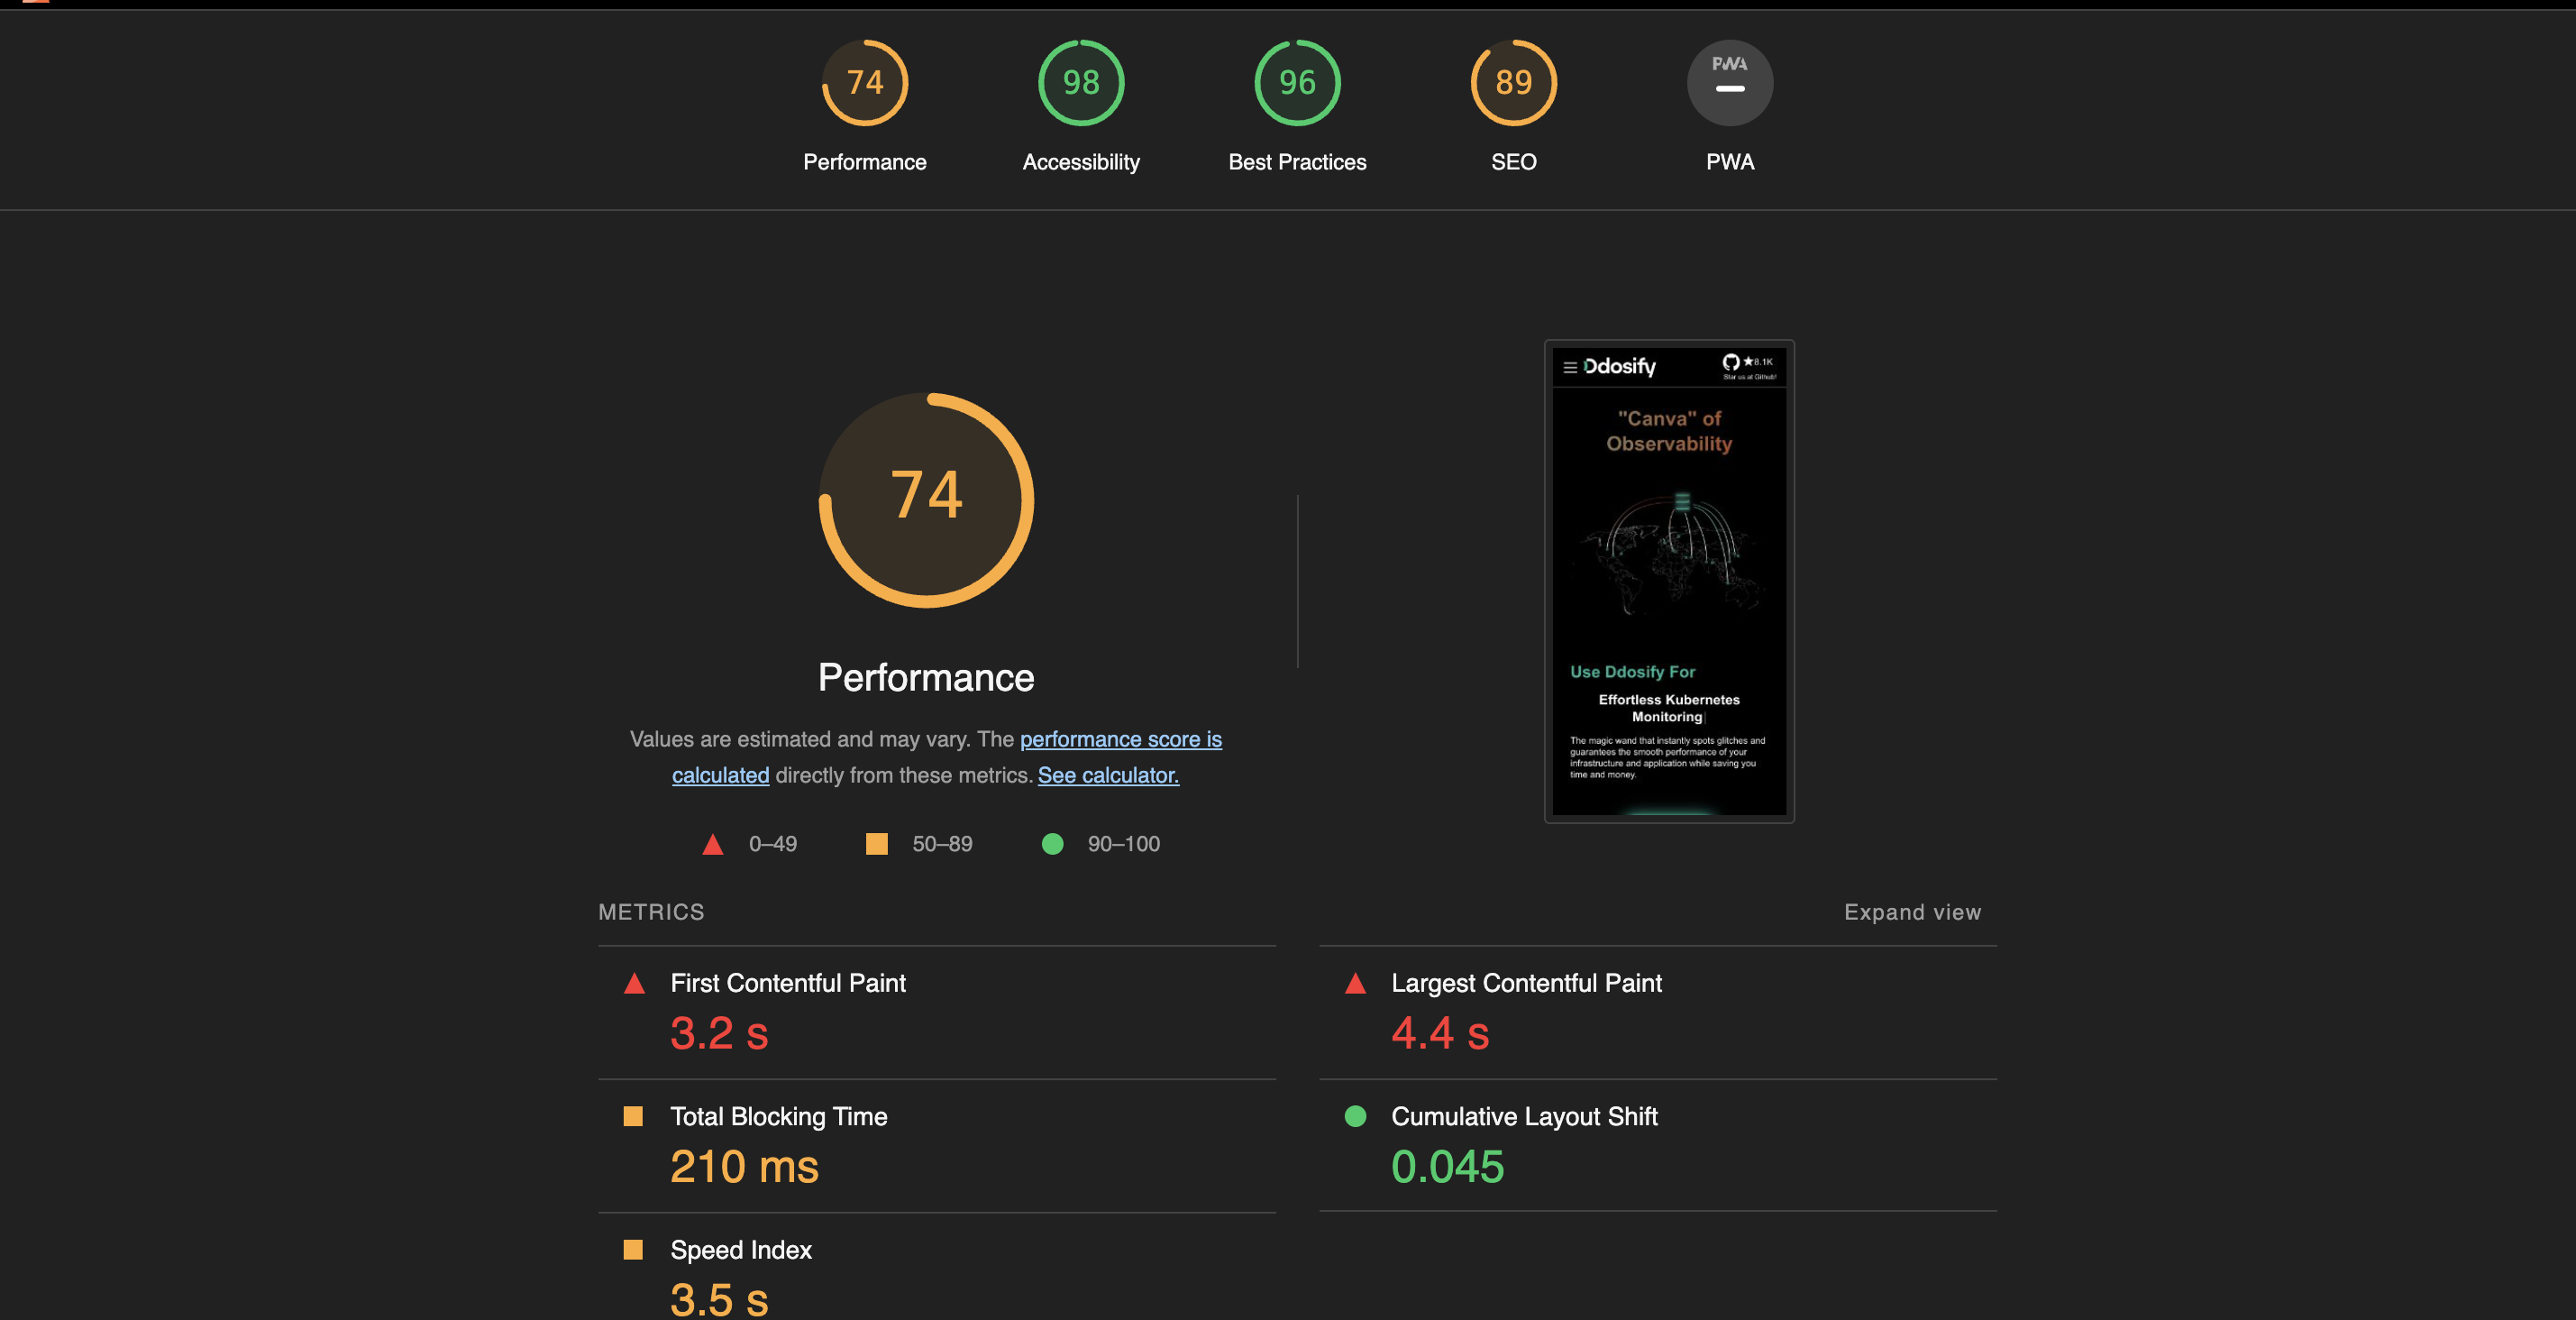
First Contentful Paint (FCP): This metric measures the time from when the page starts loading to when any part of the page's content is rendered on the screen.
Largest Contentful Paint (LCP):: This metric reports the render time of the largest image or text block visible within the viewport. It is important for measuring perceived load speed and marks the point in the page load timeline when the page's main content has likely loaded.
Speed Index: This indicates how quickly the contents of a page are visibly populated. It measures how fast the pages are visually displayed during the page load.
Time to Interactive (TTI): This metric measures the time from when the page starts loading to when all its main sub-resources have loaded and it is capable of reliably responding to user input quickly.
Total Blocking Time (TBT): This metric measures the total amount of time that a page is blocked from responding to user input, such as mouse clicks, screen taps, or keyboard presses.
Cumulative Layout Shift (CLS): This metric measures the visual stability of a page. It quantifies how much a page's content visually shifts around. A low CLS helps ensure that the page is delightful.
Each of these metrics gives a unique perspective on different aspects of user experience and combined together, they provide a comprehensive picture of the page performance. Lighthouse also provides recommendations for improvements, which can be really helpful in optimizing the overall performance.
How To use LightHouse to Measure Frontend Performance Metrics in Browser
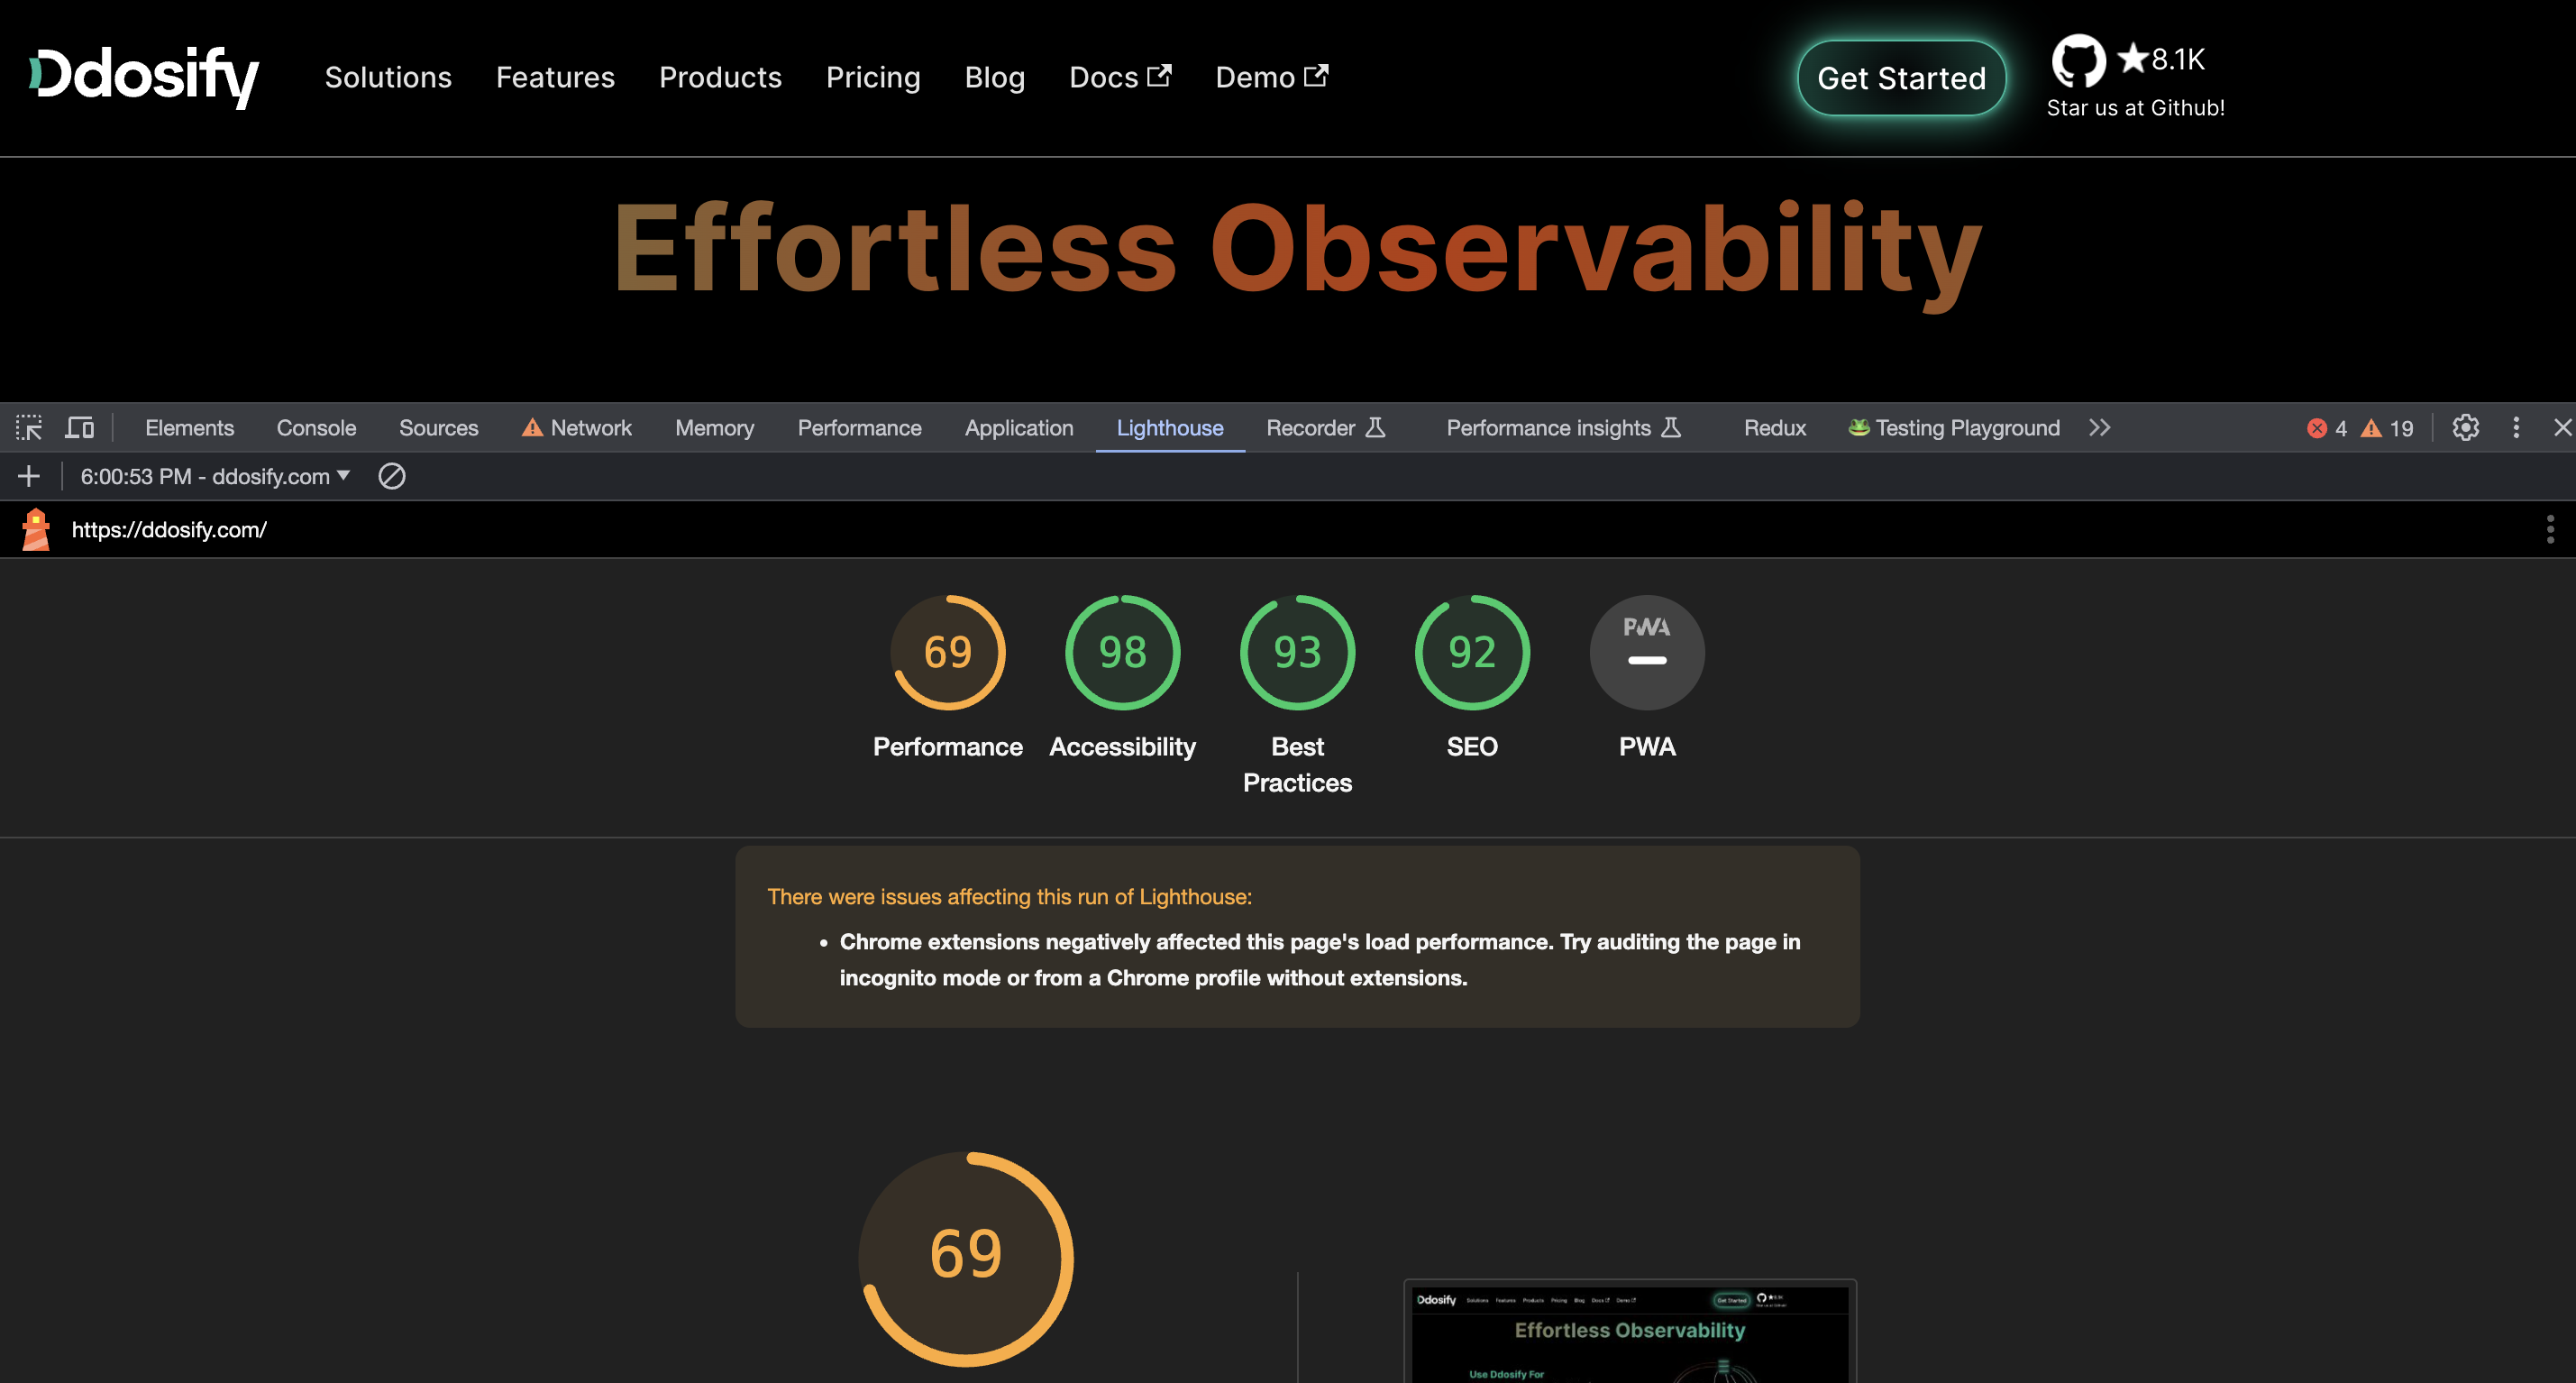
Lighthouse is a handy, cost-free tool that's open to anyone looking to evaluate various aspects of their website. This includes performance, accessibility, metrics for progressive web apps, SEO, and more. You can effortlessly access it through the Chrome DevTools panel. When you open up the DevTools, there's a "Lighthouse" tab. By hitting the "Generate report" button in this tab, you can execute a range of tests on any webpage you want. The results conveniently show up right in the Lighthouse tab, simplifying the process of testing any webpage, whether it's publicly accessible or needs authentication.
For those who prefer browsing with other platforms rather than Chrome or Chromium-based browsers such as Microsoft Edge or Brave, Lighthouse offers a web interface to run its tests. However, keep in mind that this handy feature is only available for websites that are openly accessible on the web. Alternatively, if you're the kind of person who likes to get hands-on, Lighthouse also has a Node command-line tool. This lets you conduct audit operations straight from the command line, offering you another convenient option to optimize your website.
Setting up the Lighthouse CI locally
While the methods I mentioned earlier do work, they need some hands-on effort. Now, picture this: what if we could include Lighthouse tests directly in our continuous integration process? We could see how our code changes affect performance with every pull request. And if the changes don't meet our performance standards, we could stop the builds. That's why Lighthouse CI exists!
Before jumping ahead, it's important to make certain that you have Node.js version 10 LTS (or a later version) and the stable version of Google Chrome loaded up on your computer. Once you've made sure of this, then you're all set to install the Lighthouse CI tool globally on your device.
npm install -g @lhci/cli
After you've successfully installed the CLI, execute lhci --help to see all the commands the tool can perform. At the moment, there are eight commands you can utilize.
lhci <command> <options>

Commands:
  lhci collect      Run Lighthouse and save the results to a local folder
  lhci upload       Save the results to the server
  lhci assert       Assert that the latest results meet expectations
  lhci autorun      Run collect/assert/upload with sensible defaults
  lhci healthcheck  Run diagnostics to ensure a valid configuration
  lhci open         Opens the HTML reports of collected runs
  lhci wizard       Step-by-step wizard for CI tasks like creating a project
  lhci server       Run Lighthouse CI server

Options:
  --help             Show help                                                                                                                            [boolean]
  --version          Show version number                                                                                                                  [boolean]
  --no-lighthouserc  Disables automatic usage of a .lighthouserc file.
You can now step forward and make a new lighthouserc.js file at the root level of your project directory. Note that your project should be managed with Git. That's because Lighthouse CI can cleverly figure out the build context settings straight from the Git repository.
touch lighthouserc.js
Here's a sample configuration file for Lighthouse CI:
module.exports = {
  ci: {
    collect: {
      staticDistDir: "./build", // default docusaurus build directory
      startServerCommand: "npm run server",
      url: ["http://localhost:4001/"],
      startServerReadyPattern: "Server is running on PORT 4000",
      startServerReadyTimeout: 30000, // milliseconds
      numberOfRuns: 3,
    },
    upload: {
      target: "temp-public-storage",
    },
  },
};
In this configuration, we've set the staticDistDir to the build directory of a Docusaurus project. We've also set the startServerCommand to run the server and the url to the local server's URL. The startServerReadyPattern is the pattern to look for in the server logs to determine if the server is ready. The startServerReadyTimeout is the time to wait for the server to be ready. The numberOfRuns is the number of runs to perform.
Temporarily, we can use the temp-public-storage target for the upload command. This will save the results to a temporary public storage location. We can then view the results in the Lighthouse CI server. We can also use the lhci open command to open the HTML reports of the collected runs.
Run the following command to collect the Lighthouse results:
lhci autorun
This will run the collect, assert, and upload commands with sensible defaults. The results will be saved to the server and the HTML reports will be opened.
The output of the lhci autorun command will look something like this:
✅  .lighthouseci/ directory writable
✅  Configuration file found
✅  Chrome installation found
⚠️   GitHub token not set
Healthcheck passed!

Started a web server on port 59011...
Running Lighthouse 3 time(s) on http://localhost:59011/
Run #1...done.
Run #2...done.
Run #3...done.
Done running Lighthouse!

Uploading median LHR of http://localhost:59011/...success!
Open the report at https://storage.googleapis.com/lighthouse-infrastructure.appspot.com/reports/**YOUR_URL**yarn.report.html
No GitHub token set, skipping GitHub status check.

Done running autorun.
You have the option to open the link to the Lighthouse report in your browser, and this will display the median test results for each URL on your site.
Assign Assertions to Lighthouse CI
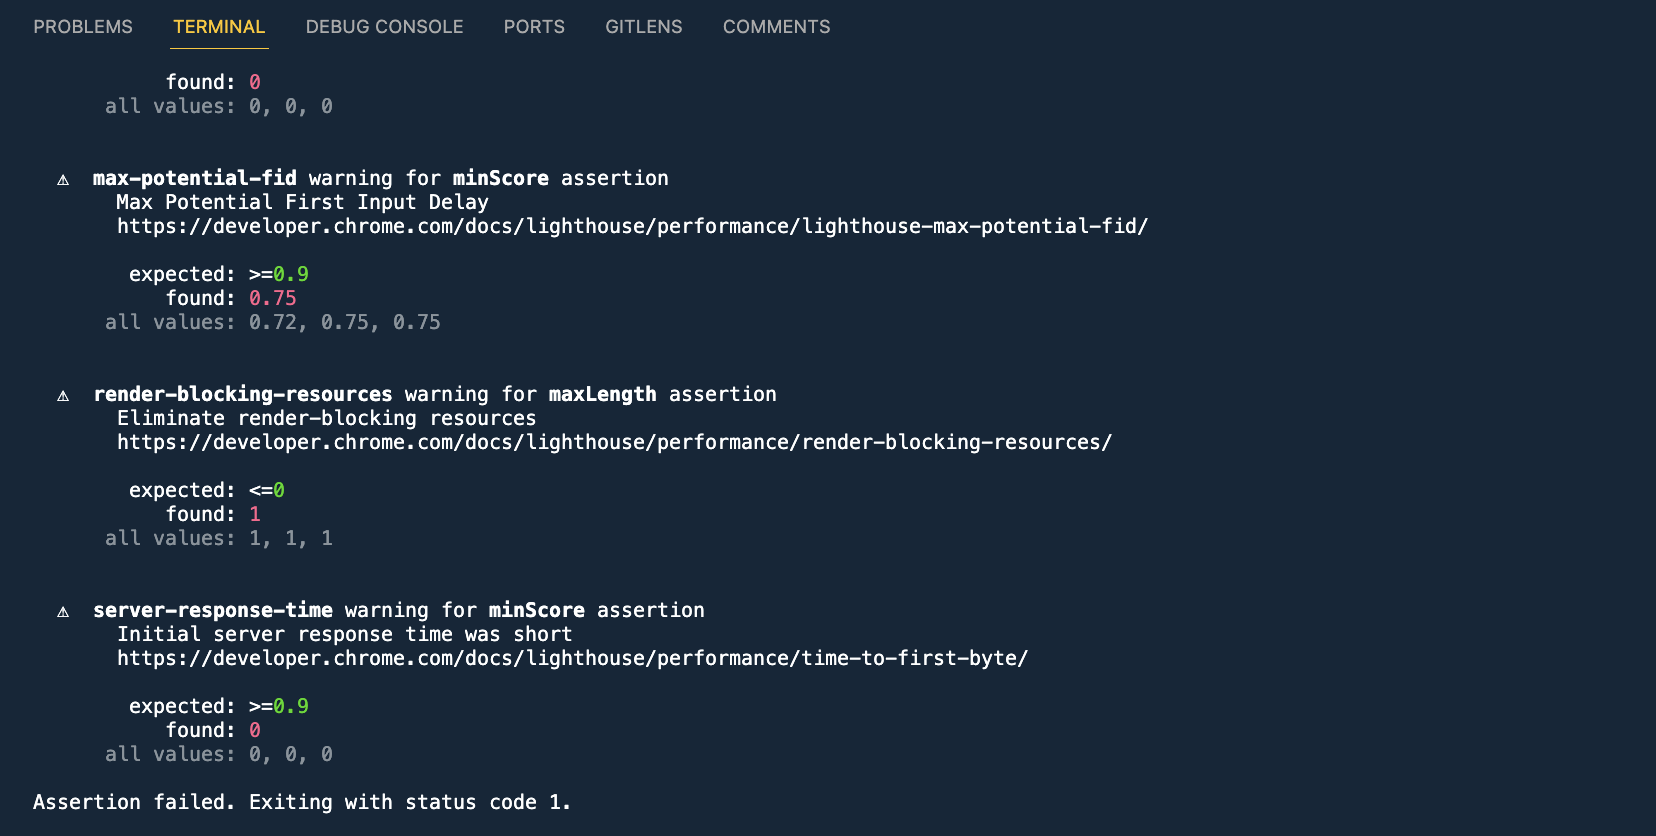
Lighthouse CI also allows you to set up assertions to ensure that your site meets certain performance criteria. You can do this by adding an assert object to the ci object in the lighthouserc.js file.
 assert: {
      preset: "lighthouse:no-pwa",
      assertions: {
        "categories:performance": ["error", { minScore: 0.9 }],
        "categories:accessibility": ["warn", { minScore: 0.9 }],
      },
    },
In this example, we've set the preset to lighthouse:no-pwa and added assertions for the performance and accessibility categories. We've set the minScore to 0.9 for both categories. This means that the build will fail if the performance and accessibility scores are less than 0.9.
Use Lighthouse CI to Run Performance Tests on GitHub Actions
Now that we've set up Lighthouse CI to run performance tests locally, we can integrate it into our GitHub Actions workflow. This will allow us to run performance tests on every pull request and report the results as a comment on the pull request.
First, we need to create a GitHub token to use with Lighthouse CI. Go to your GitHub account settings and create a new personal access token with the repo scope. Then, add the token as a secret in your GitHub repository settings.
Next, we need to create a new workflow file in the .github/workflows directory of your repository. This file will define the GitHub Actions workflow to run the Lighthouse CI tests.
name: Lighthouse Report Generation

on:
  push:
    branches: [ git-workflows ]
  pull_request:
    branches: [ git-workflows ]

jobs:
  lighthouse:
    runs-on: ubuntu-latest

    steps:
      - uses: actions/checkout@v2

      - name: 'Installing deps'
        run: |
          yarn
          npm i -g @lhci/[email protected] serve

      - name: 'Build Prodcution'
        run: yarn build

      - name: 'Serve Prodcution Server'
        run: serve -s build &

      - name: 'Run Lighthouse tests'
        continue-on-error: true
        run: lhci autorun

      - name: 'Upload report'
        uses: actions/upload-artifact@v2
        if: always()
        with:
          name: lhci-reports
          path: |
            .lighthouseci/
          # if-no-files-found: error
          # if: ${{ success() && steps.lighthouse.outputs.hasHtmlReport == 'true' && steps.lighthouse.outputs.hasJsonReport == 'true' }}
This workflow file defines a job called lighthouse that runs on the ubuntu-latest runner when a push or pull request is made to the git-workflows branch. The job has several steps:
- It checks out the repository using the
actions/checkoutaction. - It installs the dependencies and builds the production server.
- It serves the production server using the
servecommand. - It runs the Lighthouse tests using the
lhci autoruncommand. - It uploads the Lighthouse reports as an artifact.
This workflow will run the Lighthouse CI tests on every push and pull request to the git-workflows branch. The results will be uploaded as an artifact that can be viewed in the GitHub Actions tab of the repository.
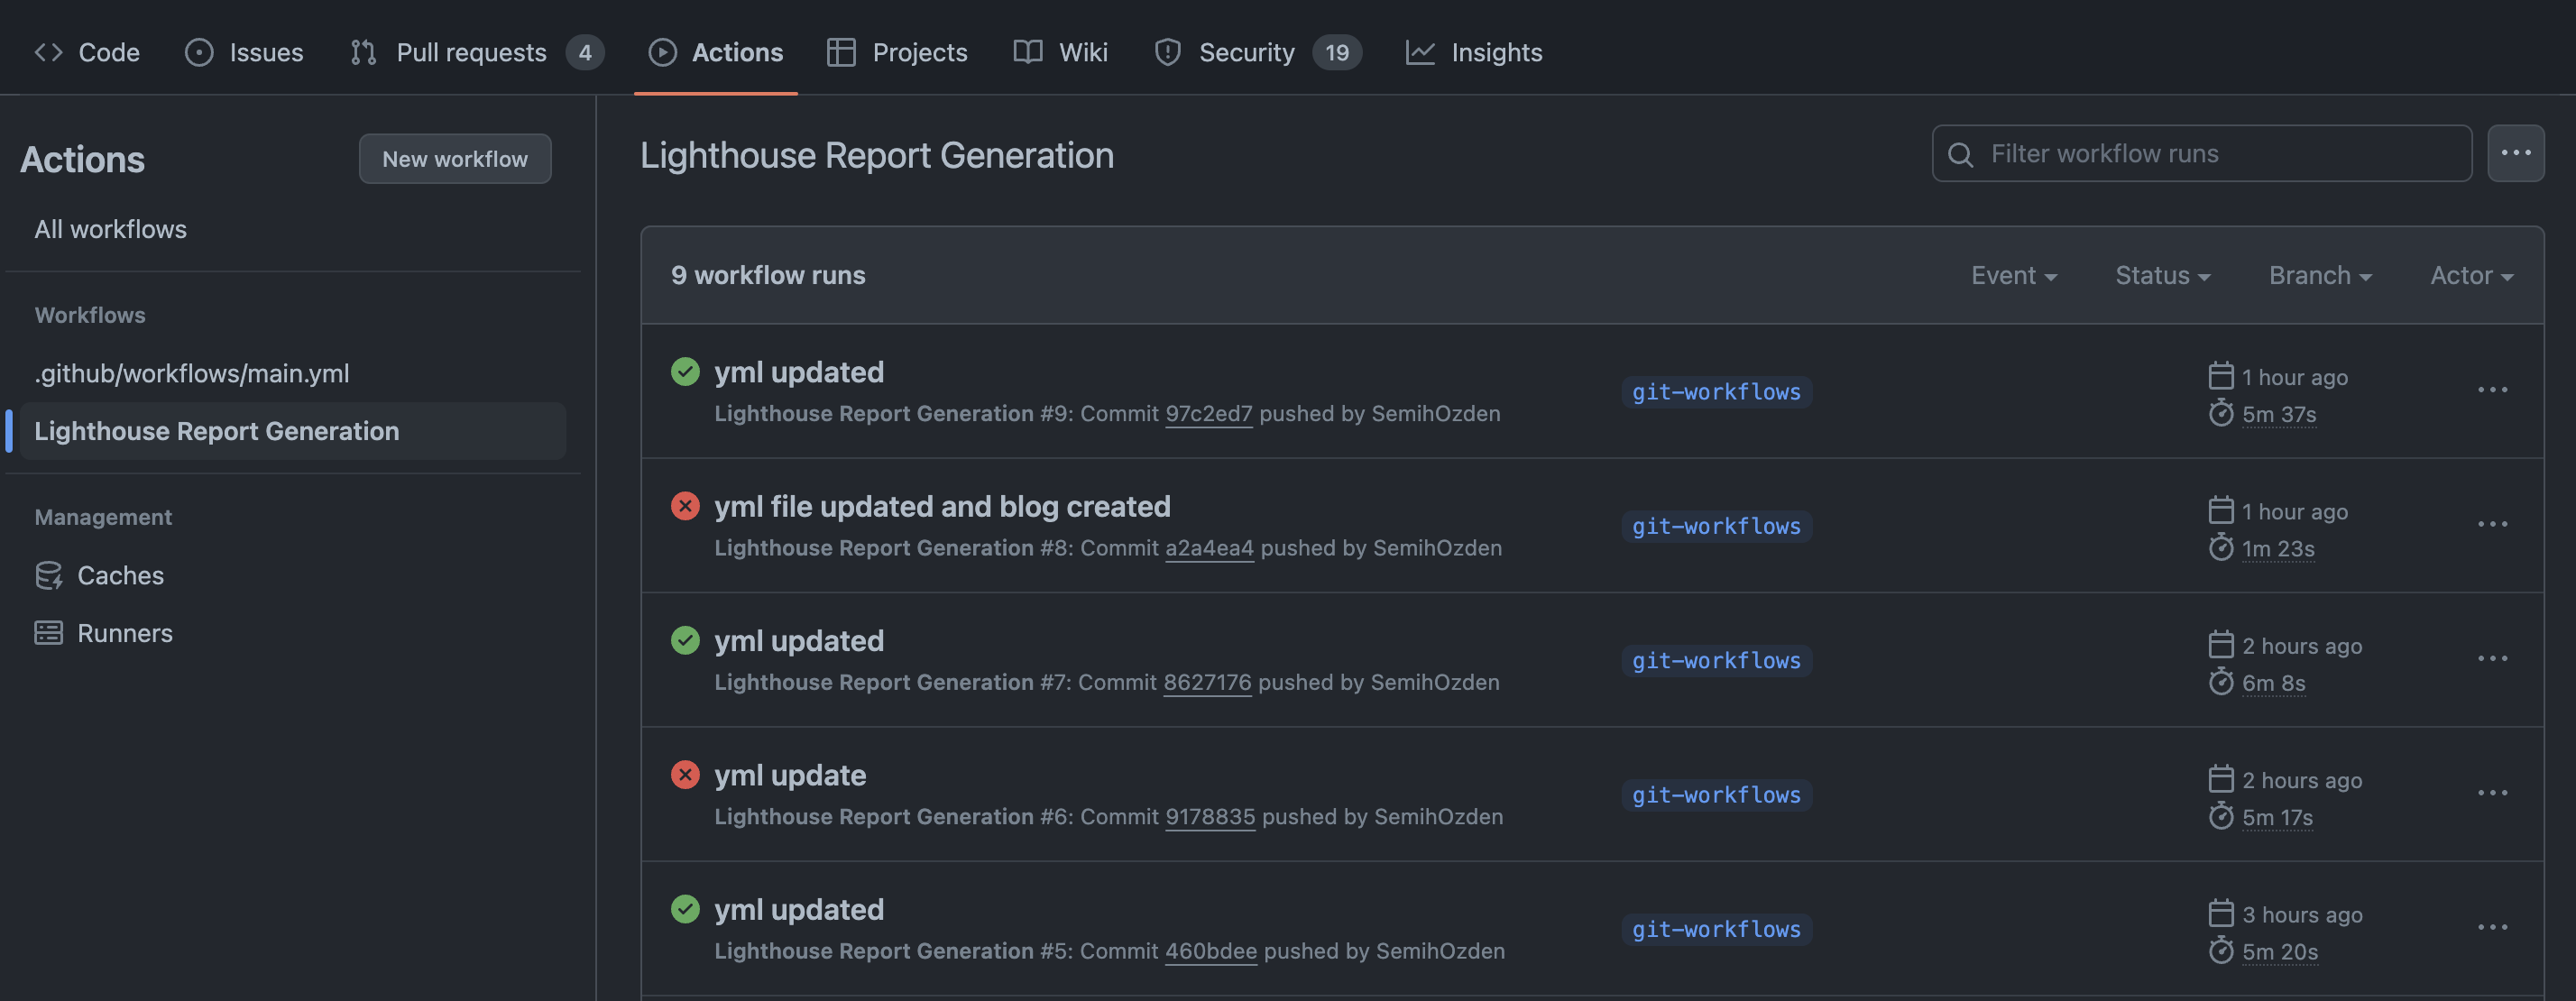
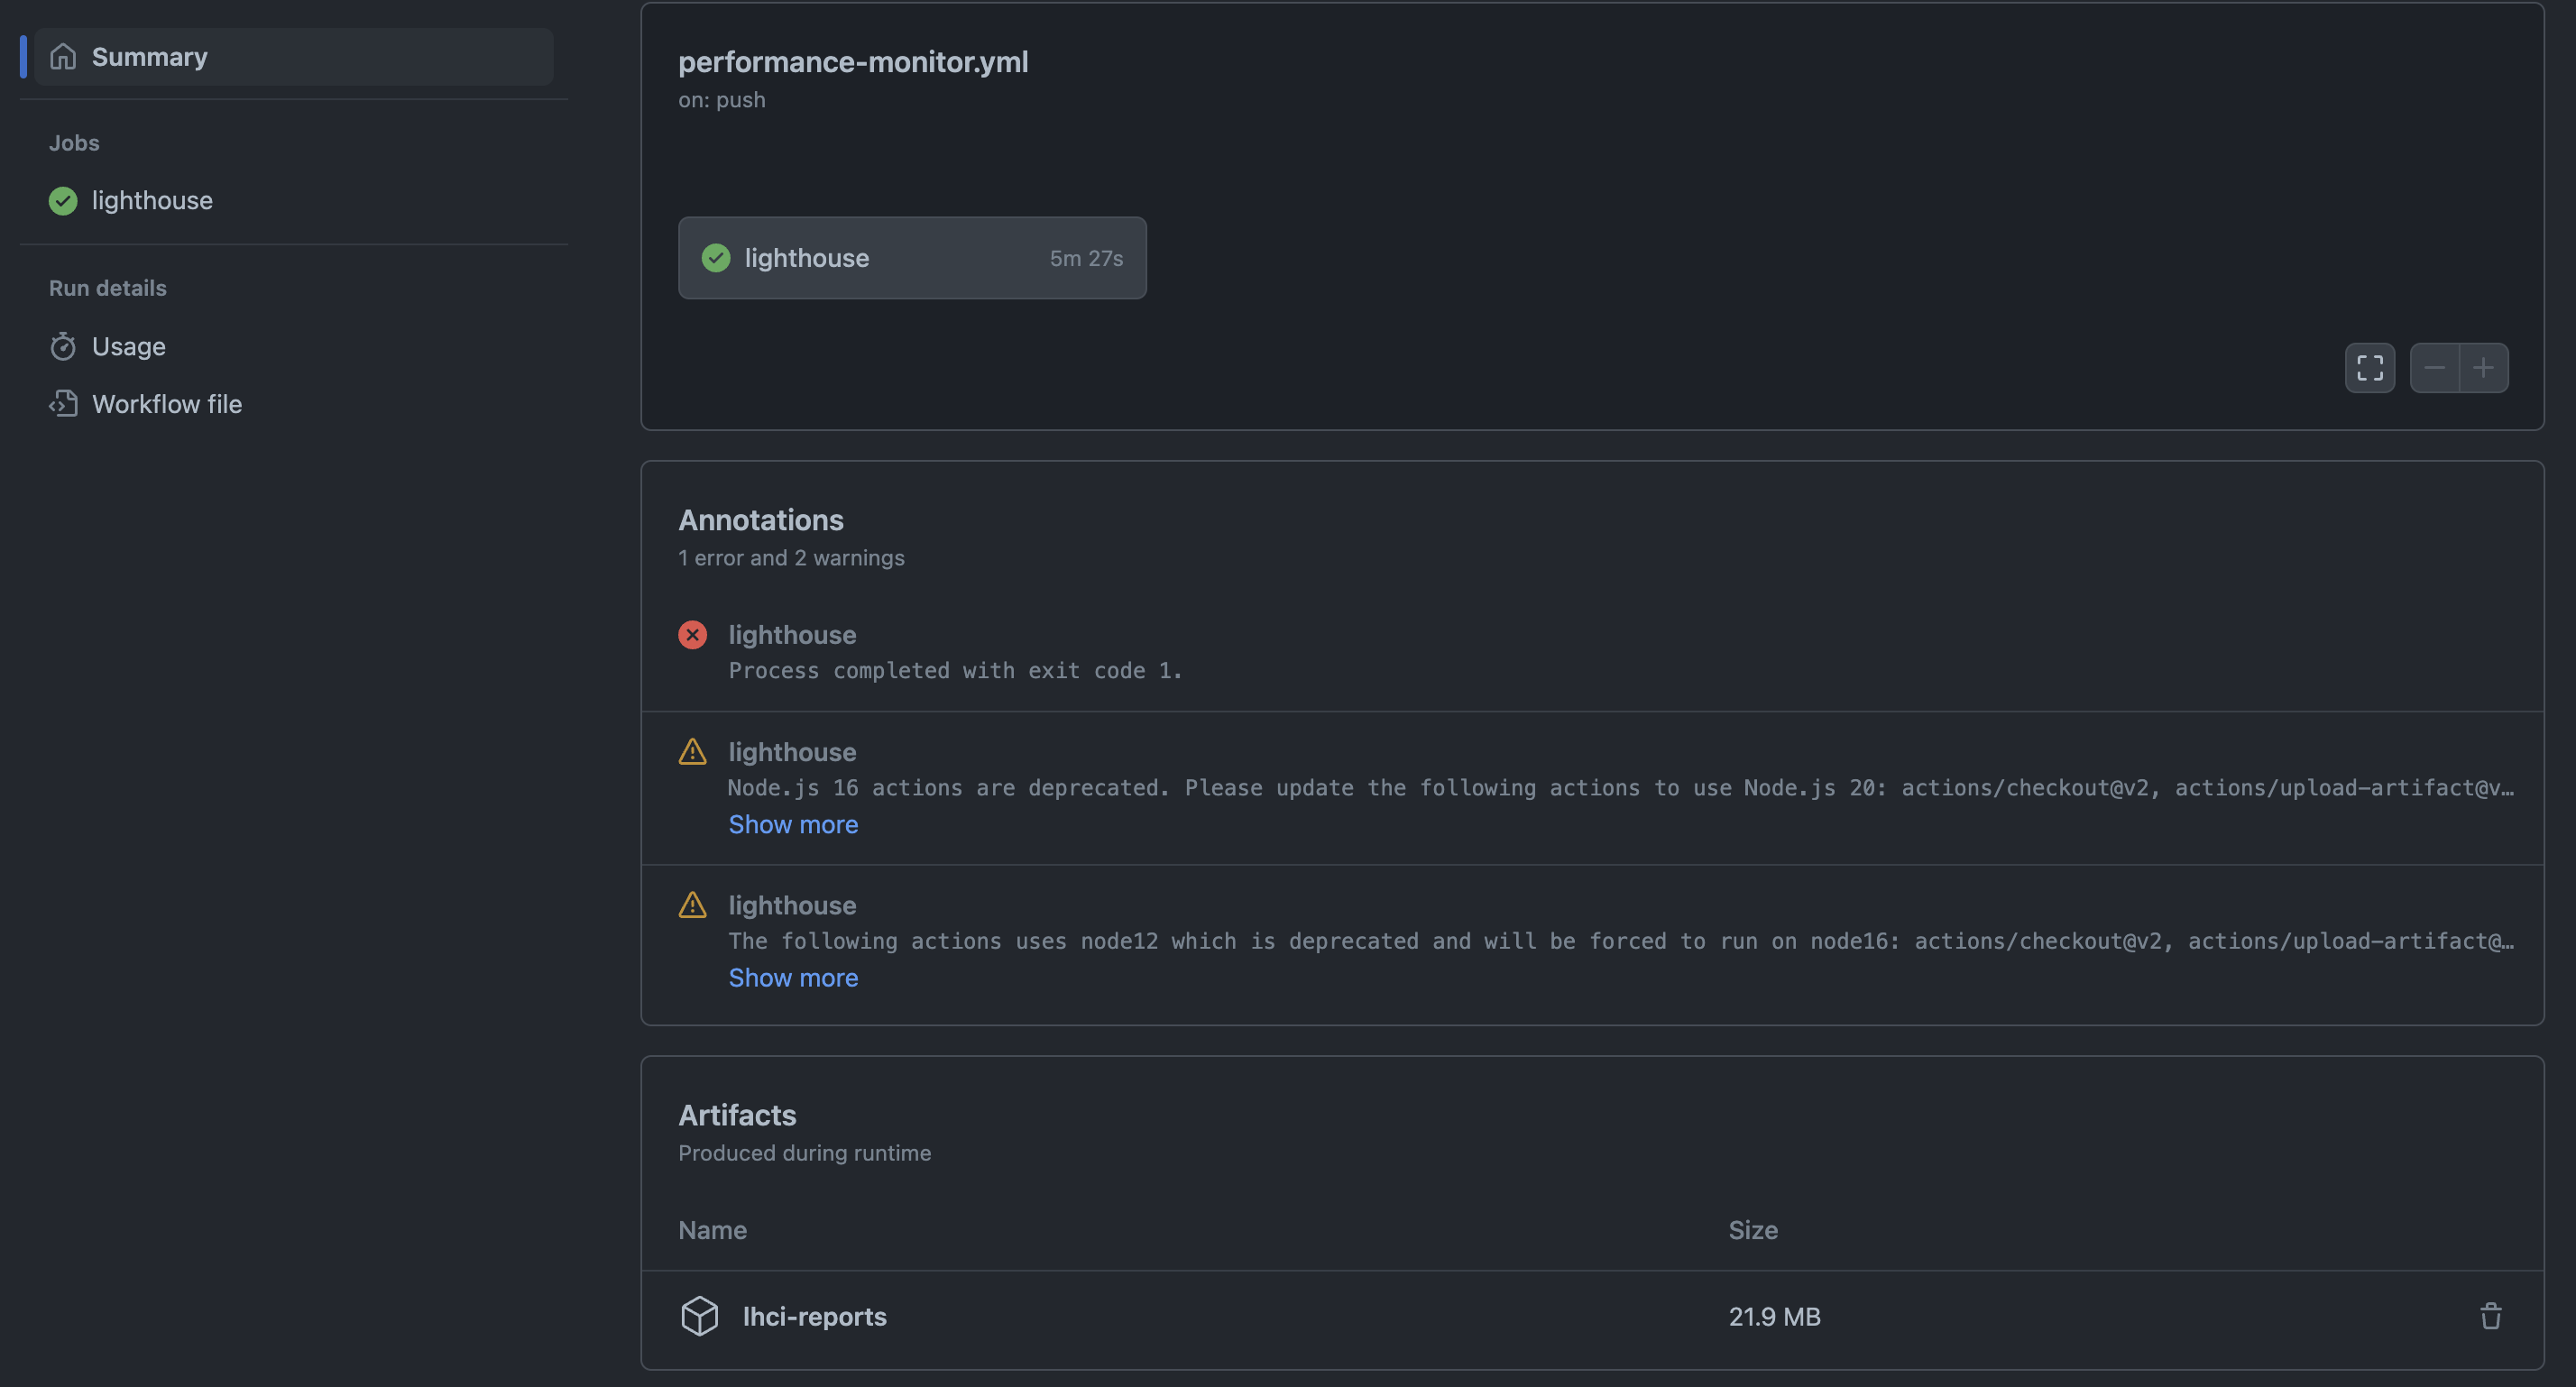
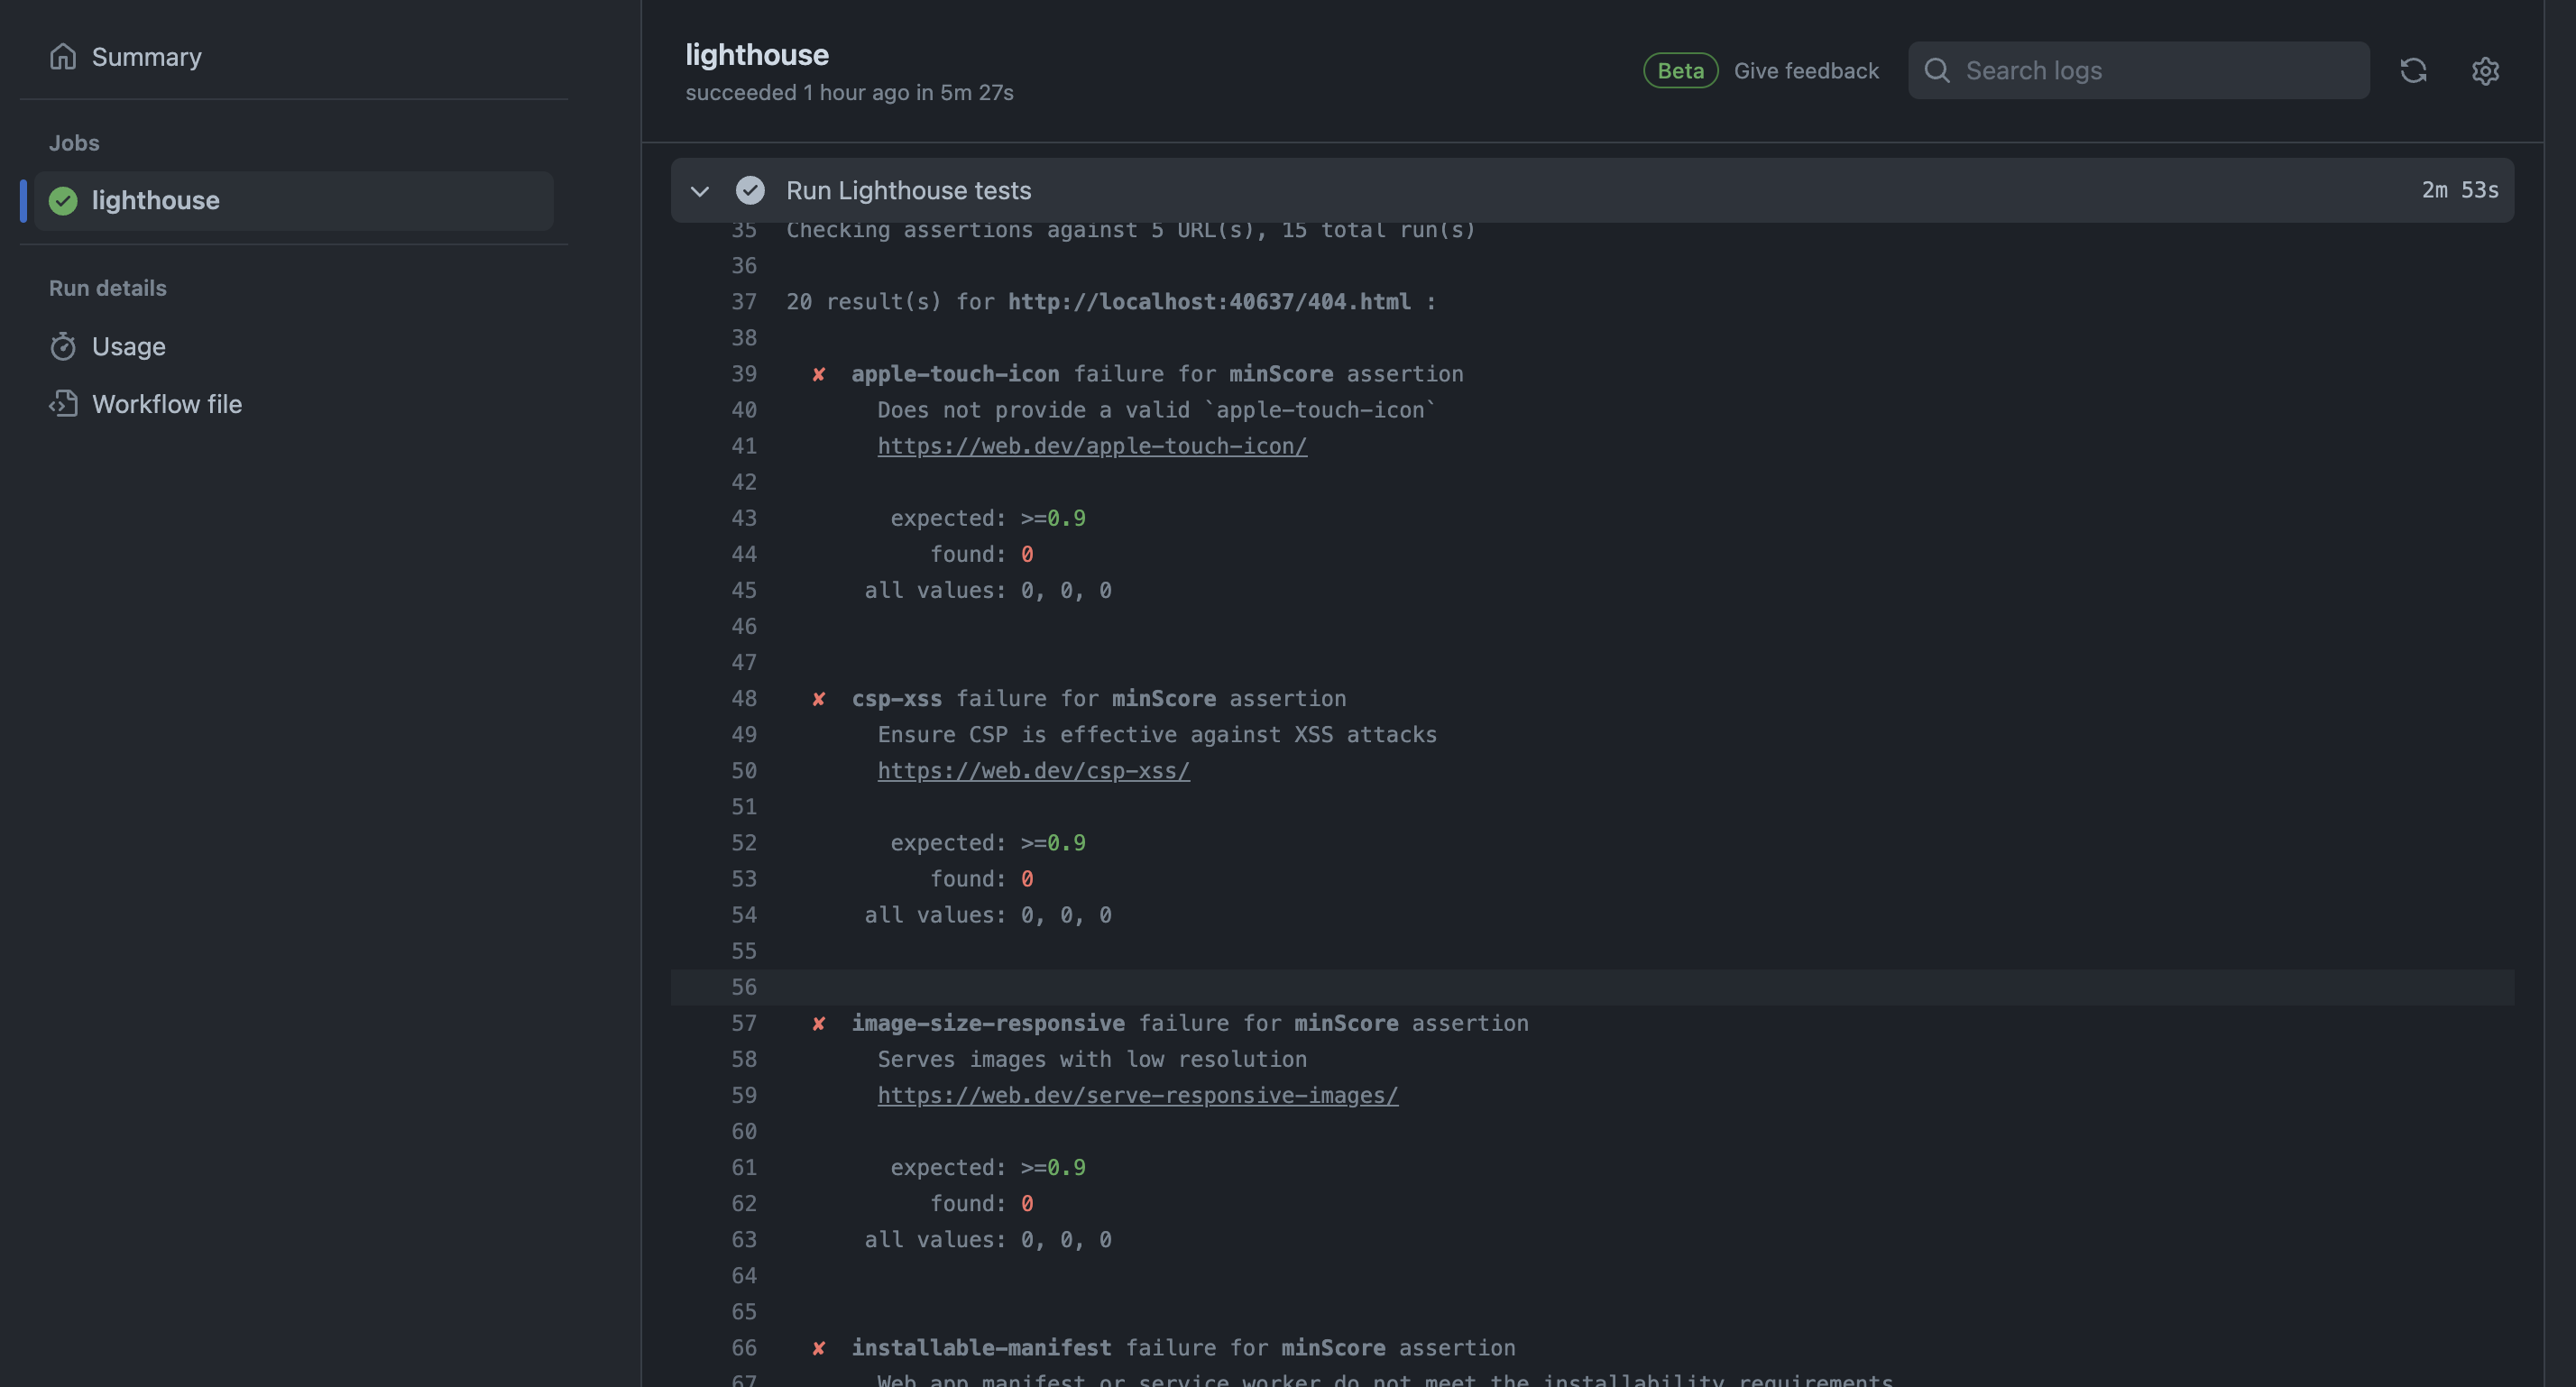
If you delve into the continuous integration (CI) job and expand it, it'll display logs for each step in that job. In my situation, everything proceeded smoothly, but my checks didn't pass, leading to a failure status. Just like we saw during our local test run, the results get uploaded to a temporary public storage area. You can check out these results by simply clicking on the relevant link shown in the logs.
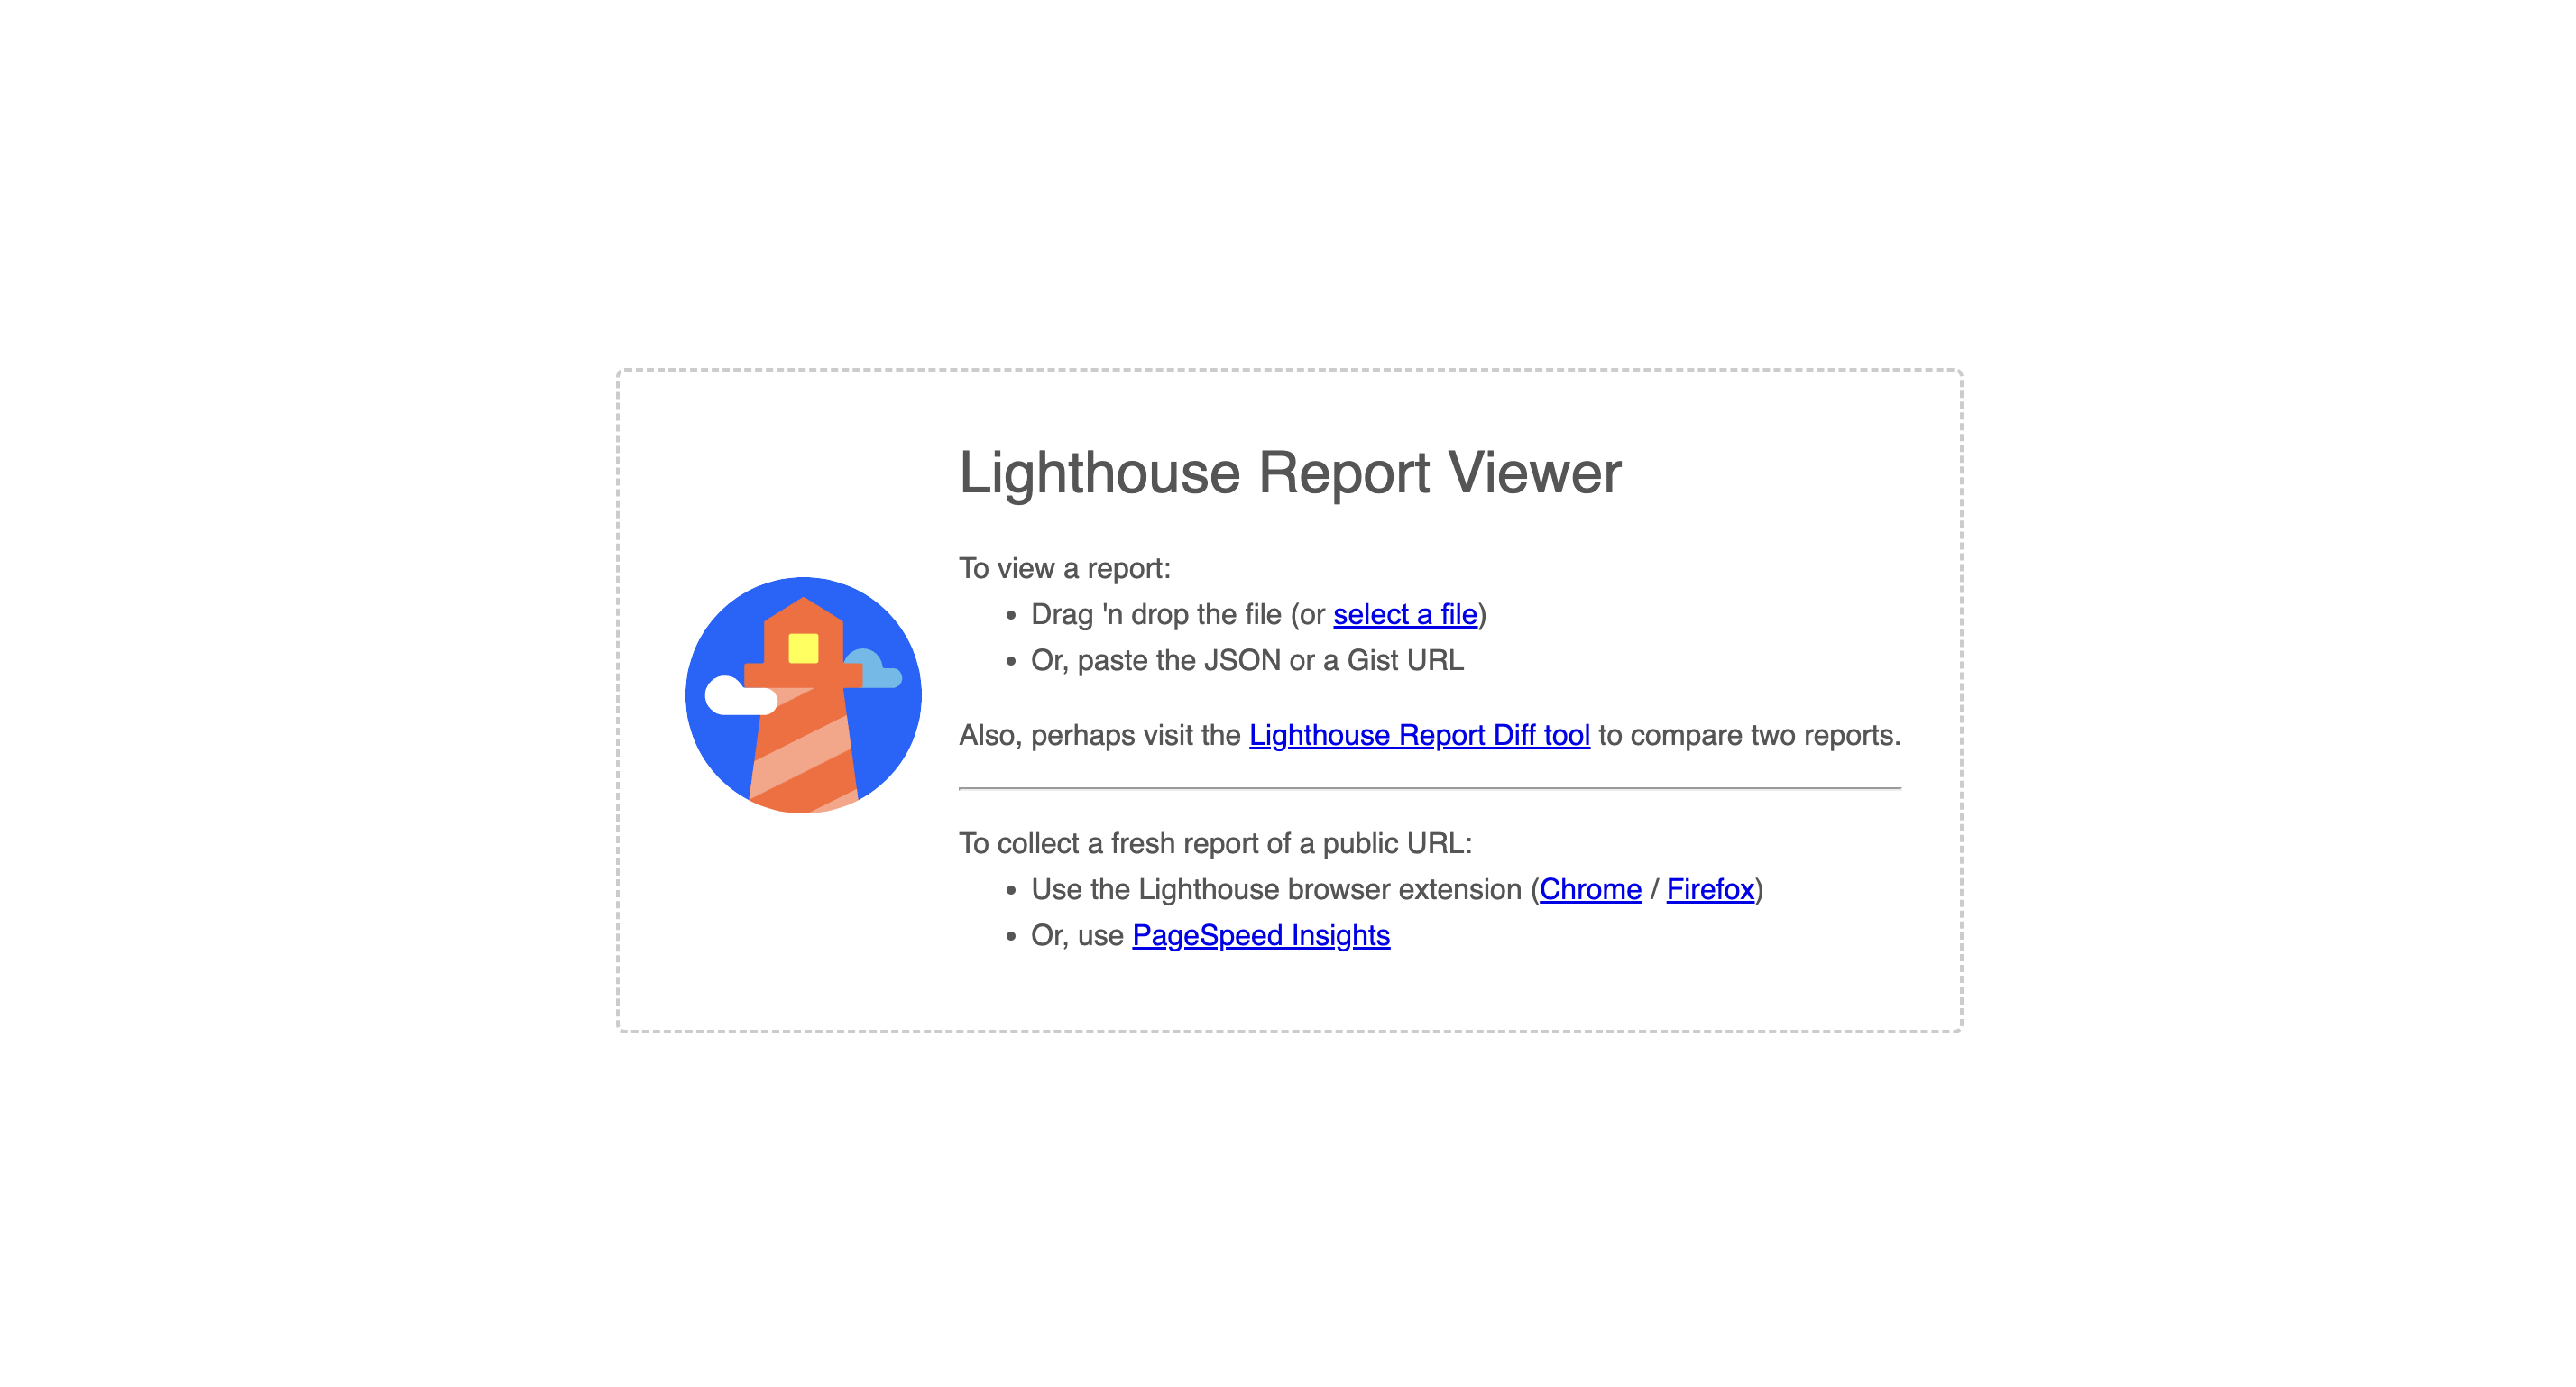
Also you can see the Lighthouse CI report in the LightHouse viewer when you download artifacts and upload it to viewer. This will display the median test results for each URL on your site.
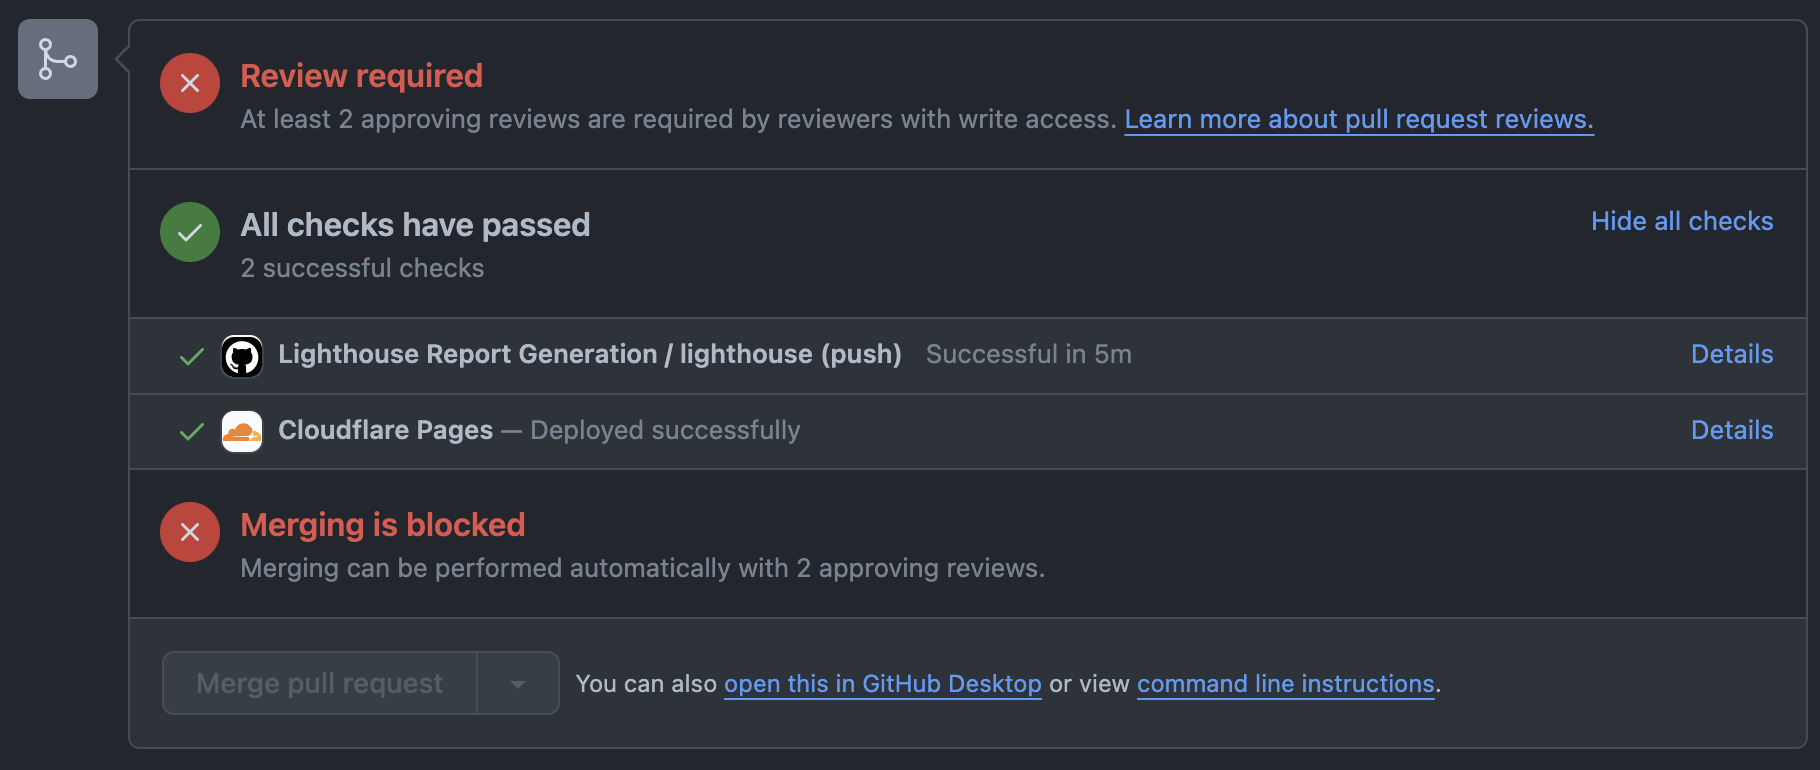
Github Status Check
You can see Github Status Check on the pull request page. If the Lighthouse CI fails, the status check will be failed.
Using Lighthouse and GitHub Actions to Monitor
Tools like Google's open-source browser extension Lighthouse can automate the process of tracking these metrics. It enables regular checks, generating detailed reports on how a web page can improve. It can audit for performance, accessibility, progressive web apps, and more.
For developers sharing and collaborating on GitHub, adding frontend performance monitoring into their GitHub workflow using GitHub actions can ensure systematic analysis. This automated approach provides performance feedback on every code change, making sure you're constantly informed and continually improving.
In conclusion, frontend performance metrics delineate the user's journey on your website. Tracking these metrics results in improved performance, better engagement, and enhanced user experience. It is not just about maintaining the frontend health; it's about growing your online presence organically, engaging your users more deeply, and expanding your business reach effectively.
Share on social media: